You can use the Data Migration Tool (DMT) to migrate your data from version 4.x or 5.x Community Edition and Enterprise Edition Hazelcast clusters when upgrading to 5.3.x or later versions of Enterprise Edition, or moving to the latest Cloud release. The DMT can also be used for infrastructure consolidation or separation with selective migration of application data between clusters.
| The DMT migrates your data for maps and replicated maps only. Replicated map metadata is not migrated. |
The DMT is typically used in the following situations:
-
When migrating from an Community Edition cluster to an Enterprise Edition cluster
-
When migrating from an earlier version of Enterprise Edition to a newer version. Such a migration can move directly between specified versions, even if several minor versions exist between them
-
When migrating from an on-premise cluster to a self-managed Enterprise Edition cluster in the cloud
-
When migrating from an on-premise cluster to a Cloud cluster
-
When you want to migrate specific application data from one cluster to another due to infrastructure changes
|
The DMT can be run on Mac, Linux, and Windows Operating Systems.
To use the DMT:
-
The source cluster must be running and populated with required data
-
The application must be using the source cluster
-
The target cluster must be set up, but have no data
At a high-level, the migration process is as follows:
-
Set up the migration cluster
-
Shutdown all applications using the source cluster
-
Run the migration using the DMT command
-
Update the client configuration with the target cluster details
-
Restart the applications using the updated client configuration
Get the DMT
You can download the DMT from the Hazelcast download page.
Once downloaded, extract the DMT package to a location in your folder structure. The DMT package includes the following:
-
The DMT
-
A custom Hazelcast distribution that creates a migration cluster and runs the data migration service
-
Example configuration files
-
Example connection configuration file, which is used to connect to the migration client
Before You Begin
Ensure that you have installed the following:
When using the DMT, bear the following in mind:
-
You can run only one migration at a time
-
The target cluster must be on 5.3.x Enterprise Edition or the latest Cloud release
| Cloud Trial and Cloud Standard have a limit of 14GB of primary data. If you require more, you must use Cloud Dedicated. For further information on the available Cloud editions, refer to the Hazelcast Cloud documentation. |
-
You must specify at least one data structure name in the migration configuration file
-
All data structures specified in the migration configuration must exist in the source cluster
-
Any populated data structures that already exist on the target cluster are not migrated; however, if the existing data structure is empty, it is migrated
-
Any empty data structures are not migrated
Migrate Your Data
To migrate your data, you must complete the following steps:
-
The source cluster is your existing cluster, the one that you want to migrate.
Hazelcast recommends that the source cluster is put in a PASSIVEstate before you start the migration. This is because the DMT cannot guarantee that any data changed during migration will be migrated. For information on changing the state, see Changing a Cluster’s State.If necessary, you can add data to the source cluster before continuing. For example, this can be done when testing a migration using a Development cluster. For further information on doing this, see the Add Data to Cluster section.
You must also update the configuration for the source cluster and related data structures. For further information on doing this, see the Update the Source Configuration section.
-
The target cluster is the new cluster to which you want to migrate the source cluster.
You must also update the configuration for the target cluster. For further information on doing this, see the Update the Target Configuration section.
-
The cluster created by the custom Hazelcast distribution.
-
Shut down any applications using the source cluster
-
Update the client configuration with the target cluster details
| If you are using the DMT to test a migration, use a Development cluster when following the steps. |
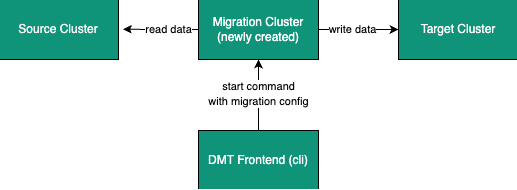
The clusters work to migrate your data as illustrated below:
Limited Migration Cluster License
A 10-node limited license is included for use with your migration cluster.
This license is valid for 30 days and can be used only for data migration and trial purposes.
Start the Source Cluster
You can start your source cluster in either of the following ways:
-
Using Docker. This is the recommended method
-
Downloading the version package, for the examples in the sections below we use Hazelcast IMDG version 4.2.7, and follow the IMDG Quickstart
Using Docker
To start your source cluster using Docker, you need the following information:
-
The IP Address on which to start the cluster. This will be your internal Docker IP address
-
The port to use. This will be your internal Docker port
-
The version of Hazelcast
Ensure that the IP address you use for Docker is different to that used by any running processes on your local machine, such as the source cluster. In the sections below, we use 127.0.0.1:5701 for the source cluster and 172.12.0.1:5701 for the Docker container.
|
The command has the following format:
docker run -p <ip_address_to_bind>:<host_port>:<container_port> -e HZ_CLUSTERNAME=source hazelcast/hazelcast:<source_version>
The -p option in the above command maps the container’s port to the host machine. This ensures that your Docker instance, which is running in a virtual network, is accessible to your local processes. The option is required because the migration and target clusters, CLC, and DMT run locally on your computer outside the Docker environment.
|
For example, to start a version 4.2.7 source cluster on IP address 127.0.0.1 and port 5701, enter the following command in a terminal:
docker run -p 127.0.0.1:5701:5701 -e HZ_CLUSTERNAME=source hazelcast/hazelcast:4.2.7Add Data to Cluster
To access the cluster and populate it with data - for example, because you are using the DMT to test a migration of a Development cluster - you can do either of the following:
-
Use the source.yaml configuration file, included in the migration_config folder of the DMT download package
-
Write data to memory as described in the Step 3. Write Data to Memory section of this documentation
The source.yaml file contains the following:
cluster:
  name: "source"
address: "127.0.0.1:5701"| If you have not installed the Hazelcast CLC, do this now. For further information on installing the CLC, refer to the Hazelcast Command-Line Client^ documentation. |
To make sure that you can add an entry to the source cluster, enter the following command in a terminal:
clc -c source.yaml map --name my-map set key-1 value-1If an error relating to CLC being unable to connect to your source cluster is returned, confirm the following:
-
The port mapping is correct
-
The source cluster container is running
-
The configuration in your source.yaml file is correct
If no errors are returned, you can populate the source cluster with 1000 entries using the following script:
Update the Source Configuration
You must update the following configuration:
-
The cluster information
-
The data structure information
To update the cluster information, complete the following steps:
-
Navigate to the folder in which you extracted the DMT package
-
Open the migration_config/source/hazelcast.yaml file in your favorite editor
The hazelcast.yaml file is a Hazelcast client configuration file, which can include any supported configuration. -
Update the
cluster-namefield to match the name of your source cluster -
Update the
cluster-membersfield to match the addresses of the cluster members -
Save the file
To update the data structure information, complete the following steps:
-
Navigate to the folder in which you extracted the DMT package
-
Open the migration_config/data/imap_names.txt and/or the migration_config/data/replicated_map_names.txt file in your favorite editor
-
Update the file content to match the names of your maps. To select multiple data structures using a single entry, you can use wildcards. For further information on using wildcards, see the Using Wildcards topic.
If you have multiple data structures, use a new line for each map name. -
Save the file
Check the Target Cluster
Ensure that the target cluster is running on one of the following:
-
Enterprise Edition version 5.3.2 or later
-
Cloud
Update the Target Configuration
You must update the following configuration:
-
The cluster
-
The connection
-
If required, SSL
To update the target configuration, complete the following steps:
-
Navigate to the folder in which you extracted the DMT package
-
Open the migration_config/target/hazelcast-client.yaml file in your favorite editor
The hazelcast-client.yaml file is a Hazelcast client configuration file, which can include any supported configuration. -
Update the
cluster-namefield to match the name of your source cluster -
Update the
networksection as follows:-
For an on-premise target cluster, update the
cluster-membersfield to match the addresses of the cluster members -
For a cloud target cluster, including a Cloud cluster, update the network information. For a public cloud cluster, refer to the documentation for the cloud provider for the required network details. For Cloud, you must update the network section as follows:
hazelcast-client:
  :
  network:
    hazelcast-cloud:
      enabled: true
      discovery-token: <token>
-
-
If required, add the
sslinformation. The format is as follows:hazelcast-client: : network: : ssl: enabled: true properties: keyStore: client.keystore keyStorePassword: abc123 trustStore: client.truststore trustStorePassword: abc123 -
Save the file
For further information on the ssl properties and their values, refer to the Using Advanced Setup section in the Hazelcast Cloud documentation.
|
For example, the file content for a cloud target cluster will look similar to the following:
hazelcast-client:
  cluster-name: xyz
  network:
    hazelcast-cloud:
      enabled: true
      discovery-token: tokentoken
    ssl:
      enabled: true
      properties:
        keyStore: client.keystore
        keyStorePassword: abc123
        trustStore: client.truststore
        trustStorePassword: abc123
Start the Migration Cluster
To start the migration cluster, complete the following steps:
-
Open a terminal
-
Navigate to the folder in which you extracted the DMT package
-
Enter the following command:
HZ_NETWORK_PORT_PORT=5702 HZ_CLUSTERNAME=migration ./bin/hz start
If the specified port is available, the cluster starts on that port. Otherwise, Hazelcast tries to find a free port as described in the Port section of the Networking topic. You can confirm the port used by the cluster in the logs displayed in your terminal.
You can find the migration.yaml file in the root folder of the DMT download package. If your logs show that the cluster starts on a different port to that specified in this file, you must update the address field to match the port number used.
DMT uses this configuration file to connect to the migration cluster when running the migration.
| The migration.yaml file uses the same configuration options as the Hazelcast CLC. For further information on the options, refer to the Hazelcast CLC documentation^. |
Run the Migration
Before running the migration, you need the following information:
-
Your Operating System
-
Your processor architecture
-
The binary that is suitable for your machine
You can find DMT binaries in the bin folder of the extracted DMT package. The binaries are in the format dmt_[platform]_[arch]. Use the arm64 binary for ARM, and the amd64 binary for Intel.
To run the migration, complete the following steps:
-
Open a terminal
-
Navigate to the folder containing the extracted DMT package
-
Enter the following command:
./bin/dmt_[platform]_[arch] --config migration.yaml start migration_config --yes --log.path migration.log
|
You can use the DMT status command to track the migration. For further information on the available DMT commands, see the DMT Command Reference.
Verify the Migrated Data
You can verify the size of the map in the target cluster in the following ways:
-
Use the Hazelcast Management Center
To use the Hazelcast Management Center, you can use either of the following methods:
-
Check the target map size, as described in the Maps section of the Hazelcast Management Center documentation
-
Check the map entries, as described in the Exploring Map Entries section of the Hazelcast Management Center documentation
-
-
Use Hazelcast CLC
To use Hazelcast CLC to verify the migrated map size, enter the following command in your terminal:
clc -c target.yaml map size --name my-mapThe output is similar to the following
1000
OK
You can also check a random value from the data we populated in the Add Data to Cluster section above using the following command:
clc -c target.yaml map get key-42 --name my-mapThe output is similar to the following:
value-42
OK
View Migration Details
When the migration completes, details of the migration are created in the following:
-
Migration report
This is written to the migration_report_[migration_id].txt file in the directory used when running the
dmtcommand. -
DMT log file
This is the file specified in the
--log.pathflag of thestartcommand.If the flag is not used, the file is saved to the location set in the
CLC_HOMEenvironment variable. If this environment variable is not set, the default location is the ~/.hazelcast folder.Logging uses the same environment variables as Hazelcast CLC. For further information on environment variables, refer to the Environment Variables^ section of the Hazelcast CLC documentation. The DMT log file includes migration member logs and other DMT logs.
The migration member logs are in the format
[(migration_id)_(member uuid)] (member log). -
__datamigration_resultsIMapThis is created on the target cluster.
The keys are UUID4 string format migration IDs, and the values are
HazelcastJsonValueserialization interfaces that correspond to migration statuses. A migration status represents the details of the completed migration, and can be provided when contacting Hazelcast Support to help us in our investigations into your issue.The migration report is also included as a field.