This tutorial will get you started with streaming features using the Hazelcast integration with Feast.
What You’ll Learn
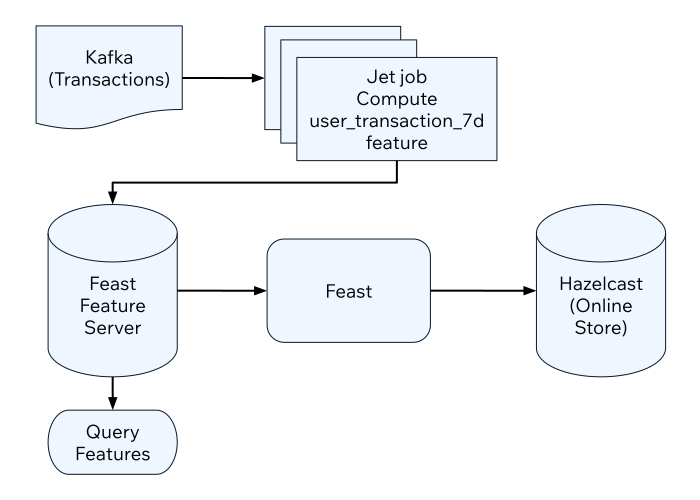
You will setup an offline feature store with PostgreSQL and an online feature store with Hazelcast. Then update the online feature store using a Jet job in real time from transactions streaming in a Kafka topic.
Before you Begin
You will need the following ready before starting the tutorial:
-
Hazelcast CLC (see Install CLC)
-
A recent version of Docker and Docker Compose
To set up your project, complete the following steps:
-
Create the sample project using the following command:
clc project create -t feast-streaming-demo -
Switch to the project directory:
cd feast-streaming-demo -
In the project directory, start the containers:
docker-compose up -
Login to the demo container:
docker-compose exec demo /bin/bash
To set up Feast, complete the following steps:
-
The Feast project is in the
feature_repodirectory. You can take a look at the Feast configuration using the following command:cat feature_repo/feature_store.yamlproject: feast_streaming registry: /home/sam/feast/data/registry.db provider: local online_store: type: hazelcast cluster_name: dev cluster_members: ["hazelcast:5701"] offline_store: type: file entity_key_serialization_version: 2 -
The feature views are defined in the
features.py. Run the following command to see its contents:cat feature_repo/features.pyfrom datetime import timedelta from feast import FeatureView, Entity, ValueType, Field from feast.data_source import PushSource from feast.infra.offline_stores.contrib.postgres_offline_store.postgres_source import PostgreSQLSource from feast.types import Int32 user_entity = Entity( name="user_id", description="A user that has executed a transaction or received a transaction", value_type=ValueType.STRING ) user_transaction_count_7d_source = PushSource( name="user_transaction_count_7d", batch_source=PostgreSQLSource( table="user_transaction_count_7d", timestamp_field="feature_timestamp"), ) user_transaction_count_7d_stream_fv = FeatureView( schema=[ Field(name="transaction_count_7d", dtype=Int32), ], name="user_transaction_count_7d", entities=[user_entity], ttl=timedelta(weeks=1), online=True, source=user_transaction_count_7d_source, ) -
Before you can use features, you must run the following command:
feast -c feature_repo applyOutputs:
Deploying infrastructure for user_transaction_count_7d -
At this point, you are ready to start the feature server. Note that the command below prevents the
feastprocess from outputting to the terminal, since you will use the same terminal for running other commands.feast -c feature_repo serve -h 0.0.0.0 -p 6566 --no-access-log 2> /dev/null &
Feature Transformation Using Jet
You will create a Jet job that reads transactions from a Kafka topic, computes the number of transactions per user in the last seven-days' buckets and populates the Hazelcast online store.
-
Before creating the Jet job, you may want to see how the jobs are created by running the following command:
cat jet/streaming_features/src/main/java/com/example/Main.javapackage com.example; import com.fasterxml.jackson.databind.ObjectMapper; import com.hazelcast.core.Hazelcast; import com.hazelcast.core.HazelcastInstance; import com.hazelcast.jet.aggregate.AggregateOperations; import com.hazelcast.jet.kafka.KafkaSources; import com.hazelcast.jet.pipeline.Pipeline; import com.hazelcast.jet.pipeline.StreamSource; import com.hazelcast.jet.pipeline.WindowDefinition; import com.hazelcast.map.impl.MapEntrySimple; import org.apache.kafka.common.serialization.StringDeserializer; import java.util.Date; import java.util.Map; import java.util.Properties; import static com.hazelcast.jet.aggregate.AggregateOperations.counting; import static com.hazelcast.jet.pipeline.WindowDefinition.sliding; import static java.util.concurrent.TimeUnit.DAYS; import static java.util.concurrent.TimeUnit.SECONDS; public class Main { private final static long MONITORING_INTERVAL_7_DAYS = DAYS.toMillis(7); private final static long REPORTING_INTERVAL = SECONDS.toMillis(1); public static Pipeline createPipeline(String feastBaseUrl, String kafkaBaseUrl) { var mapper = new ObjectMapper(); Properties props = new Properties(); props.setProperty("bootstrap.servers", kafkaBaseUrl); props.setProperty("key.deserializer", StringDeserializer.class.getCanonicalName()); props.setProperty("value.deserializer", StringDeserializer.class.getCanonicalName()); props.setProperty("auto.offset.reset", "earliest"); StreamSource<Map.Entry<String, String>> kafkaSource = KafkaSources.kafka(props, "transaction"); Pipeline pipeline = Pipeline.create(); pipeline .readFrom(kafkaSource) .withNativeTimestamps(0) .map(item -> mapper.readValue(item.getValue(), Transaction.class)) .groupingKey(Transaction::getAcct_num) .window(sliding(MONITORING_INTERVAL_7_DAYS, REPORTING_INTERVAL)) .aggregate(counting()) .map(item -> { var userId = item.getKey(); // set the current datetime var timestamp = new Date(); var utc = new UserTransactionCount7d(userId, item.getValue(), timestamp); return (Map.Entry<String, UserTransactionCount7d>) new MapEntrySimple(userId, utc); }) .map(item -> mapper.writeValueAsString(item.getValue())) .writeTo(FeastSinks.push(feastBaseUrl, "user_transaction_count_7d")); return pipeline; } public static void main(String[] args) { var feastBaseUrl = "http://localhost:6566"; var kafkaBaseUrl = "localhost:9092"; if (args.length >= 1) { feastBaseUrl = args[0]; } if (args.length >= 2) { kafkaBaseUrl = args[1]; } Pipeline pipeline = createPipeline(feastBaseUrl, kafkaBaseUrl); HazelcastInstance hz = Hazelcast.bootstrappedInstance(); hz.getJet().newJob(pipeline); } } -
You must compile the Java code that creates the Jet job. We provided an easy-to-use script to do that from inside the demo container:
run build_jet streaming_features -
You can now create the Jet job and run it. The Jet job requires the addresses of the feature server and the Kafka instance:
clc job submit --name transform_features build/jet/streaming_features/libs/*.jar http://demo:6566 kafka:19092 -
You can list the running jobs and verify that the jobs completed successfully using the following command:
clc job listOutputs:
------------------------------------------------------------------------------------------------ Job ID | Name | Status | Submitted | Completed ------------------------------------------------------------------------------------------------ 0c13-9428-92c4-0001 | transform_features | RUNNING | 2024-07-29 07:18:53 | - -
Running the Jet job created an IMap that corresponds to the "user_transaction_count_7d" feature in the Hazelcast cluster. You can list it using the following command:
clc object list mapOutputs:
------------------------------------------- Object Name ------------------------------------------- feast_streaming_user_transaction_count_7d ------------------------------------------- OK Returned 1 row(s). -
Check the contents of the feature IMap to check the data written by Feast:
clc map -n feast_streaming_user_transaction_count_7d entry-set | head -10 -
You can retrieve features from the feature server in a human-readable format:
curl -X POST \
  "http://localhost:6566/get-online-features" \
  -d '{
    "features": [
      "user_transaction_count_7d:transaction_count_7d"
    ],
    "entities": {
      "user_id": ["EBJD80665876768751", "YVCV56500100273531", "QRQP56813768247223"]
    }
  }' | jq
Outputs something similar to:
{
  "metadata": {
    "feature_names": [
      "user_id",
      "transaction_count_7d"
    ]
  },
  "results": [
    {
      "values": [
        "EBJD80665876768751",
        "YVCV56500100273531",
        "QRQP56813768247223"
      ],
      "statuses": [
        "PRESENT",
        "PRESENT",
        "PRESENT"
      ],
      "event_timestamps": [
        "1970-01-01T00:00:00Z",
        "1970-01-01T00:00:00Z",
        "1970-01-01T00:00:00Z"
      ]
    },
    {
      "values": [
        6,
        11,
        11
      ],
      "statuses": [
        "PRESENT",
        "PRESENT",
        "PRESENT"
      ],
      "event_timestamps": [
        "2024-07-29T07:24:00Z",
        "2024-07-29T07:24:00Z",
        "2024-07-29T07:24:00Z"
      ]
    }
  ]
}
Summary
In this tutorial, you learned how to set up a feature engineering project that uses Hazelcast as the online store. You also learned how to write a Jet job that transforms data and sends it to a Feast feature server.
See Also
There is more to feature engineering with Hazelcast.
Check out our documentation about Feast:
If you have any questions, suggestions, or feedback please do not hesitate to reach out to us through Hazelcast Community Slack.