Get Started with Feast Batch Features
This tutorial will get you started with feature engineering using the Hazelcast integration with Feast.
What You’ll Learn
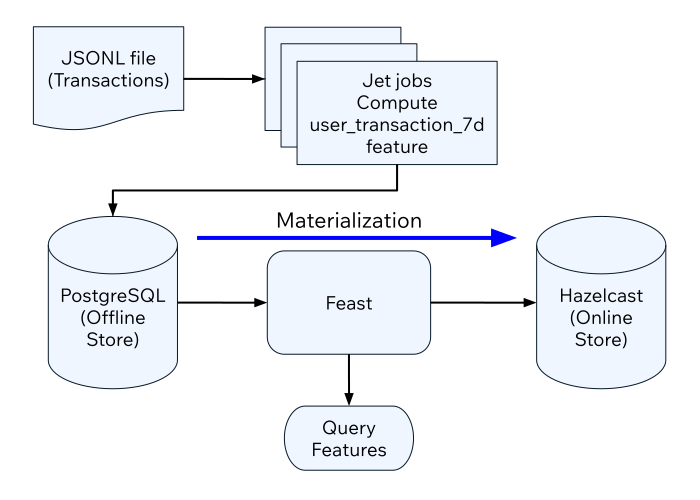
You will setup an offline feature store with PostgreSQL and an online feature store with Hazelcast. Then, populate the offline feature store using Jet jobs. Finally, you will transfer the features in the offline store to the online store.

Before you Begin
You will need the following ready before starting the tutorial:
-
Hazelcast CLC (see Install CLC)
-
A recent version of Docker and Docker Compose
To set up your project, complete the following steps:
-
Create the sample project using the following command:
clc project create -t feast-batch-demo -
Switch to the project directory:
cd feast-batch-demo -
In the project directory, start the containers:
docker-compose up -
Login to the demo container:
docker-compose exec demo /bin/bash
To set up Feast, complete the following steps:
-
The Feast project is in the
feature_repodirectory. You can take a look at the Feast configuration using the following command:cat feature_repo/feature_store.yamlproject: feast_batch registry: /home/sam/feast/data/registry.db provider: local online_store: type: hazelcast cluster_name: dev cluster_members: ["hazelcast:5701"] offline_store: type: postgres host: postgresql port: 5432 database: demo db_schema: public user: demo password: demo -
The feature views are defined in the
features.py. Run the following command to see its contents:cat feature_repo/features.pyfrom datetime import timedelta from feast import FeatureView, Entity, ValueType from feast.infra.offline_stores.contrib.postgres_offline_store.postgres_source import PostgreSQLSource user_entity = Entity( name="user_id", description="A user that has executed a transaction", value_type=ValueType.STRING ) user_transaction_count_7d_fv = FeatureView( name="user_transaction_count_7d", entities=[user_entity], ttl=timedelta(weeks=1), source=PostgreSQLSource( table="user_transaction_count_7d", timestamp_field="feature_timestamp")) -
Before you can use features, you must run the following command:
feast -c feature_repo applyOutputs:
Deploying infrastructure for user_transaction_count_7d
Feature Transformation Using Jet
You will create several Jet jobs that read transactions from the data file, compute the number of transactions per user in seven-day buckets and populate the user_transaction_count_7d table in the PostgreSQL database.
-
To access PostgreSQL tables from Jet jobs, a data connection must be created. You can do that by running an SQL script using CLC:
clc script run --echo etc/create_data_connection.sqlOutputs:
1: CREATE DATA CONNECTION IF NOT EXISTS demo TYPE JDBC SHARED OPTIONS ( 'jdbcUrl'='jdbc:postgresql://postgresql:5432/demo', 'user'='demo', 'password'='demo', 'maximumPoolSize'='50' ); OK Executed the query. -
You can verify that the data connection is active by running the following command:
clc sql "show resources for demo"------------------------------------------------------ name | type ------------------------------------------------------ "public"."user_transaction_count_7d" | Table ------------------------------------------------------ -
You are ready to create the Jet jobs. Before that, you may want to see how the jobs are created by running the following command:
cat jet/batch_features/src/main/java/com/example/Main.javapackage com.example; import com.hazelcast.core.Hazelcast; import com.hazelcast.core.HazelcastInstance; import com.hazelcast.jet.aggregate.AggregateOperations; import com.hazelcast.jet.pipeline.DataConnectionRef; import com.hazelcast.jet.pipeline.Pipeline; import com.hazelcast.jet.pipeline.Sinks; import com.hazelcast.jet.pipeline.file.FileFormat; import com.hazelcast.jet.pipeline.file.FileSources; import com.hazelcast.map.impl.MapEntrySimple; import java.sql.Timestamp; import java.time.Instant; import java.time.LocalDateTime; import java.time.ZoneOffset; import java.util.Map; public class Main { public static Pipeline createPipeline(String dataSetPath, LocalDateTime endDate) { var endDateEpoch = endDate.toEpochSecond(ZoneOffset.UTC); var beginDate = endDate.minusDays(7); var beginDateEpoch = beginDate.toEpochSecond(ZoneOffset.UTC); var pipeline = Pipeline.create(); var source = pipeline .readFrom(FileSources.files(dataSetPath) .glob("demo_data.jsonl") .format(FileFormat.json(Transaction.class)) .build()); var last7Days = source .filter(transaction -> { var transactionTime = transaction.getUnixTime(); return transactionTime > beginDateEpoch && transactionTime <= endDateEpoch; }); last7Days .groupingKey((Transaction::getAccountNumber)) .aggregate((AggregateOperations.counting())) .map(item -> { var userId = item.getKey(); var utc = new UserTransactionCount(userId, item.getValue(), endDateEpoch); return (Map.Entry<String, UserTransactionCount>) new MapEntrySimple(userId, utc); }) .writeTo(Sinks.jdbc("INSERT INTO user_transaction_count_7d(user_id, transaction_count_7d, feature_timestamp) values(?, ?, ?) ON CONFLICT DO NOTHING", DataConnectionRef.dataConnectionRef("demo"), (stmt, item) -> { var utc = item.getValue(); stmt.setString(1, utc.getUserId()); stmt.setLong(2, utc.getTransactionCount7d()); stmt.setTimestamp(3, Timestamp.from(Instant.ofEpochSecond(utc.getFeatureTimestamp()))); })); return pipeline; } public static void backfillFeatures(HazelcastInstance hz, String dataSetPath, LocalDateTime earliestEndDate) { var endDate = earliestEndDate; for (int i = 0; i < 8; i++) { hz.getJet().newJob(createPipeline(dataSetPath, endDate)); endDate = endDate.minusDays(1); } } public static void main(String[] args) { if (args.length == 0) { throw new RuntimeException("dataSetPath is required"); } var hz = Hazelcast.bootstrappedInstance(); var endDate = LocalDateTime.now(); var dataSetPath = args[0]; backfillFeatures(hz, dataSetPath, endDate); } } -
You must compile the Java code that creates the Jet jobs. We provided an easy-to-use script to do that from inside the demo container:
run build_jet batch_features -
You can now create the Jet jobs and run them:
clc job submit build/jet/batch_features/libs/*.jar /home/hazelcast/data -
You can list the running jobs and verify that the jobs completed successfully using the following command:
clc job listOutputs:
------------------------------------------------------------------------------------
 Job ID              | Name | Status    | Submitted           | Completed
------------------------------------------------------------------------------------
 0c0d-c9a3-c14d-0001 | N/A  | COMPLETED | 2024-07-24 19:15:19 | 2024-07-24 19:15:19
 0c0d-c9a3-c14b-0001 | N/A  | COMPLETED | 2024-07-24 19:15:17 | 2024-07-24 19:15:17
 0c0d-c9a3-c149-0001 | N/A  | COMPLETED | 2024-07-24 19:15:15 | 2024-07-24 19:15:15
 0c0d-c9a3-c147-0001 | N/A  | COMPLETED | 2024-07-24 19:15:13 | 2024-07-24 19:15:13
 0c0d-c9a3-c145-0001 | N/A  | COMPLETED | 2024-07-24 19:15:11 | 2024-07-24 19:15:11
 0c0d-c9a3-c143-0001 | N/A  | COMPLETED | 2024-07-24 19:15:09 | 2024-07-24 19:15:09
 0c0d-c9a3-c141-0001 | N/A  | COMPLETED | 2024-07-24 19:15:07 | 2024-07-24 19:15:07
 0c0d-c9a3-c140-0001 | N/A  | COMPLETED | 2024-07-24 19:15:05 | 2024-07-24 19:15:06
Materialization
Materialization is the process of transferring features from the offline store to the online store. In this case, from PostgreSQL to Hazelcast.
-
Run the following command to materialize the features:
feast -c feature_repo materialize-incremental "2024-07-24T08:00:00" -
Running the command above created an IMap that corresponds to the "user_transaction_count_7d" feature in the Hazelcast cluster. You can list it using the following command:
clc object list mapOutputs:
--------------------------------------- Object Name --------------------------------------- feast_batch_user_transaction_count_7d --------------------------------------- OK Returned 1 row(s). -
Check the contents of the feature IMap to check the data written by Feast:
clc map -n feast_batch_user_transaction_count_7d entry-set | head -10
Summary
In this tutorial, you learned how to set up a feature engineering project that uses Hazelcast as the online store and PostgreSQL as the offline store.. You also learned how to write Jet jobs that transform data and store it in a PostgreSQL table to be used by the Feast offline store.
See Also
There is more to feature engineering with Hazelcast.
Check out our documentation about Feast:
If you have any questions, suggestions, or feedback please do not hesitate to reach out to us through Hazelcast Community Slack.

