This tutorial introduces you to WAN Replication by replicating map entries across two clusters: London and Tokyo. At the end of this tutorial, you’ll know how to synchronize a map from one cluster to another.
WAN Replication can work in two modes. This tutorial uses active-passive mode.
-
Active-Passive: An active cluster replicates its maps and/or caches to one or more passive clusters for the purpose of maintaining a backup. If the active cluster becomes unavailable, you can redirect the application traffic to the passive cluster.
-
Active-Active: Each cluster replicates maps and/or caches to all other clusters.
In this tutorial, you will complete the following steps:
-
Start a passive Enterprise cluster, without WAN Replication, which will receive updates from the active cluster.
-
Start an active cluster, with WAN Replication configured, which will send updates to the passive cluster.
-
Create a map in the active cluster and see that the entries are replicated on the passive cluster.
-
Modify some map entries in the active cluster and see the modifications appear in the passive one.
Before You Begin
To complete this tutorial, you need the following:
| Prerequisites | Useful resources |
|---|---|
Trial license |
|
Docker image for the full Hazelcast distribution |
|
Docker network with the name |
Use the |
Step 1. Start the Passive Cluster
In this step you’ll start an Enterprise cluster called london with a single member. This will be the passive cluster
which means it does not need WAN Replication to be configured. Run the following Docker command in a terminal.
docker run \
    --network hazelcast-network \
    -e HZ_NETWORK_PUBLICADDRESS=<host_ip>:5701 \ (1)
    -e HZ_LICENSEKEY=<your license key> \ (2)
    -e HZ_CLUSTERNAME=london \
hazelcast/hazelcast-enterprise:5.0.5| 1 | Replace the <host_ip> placeholder with the IP address of your Docker host. |
| 2 | Replace the <your license key> placeholder with your Hazelcast Enterprise license key. |
The member is up and running now.
2021-11-23 11:08:15,055 [ INFO] [main] [c.h.i.c.ClusterService]: [172.18.0.3]:5701 [london] [5.0.5]

Members {size:1, ver:1} [
	Member [172.18.0.3]:5701 - bed20746-1505-449b-9f4a-548bcdbe12b8 this
]
Step 2. Start the Active Cluster
Now you’ll start another Enterprise cluster called tokyo with a single member. This will be the active cluster
which means it needs WAN Replication to be configured.
Since the configuration for WAN Replication is a bit more detailed, you are going to use a Hazelcast configuration file and pass it to the Docker command, instead of giving all the configuration options in a single command.
-
Create a
hazelcast.yaml(or XML) configuration file with the following content and place it in~/config-tokyodirectory.hazelcast: cluster-name: tokyo license-key: <your license key> wan-replication: london-wan-rep: batch-publisher: londonPublisherId: cluster-name: london target-endpoints: <host_ip>:5701 map: cities: (1) wan-replication-ref: london-wan-rep: (2) republishing-enabled: false1 Name of the map you are going to create. 2 Name of the WAN Replication configuration (given under the wan-replicationtag) which provides the details on where the map data will be replicated.<hazelcast> <cluster-name>tokyo</cluster-name> <license-key>"your license key"</license-key> <wan-replication name="london-wan-rep"> <batch-publisher> <cluster-name>london</cluster-name> <publisher-id>londonPublisherId</publisher-id> <target-endpoints>"host_ip":5701</target-endpoints> <map name="cities"> <wan-replication-ref name="london-wan-rep"> </map> </hazelcast> -
Open a new terminal and start the active cluster.
docker run \
     --network hazelcast-network \
     -e JAVA_OPTS="-Dhazelcast.config=/opt/hazelcast/config_ext/hazelcast.yaml" -v ~/config-tokyo:/opt/hazelcast/config_ext hazelcast/hazelcast-enterprise:5.0.5
Here is your other single-member cluster:
2021-11-23 11:39:14,198 [ INFO] [main] [c.h.i.c.ClusterService]: [172.18.0.4]:5701 [tokyo] [5.0.5]

Members {size:1, ver:1} [
	Member [172.18.0.4]:5701 - 98d9a815-5eb3-4341-bec1-e9816cee44b5 this
]
Note the member’s IP address and port since you are going to use it while connecting Management Center.
Step 3. Set Up Management Center
-
Start Management Center
docker run \ --network hazelcast-network \ -p 8080:8080 hazelcast/management-center:5.0.5 -
Once you see the
Hazelcast Management Center successfully started at http://localhost:8080/log in the terminal, open a web browser, go to localhost:8080, and enable Dev Mode. -
You will see a Connect box on the screen; click on it and enter the passive cluster’s name (
london) and IP address of its member.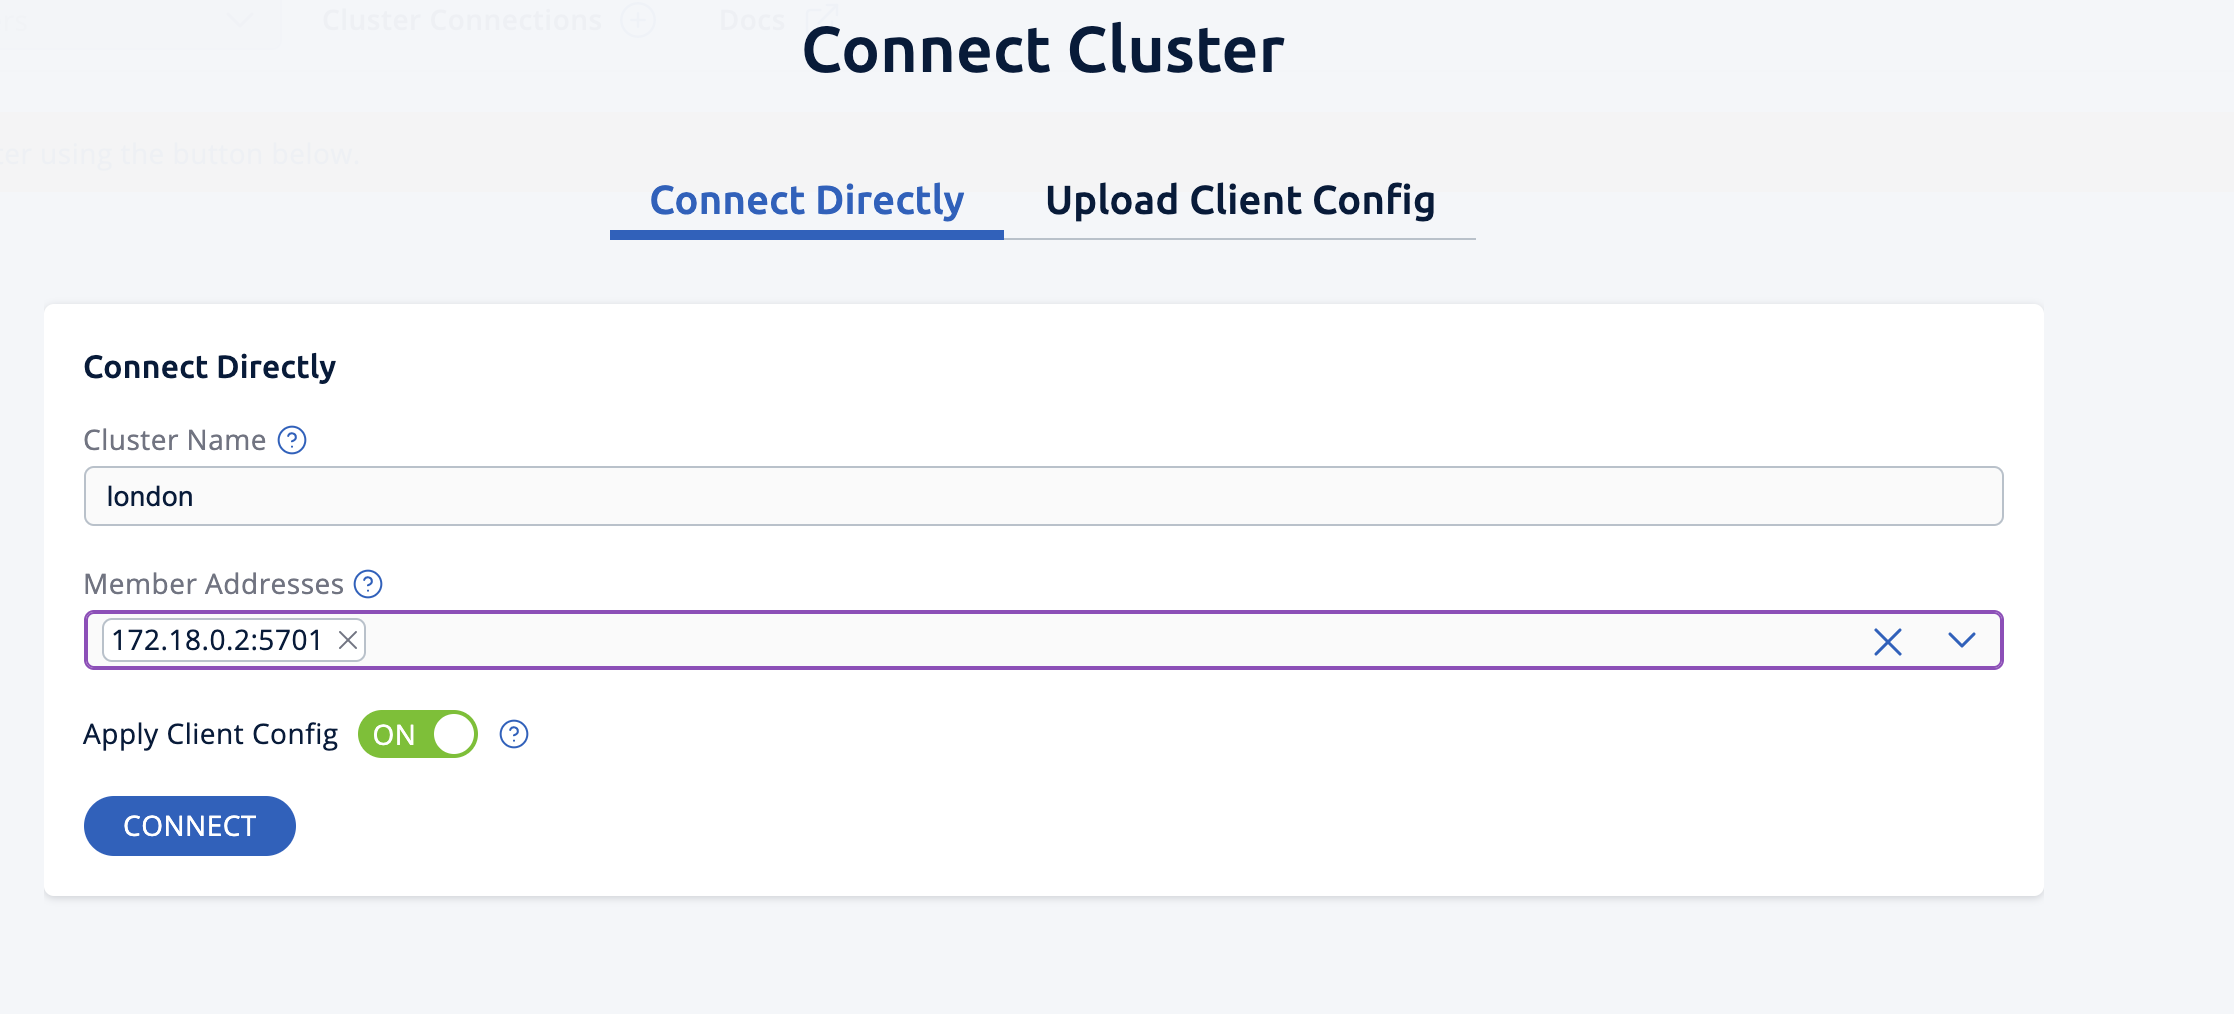 Management Center is now connected to the
 londoncluster. -
Click Connect again and enter the active cluster’s name (
tokyo) and the IP address of its member.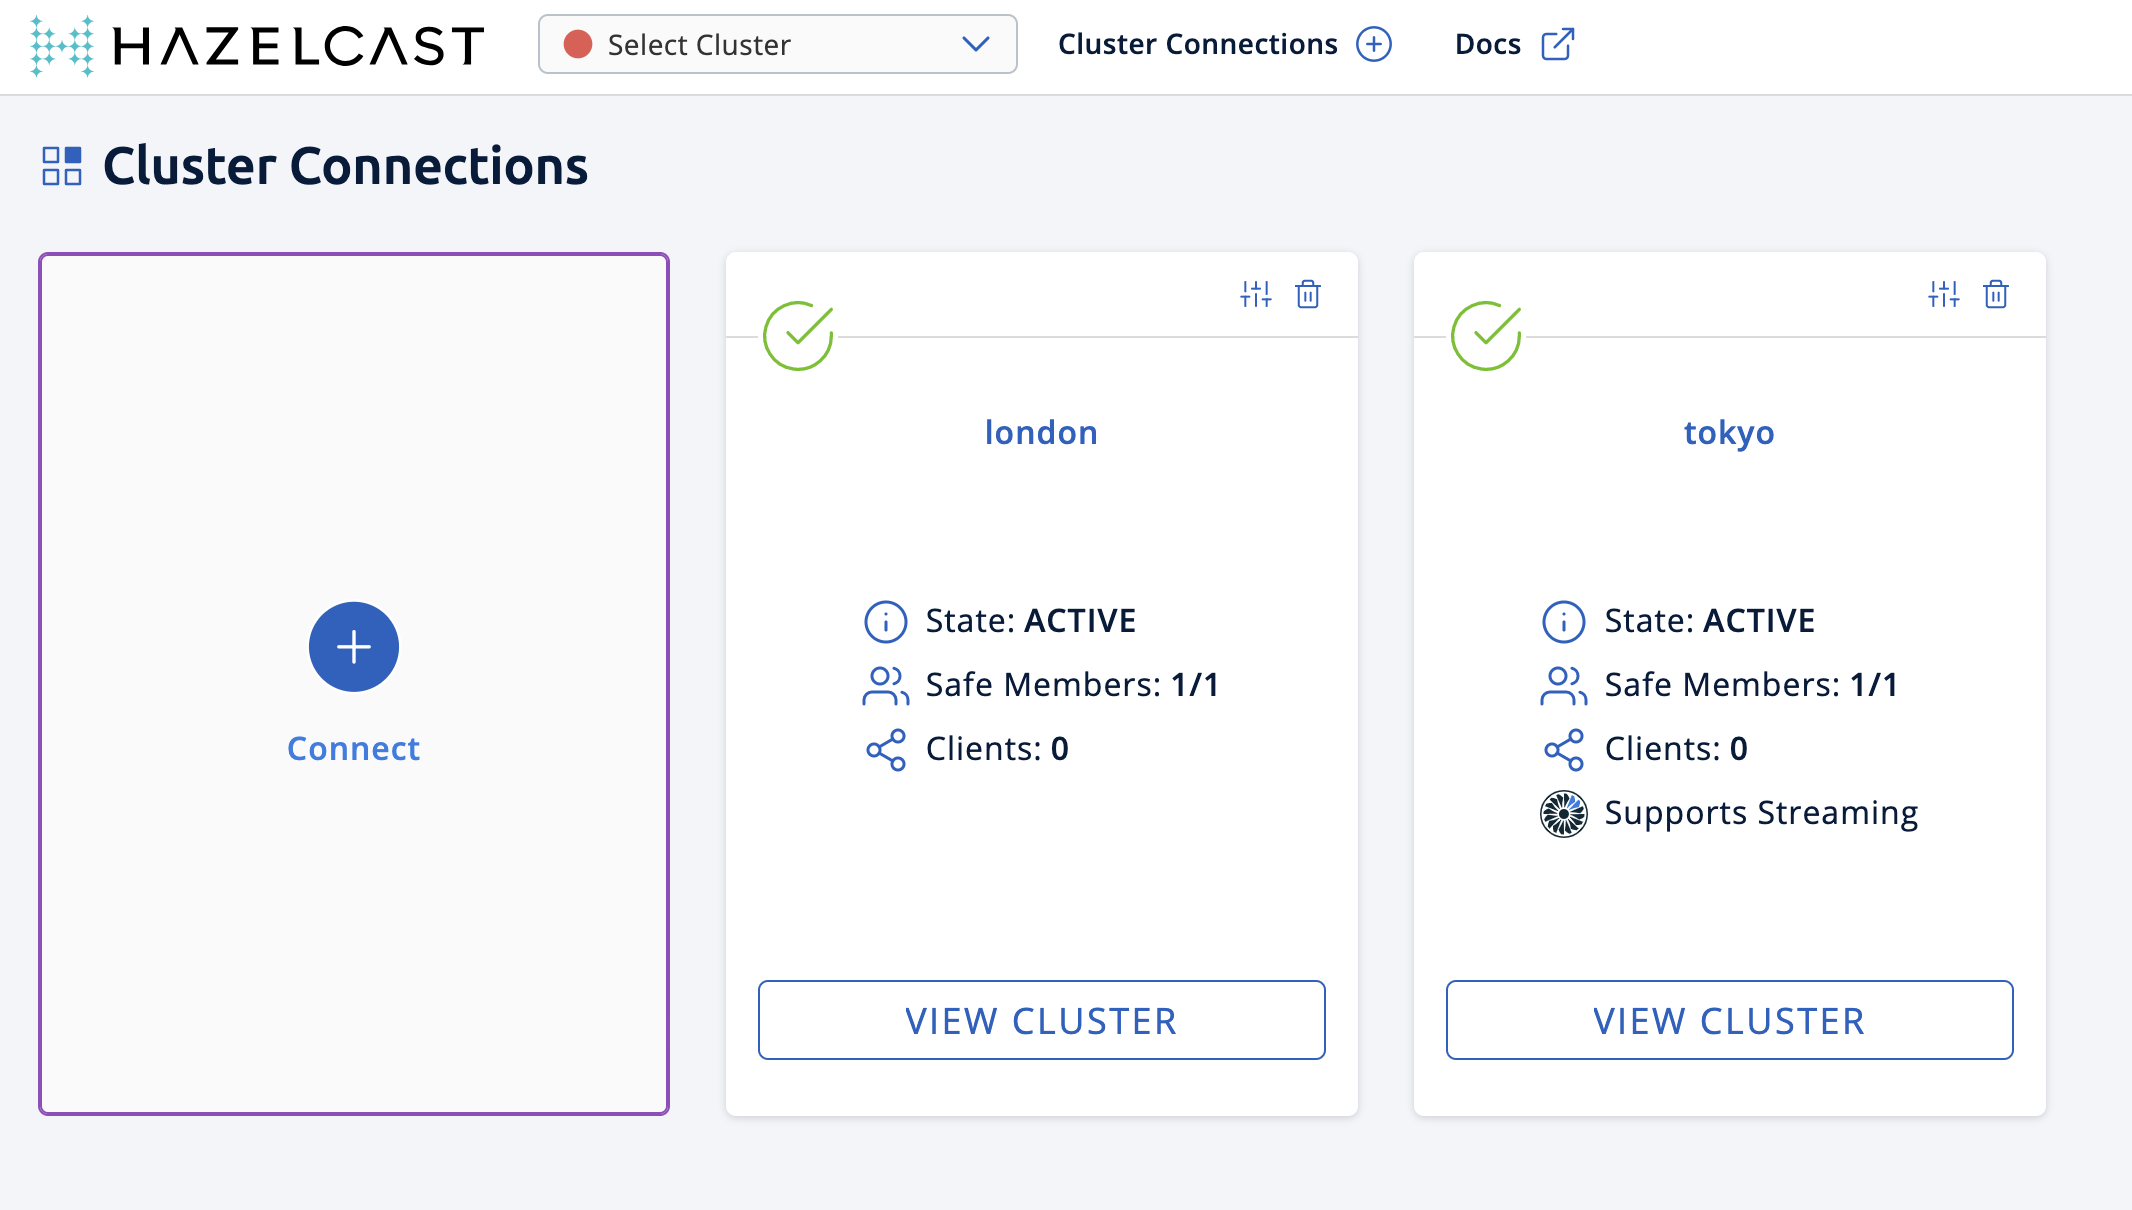 Management Center is now connected to the
 tokyocluster. -
You need to provide your license key; this is needed since you are going to use the WAN Replication feature for the
tokyocluster in Management Center. Click on View Cluster fortokyo, go to Settings located on the very top right of the user interface and, select License.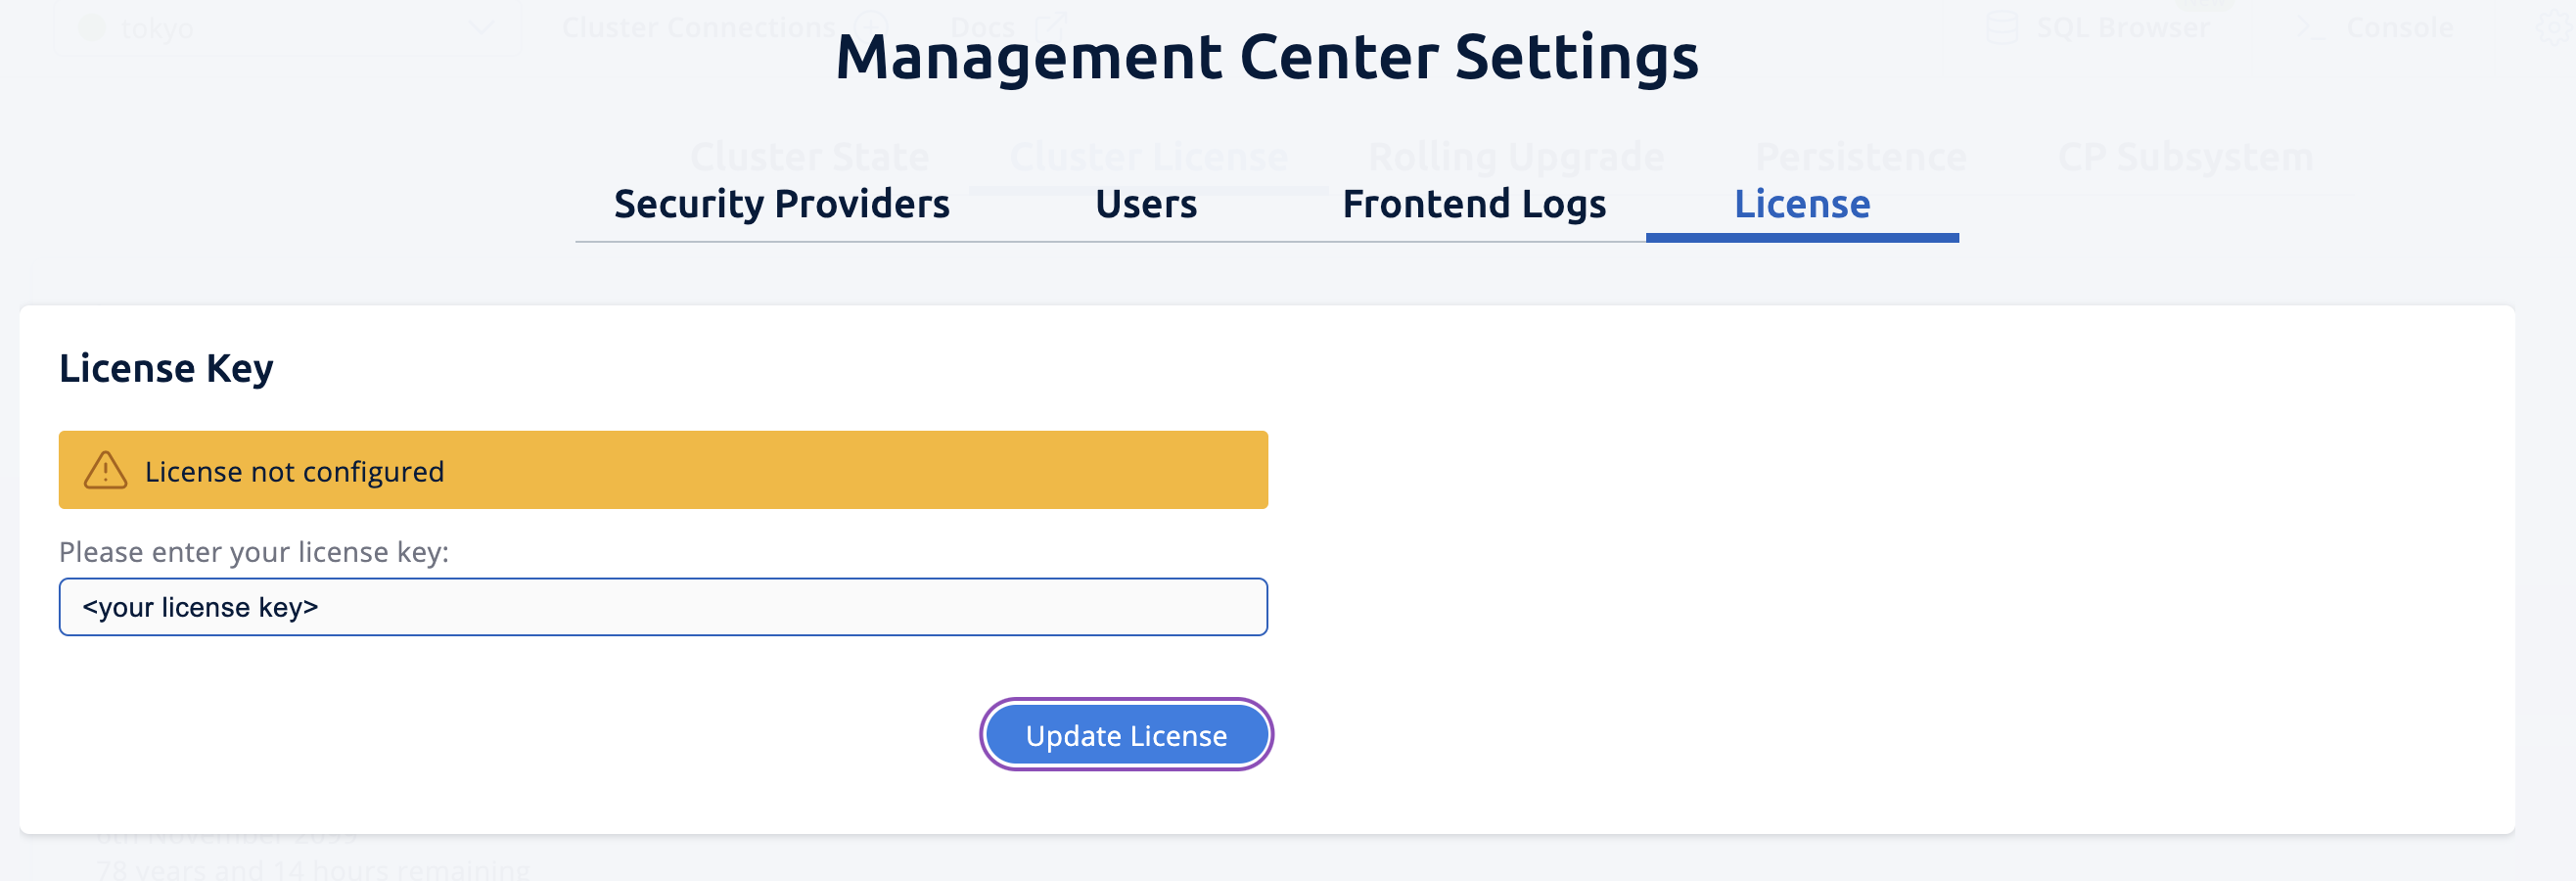 Type in your license key and click on Update License. Close the license screen.
 -
Verify that the
tokyocluster has WAN Replication enabled. Go to Cluster > WAN Replication.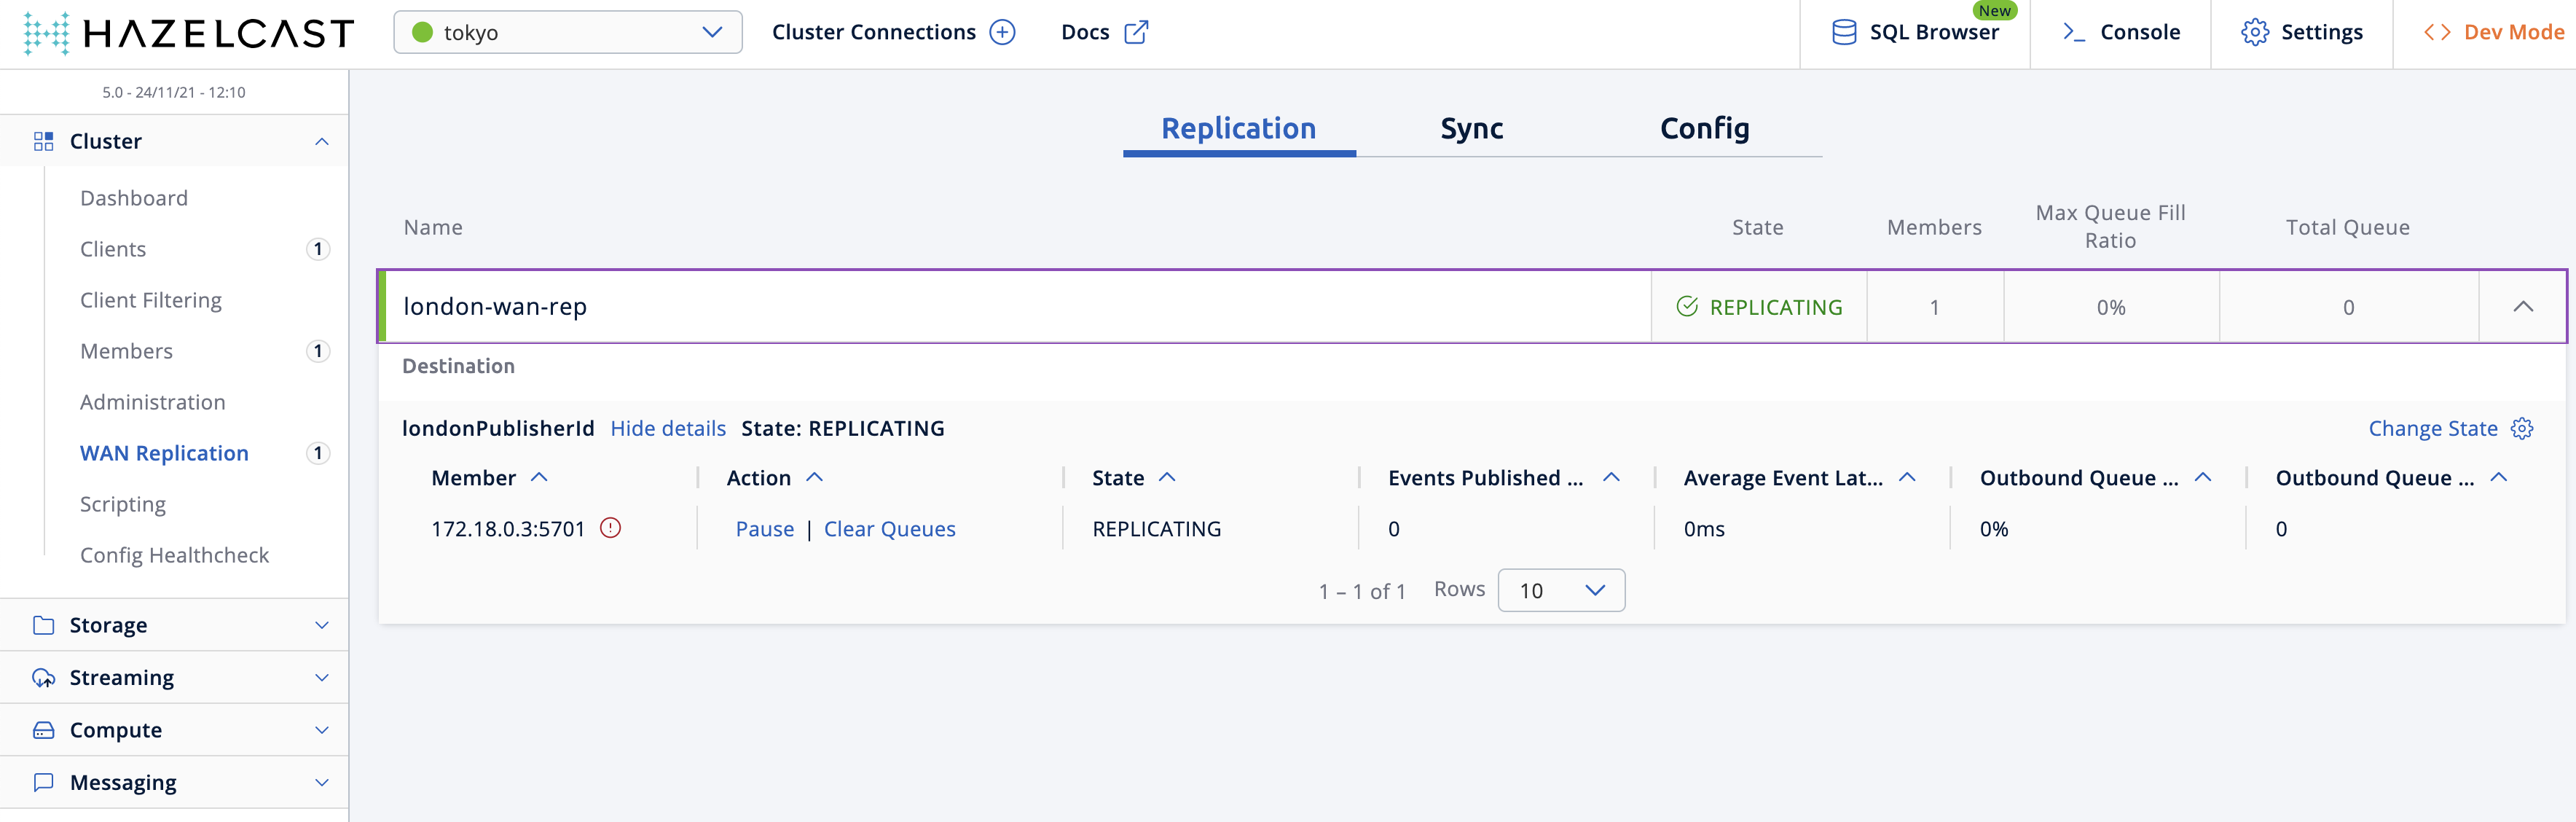
Step 4. Create a Map
In this step you switch to the SQL shell in a terminal, create a map called cities for the tokyo cluster, and put data into it.
-
In a new terminal, start the SQL shell that will be connected to the
tokyocluster.docker run --network hazelcast-network -it --rm hazelcast/hazelcast:5.0.5 hz-cli --targets [email protected]:5701 sql -
Once you see the SQL shell (
sql>), type the following command and press Enter to create the map.CREATE MAPPING cities (__key INT, country VARCHAR, city VARCHAR) TYPE IMap OPTIONS ('keyFormat'='int', 'valueFormat' = 'json-flat'); -
Then, type the following command and press Enter to add data to the map.
INSERT INTO cities VALUES (1,'Australia','Canberra'), (2,'Croatia','Zagreb'), (3,'Czech Republic','Prague'), (4,'England','London'), (5,'Turkey','Ankara'), (6,'United States','Washington, DC'); -
See the entries by running the following query.
SELECT * FROM cities;
You can also see the map and its entries in Management Center, using the SQL browser:
-
Select tokyo in the dropdown field left to Cluster Connections on top of the user interface.
-
Go to Storage > Maps, you will see the
citiesmap information.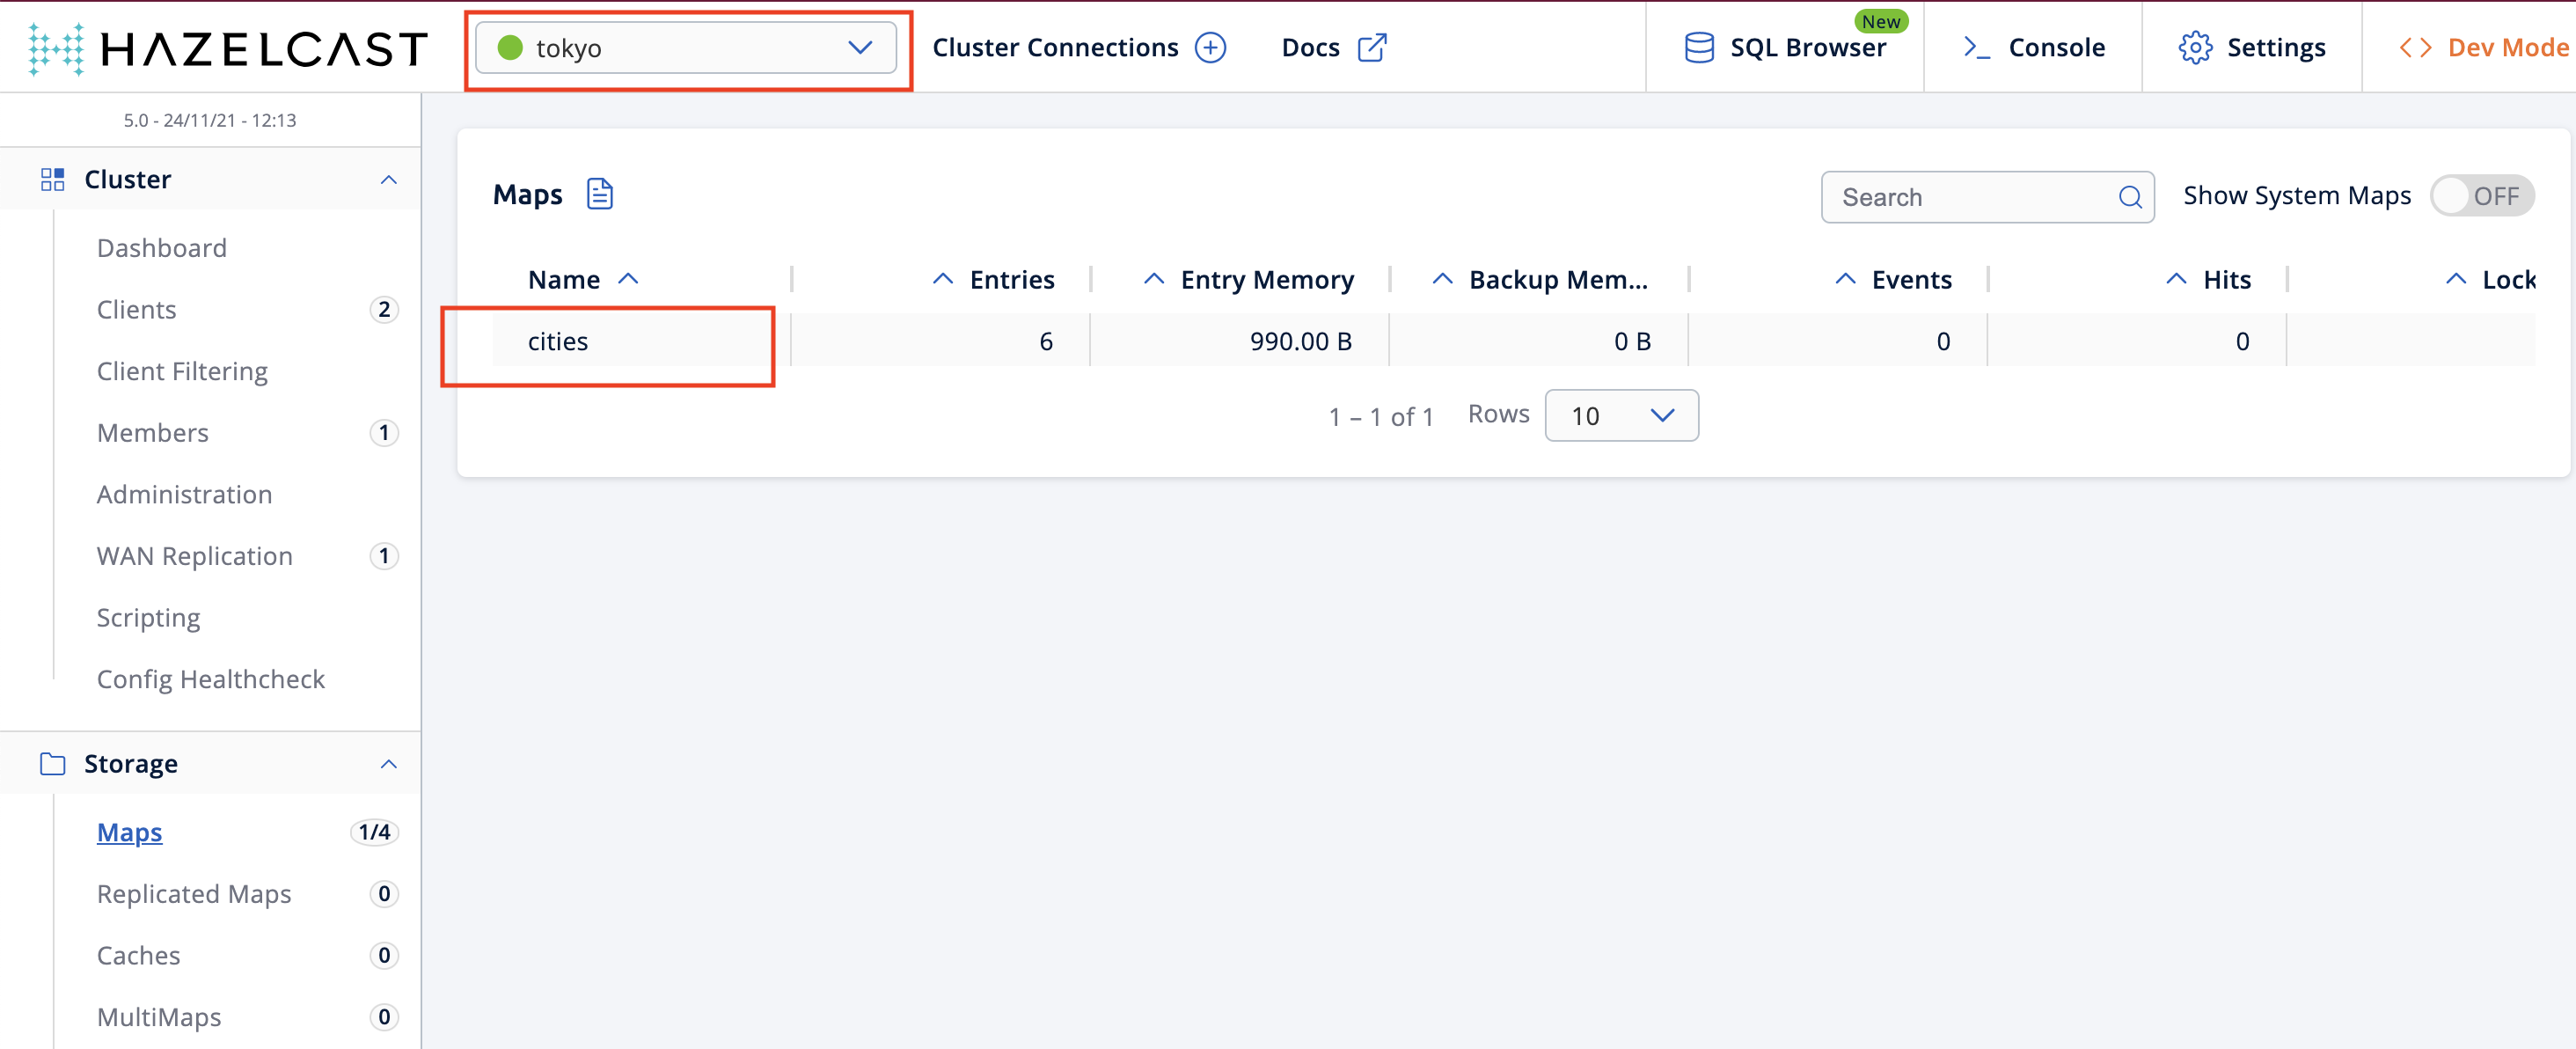
-
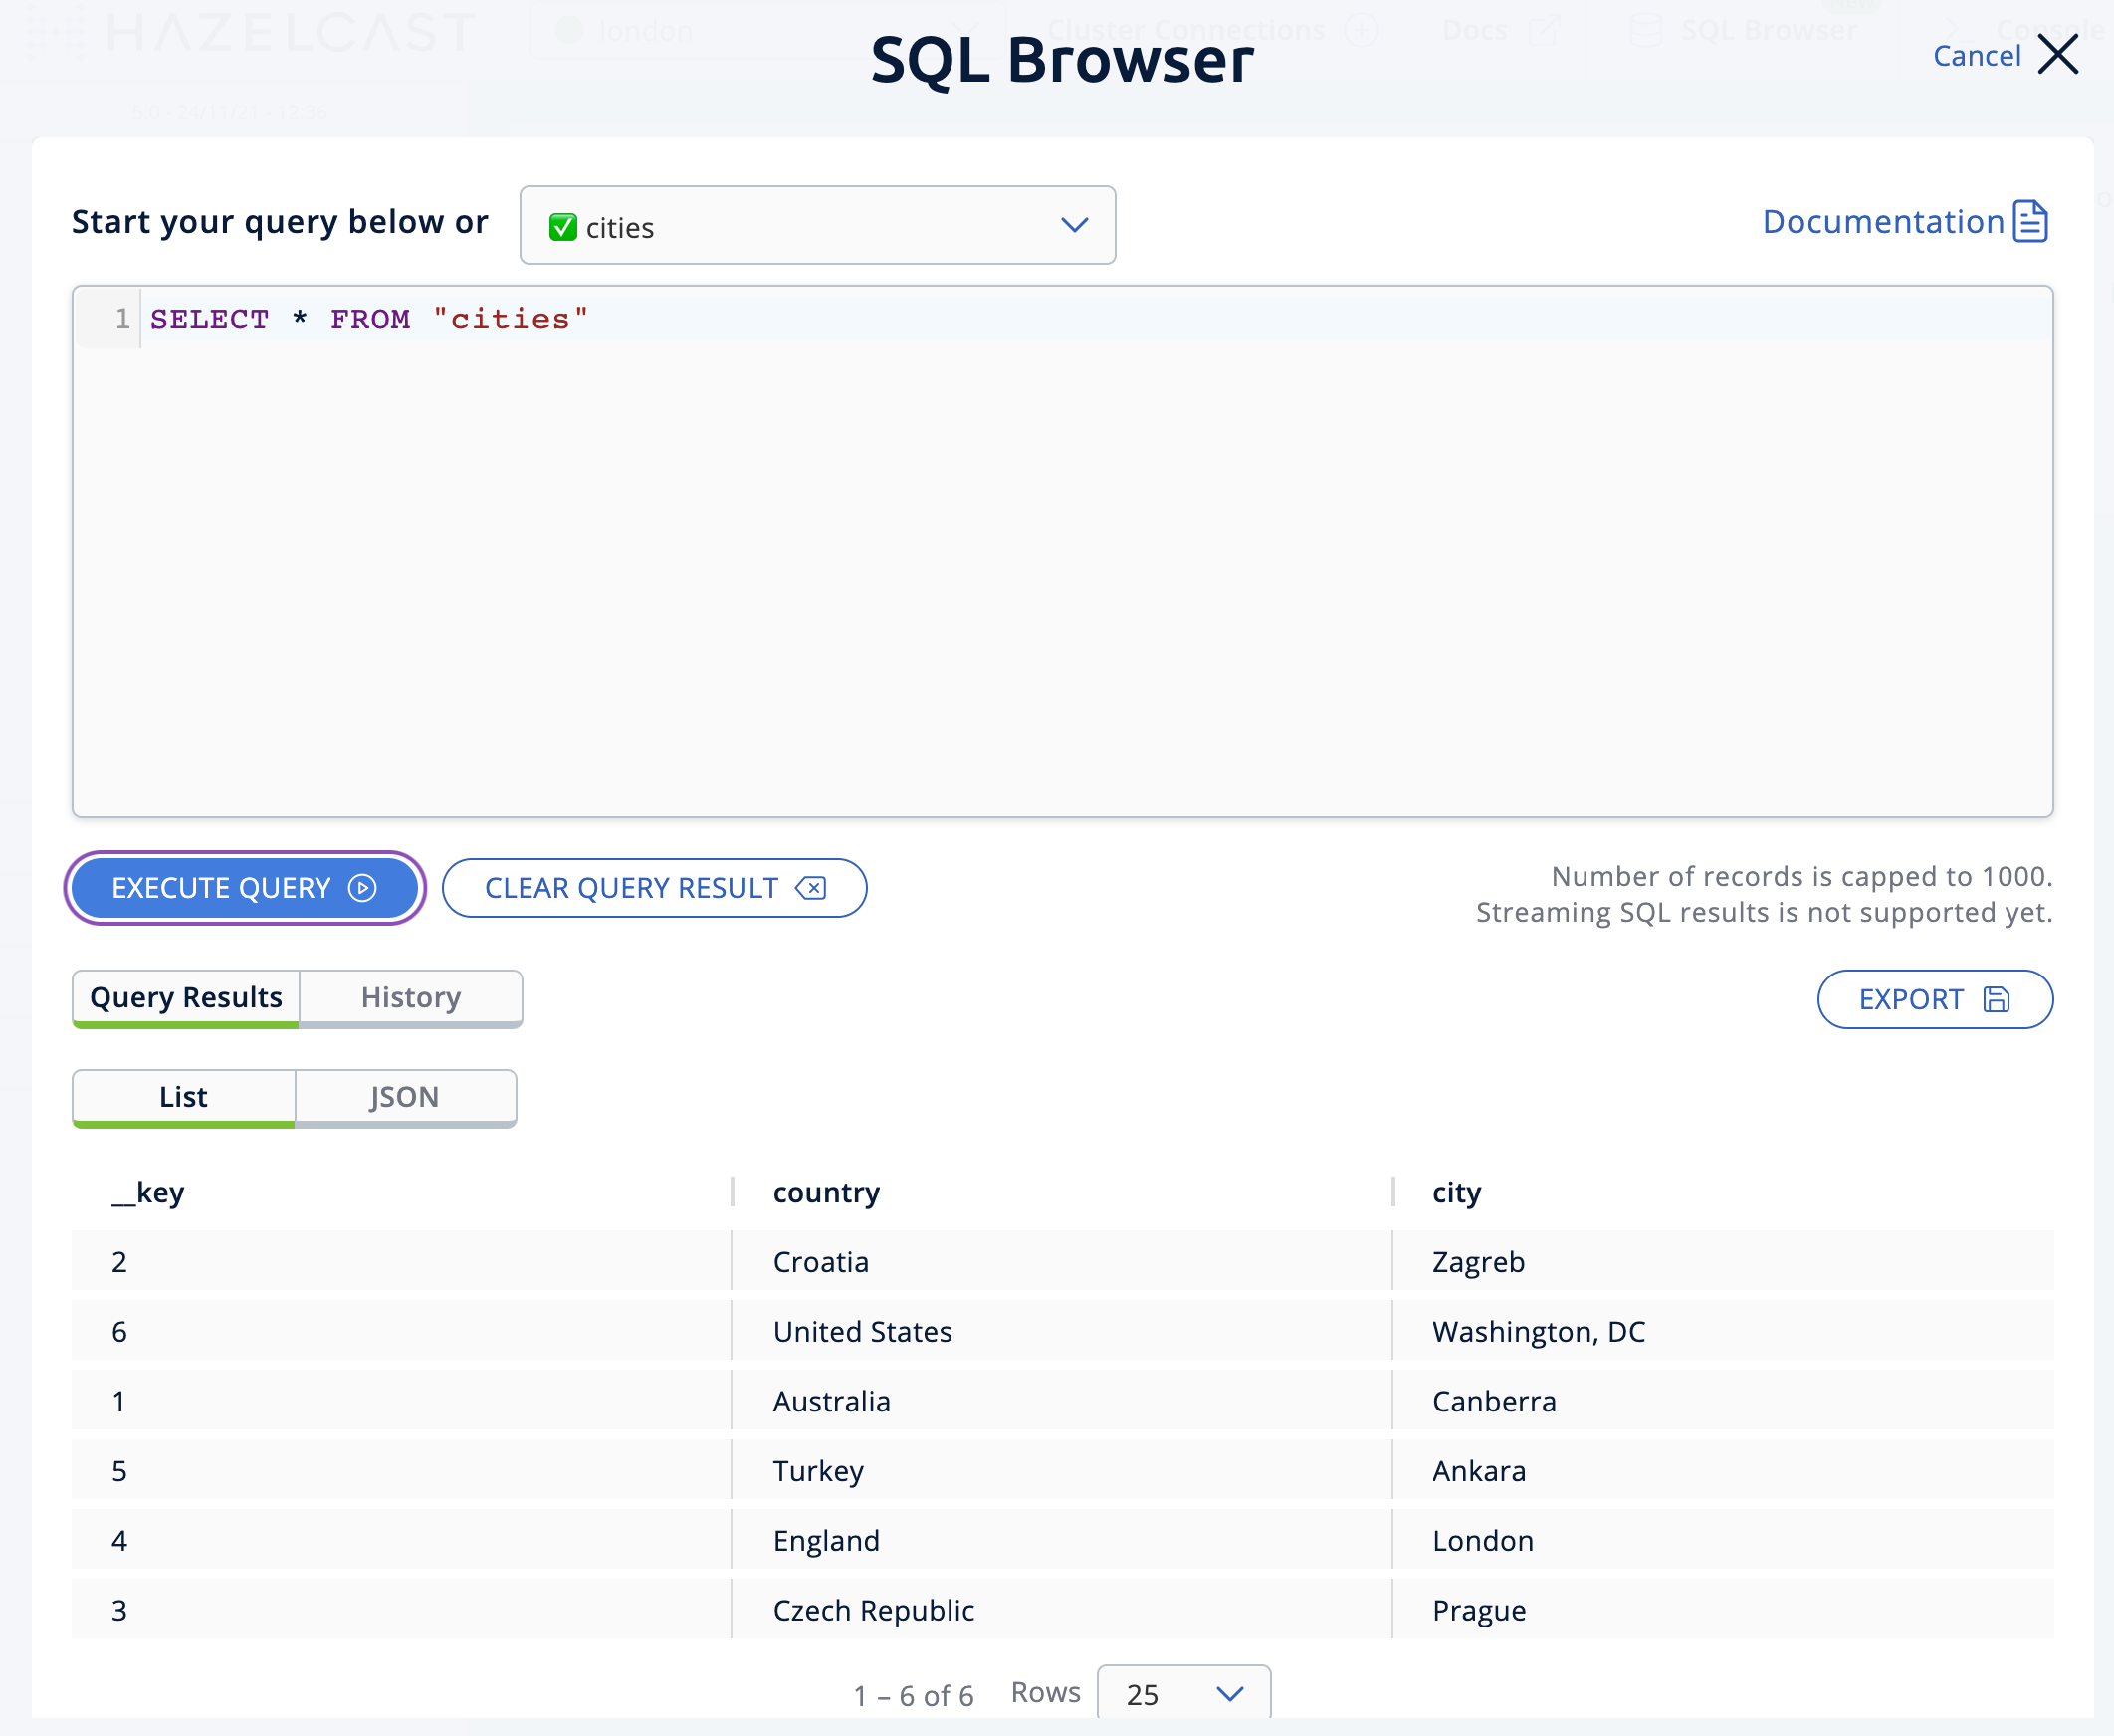
Click on SQL Browser located on the very top right of the user interface and choose
citiesin the select a map field. The SQL browser then shows the default query in its editor,SELECT * FROM cities;. -
Click on Execute Query; you will see the data you’ve put in.
-
Close the SQL browser.
Step 5. Verify the Replication
With WAN Replication enabled, your cities map and its data should have been replicated from the active cluster (tokyo)
to the passive one (london). In this step, you’ll verify that the cities map now also exists in the london cluster.
-
In Management Center, select london in the dropdown field left to Cluster Connections on top of the user interface.
-
Go to Storage > Maps and see that the cities map is there.
Additionally, you can query the map entries on the london cluster using the SQL browser in Management Center.
-
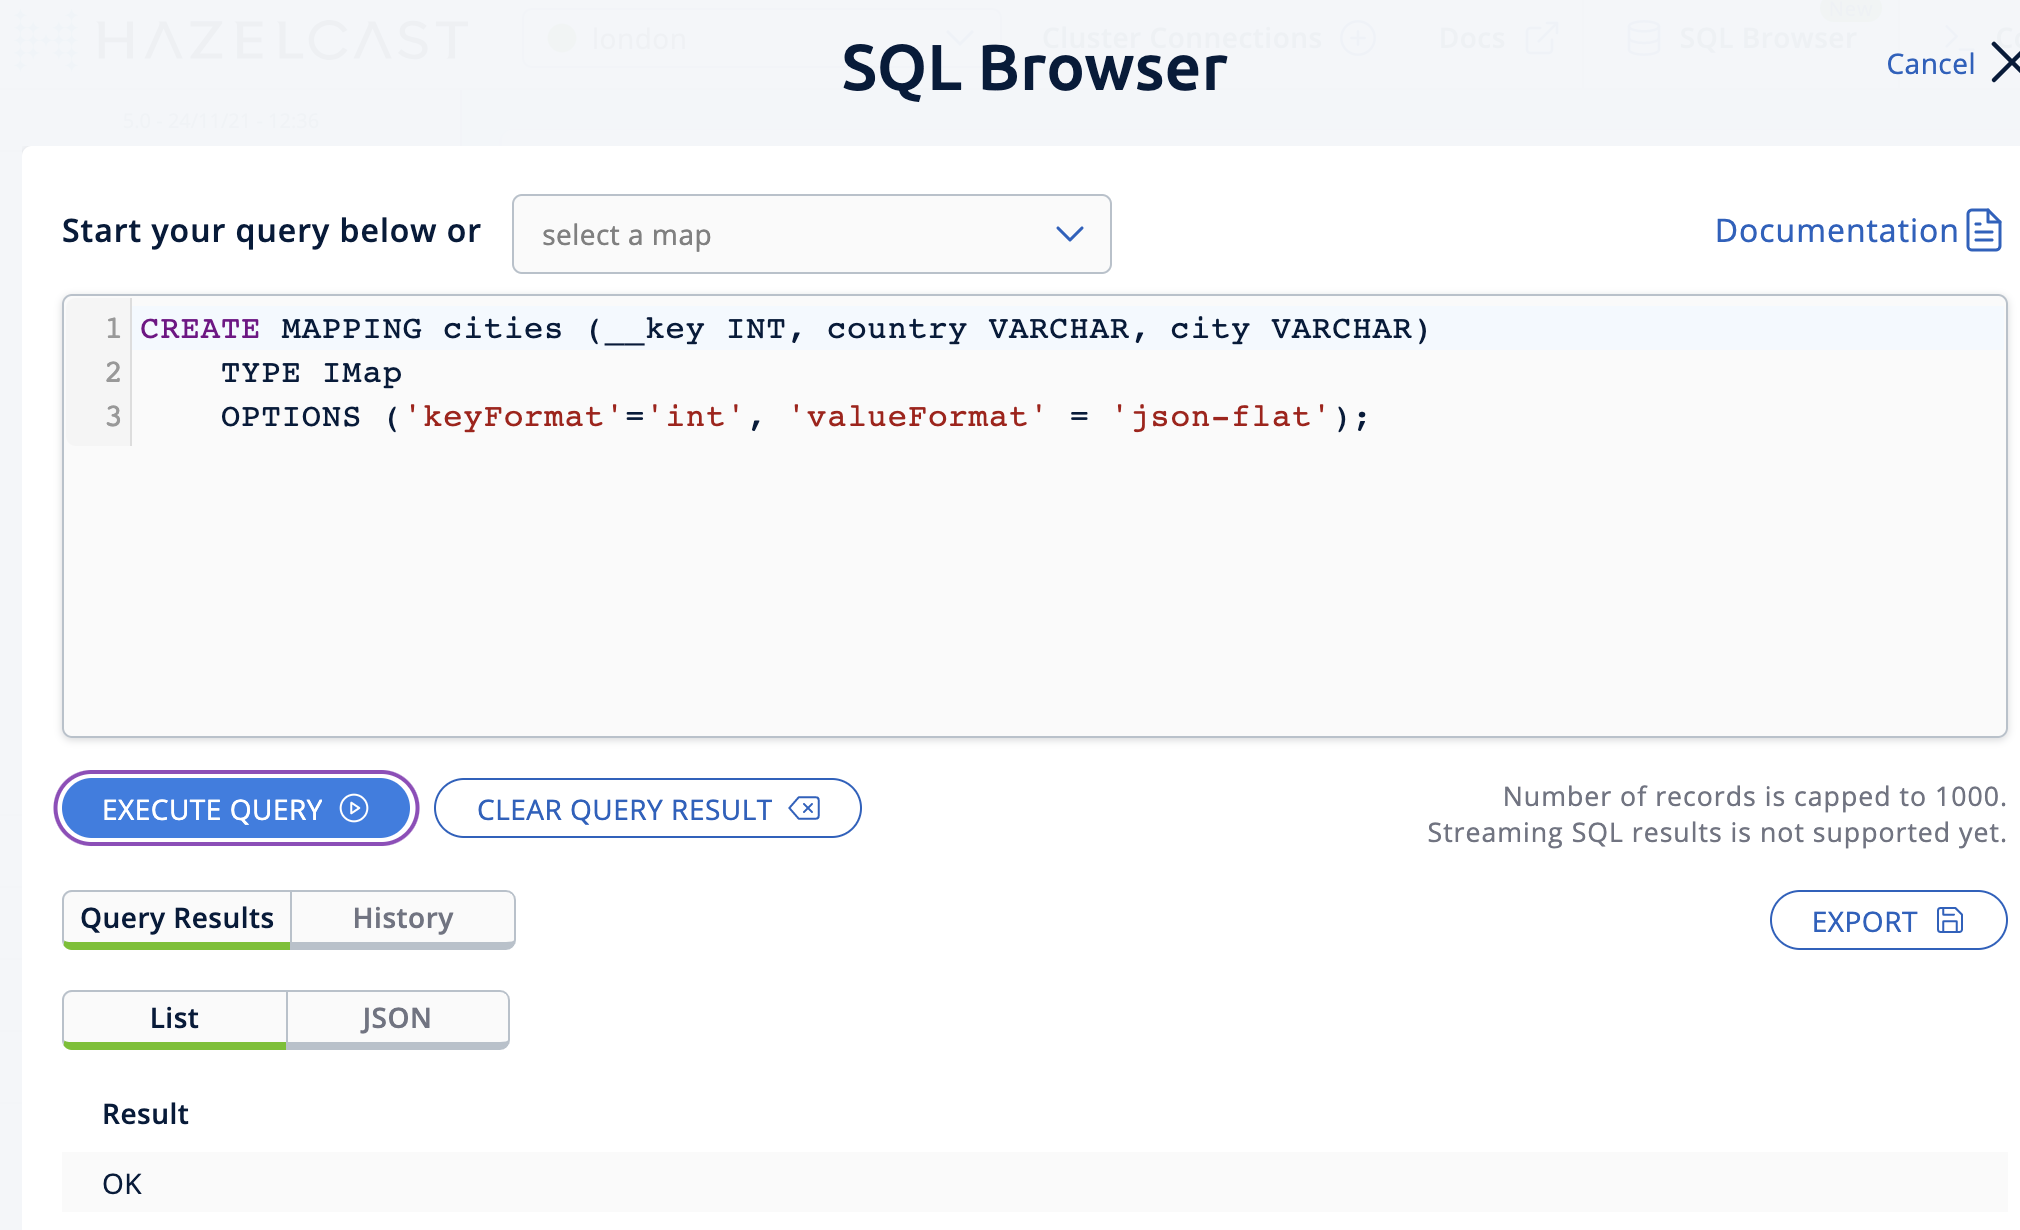
You first need to create the mapping so that the
londoncluster can read the map entries. Open the SQL browser, type in the following query.CREATE MAPPING cities (__key INT, country VARCHAR, city VARCHAR) TYPE IMap OPTIONS ('keyFormat'='int', 'valueFormat' = 'json-flat'); -
Click Execute Query.
-
In the
select a mapfield, choosecities. The editor shows the defaultSELECT * FROM cities;query. Once you execute it, you will see the entries ofcitiesmap, as in Step 4. -
Close the SQL browser.
Step 6. Update a Map Entry on the Active Cluster
In this step, you’ll update an entry in the cities map on the active cluster (tokyo) and verify the update is replicated to the passive one (london).
-
Select tokyo in the dropdown field left to Cluster Connections on top of the user interface and go to SQL Browser.
-
Choose cities in the select a map field and execute the default
SELECT * FROM "cities"query.
-
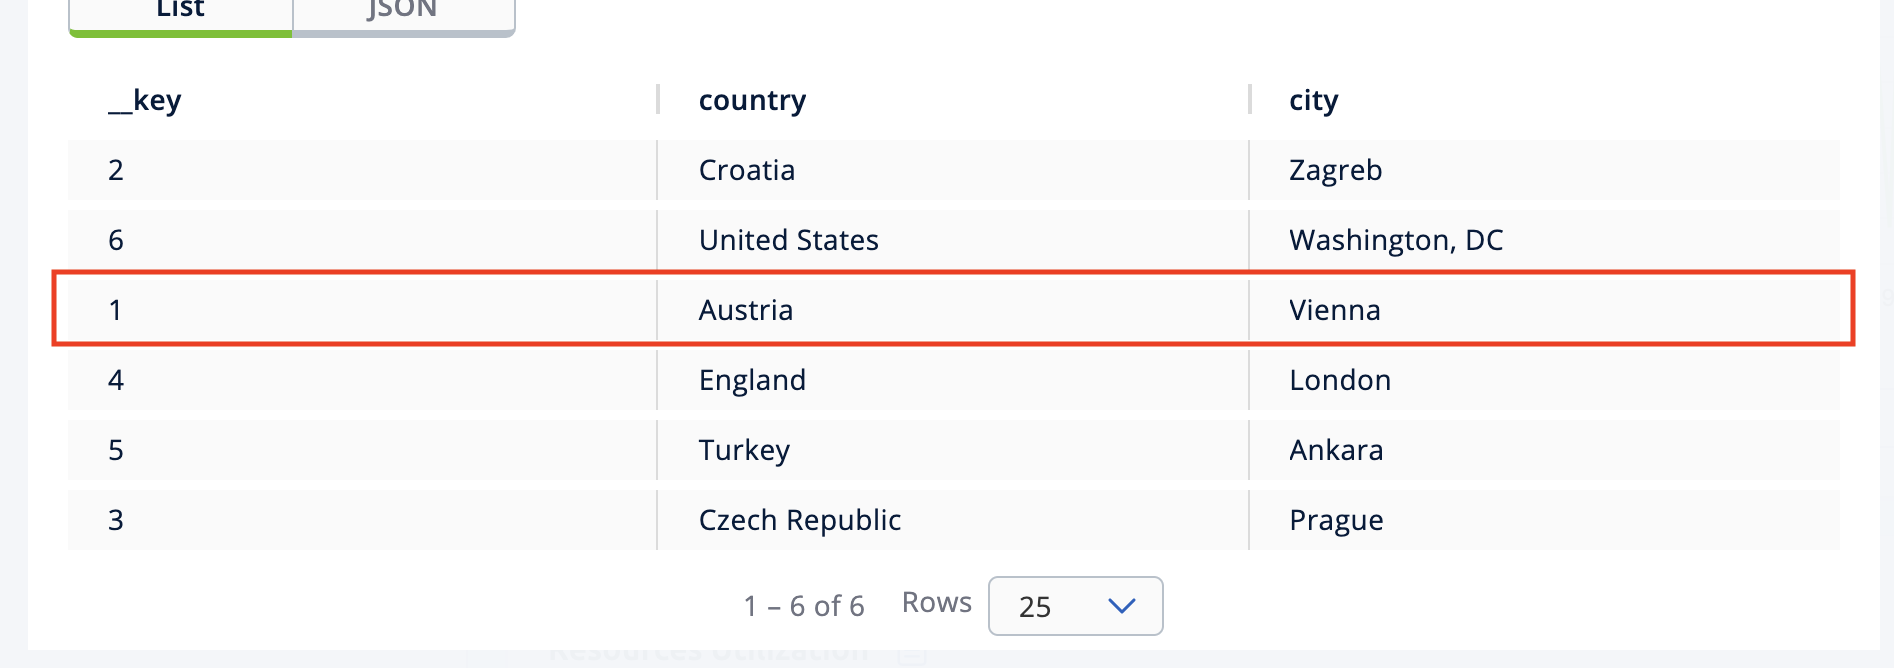
Now, you are going to modify the data shown above in the red box (the entry having the key
1). In the SQL editor, delete the default query and type in the following command.SINK INTO cities VALUES (1, 'Austria', 'Vienna');Execute the query and see the entry has changed.
-
Close the SQL browser and now go to the passive cluster (
london) by choosing london in the dropdown field left to Cluster Connections on top of the user interface. -
Open the SQL browser, choose cities in the select a map field and execute the default query.
-
You will see the entry having the key
1is also modified.
In this step, you have seen that a data modification in the active cluster is immediately replicated to the passive one. If you do the modification first on the passive cluster, you’d see that the modification is not applied to the active one.
Step 7. Shut Down the Cluster
Shut down the cluster you’ve created in this tutorial so that you can start a fresh one when you move to the other tutorials. To shut down, close the terminals in which the members are running or press Ctrl+C in each terminal.
Next Steps
See Synchronizing Data Across Clusters if you’re interested in learning more about the topics introduced in this tutorial.
Continue learning by configuring clients with a failover cluster in Deploy Blue-Green Clusters.