This tutorial introduces you to WAN Replication (also known as Geo-Replication) by showing how to replicate map entries across two clusters.
Overview
In this tutorial, you’ll do the following:
-
Start a passive cluster, which will receive updates from the active cluster.
-
Start an active cluster with WAN Replication, which will send updates to the passive cluster.
-
Create a map in the active cluster and check entries are replicated on the passive cluster.
-
Modify some map entries in the active cluster and see the changes replicated in the passive cluster.
|
WAN Replication can work in two modes. This tutorial uses active-passive mode, which means an active cluster replicates its maps and/or caches to one or more passive clusters for the purpose of maintaining a backup. If the active cluster becomes unavailable, the application traffic is automatically redirected to the passive cluster. In contrast, in active-active mode each cluster replicates maps and/or caches to all other clusters. |
The tutorial should take approximately 15 minutes to complete.
Step 1: Start the passive cluster
In this step, you’ll start an Enterprise Edition cluster called London with a single member. This will be the passive cluster,
which means it doesn’t need WAN Replication to be enabled.
-
Run the following Docker command in a terminal, replacing the <YOUR_LICENSE_KEY> placeholder with your Hazelcast Enterprise Edition license key:
docker run \
    -p 5701:5701 \
    --network hazelcast-network \
    -e HZ_NETWORK_PUBLICADDRESS=host.docker.internal:5701 \ (1)
    -e HZ_LICENSEKEY=<YOUR_LICENSE_KEY> \ (2)
    -e HZ_MANAGEMENTCENTER_CONSOLEENABLED=true \
    -e HZ_CLUSTERNAME=London \
    hazelcast/hazelcast-enterprise:5.7.0-SNAPSHOT
1 You can replace host.docker.internalwith the IP address of your Docker host. Either method will work but you will need to know the IP address for the later step connecting, for example, a SQL client to a specific member.2 Replace the <YOUR_LICENSE_KEY>placeholder with the Hazelcast Enterprise Edition license key.
You should see confirmation that looks like:
2024-11-23 11:08:15,055 [ INFO] [main] [c.h.i.c.ClusterService]: [host.docker.internal]:5701 [London] [5.7.0-SNAPSHOT]

Members {size:1, ver:1} [
	Member [host.docker.internal]:5701 - bed20746-1505-449b-9f4a-548bcdbe12b8 this
]
Step 2: Start the active cluster
In this step, you’ll start another Enterprise Edition cluster called Tokyo with a single member. This will be the active cluster
which means it needs WAN Replication to be configured.
| This section shows you how to create a Hazelcast configuration file and use Docker to start Hazelcast, instead of providing all the configuration options in a single command. |
-
Create a
hazelcast.yaml(or XML) configuration file in a~/config-tokyodirectory, replacing the <YOUR_LICENSE_KEY> placeholder:hazelcast: cluster-name: Tokyo license-key: <YOUR_LICENSE_KEY> jet: enabled: true wan-replication: (1) london-wan-rep: batch-publisher: londonPublisherId: cluster-name: London target-endpoints: host.docker.internal:5701 map: cities: (2) wan-replication-ref: london-wan-rep: (3) republishing-enabled: false1 Enables WAN Replication and creates the connection to the London cluster. 2 Defines the name of the map we’re going to replicate i.e. cities.3 Configures the map to use the wan-replicationdefined in <1>. If you wanted to replicate multiple maps, you could add othermapentries here.<hazelcast> <cluster-name>Tokyo</cluster-name> <license-key><YOUR_LICENSE_KEY></license-key> <jet enabled="true" /> <wan-replication name="london-wan-rep"> (1) <batch-publisher> <cluster-name>London</cluster-name> <publisher-id>londonPublisherId</publisher-id> <target-endpoints>host.docker.internal:5701</target-endpoints> <map name="cities"> (2) <wan-replication-ref name="london-wan-rep"> (3) </map> </hazelcast>1 Enables WAN Replication and creates the connection to the London cluster. 2 Defines the name of the map to be replicated i.e. cities.3 Configures the map to use the wan-replicationdefined in <1>. If you wanted to replicate multiple maps, you could add othermapentries here. -
Open a new terminal and start the active cluster as follows:
docker run \
     --network hazelcast-network \
     -e JAVA_OPTS="-Dhazelcast.config=/opt/hazelcast/config_ext/hazelcast.yaml" -v ~/config-tokyo:/opt/hazelcast/config_ext hazelcast/hazelcast-enterprise:5.7.0-SNAPSHOT
This code example uses ~/configas the path to the directory containing the configuration file created in step 1. If you saved the configuration file somewhere else, you need to update this path.You should see confirmation like:
2024-11-23 11:39:14,198 [ INFO] [main] [c.h.i.c.ClusterService]: [172.18.0.3]:5701 [Tokyo] [5.7.0-SNAPSHOT] Members {size:1, ver:1} [ Member [172.18.0.3]:5701 - 98d9a815-5eb3-4341-bec1-e9816cee44b5 this ] -
Note the member IP address and port for connecting to this cluster later via Management Center.
Step 3: Set up Management Center
The next step is connecting to the clusters using Management Center and adding the license key so you can enable WAN Replication.
-
Open a new terminal and start Management Center using the following code:
docker run \ --network hazelcast-network \ -p 8080:8080 hazelcast/management-center:latest-snapshot -
Open a web browser and go to
localhost:8080. -
Enable Dev Mode and click Connect.
-
Enter the passive cluster’s name (
London) and the IP address and port e.g.host.docker.internal:5701.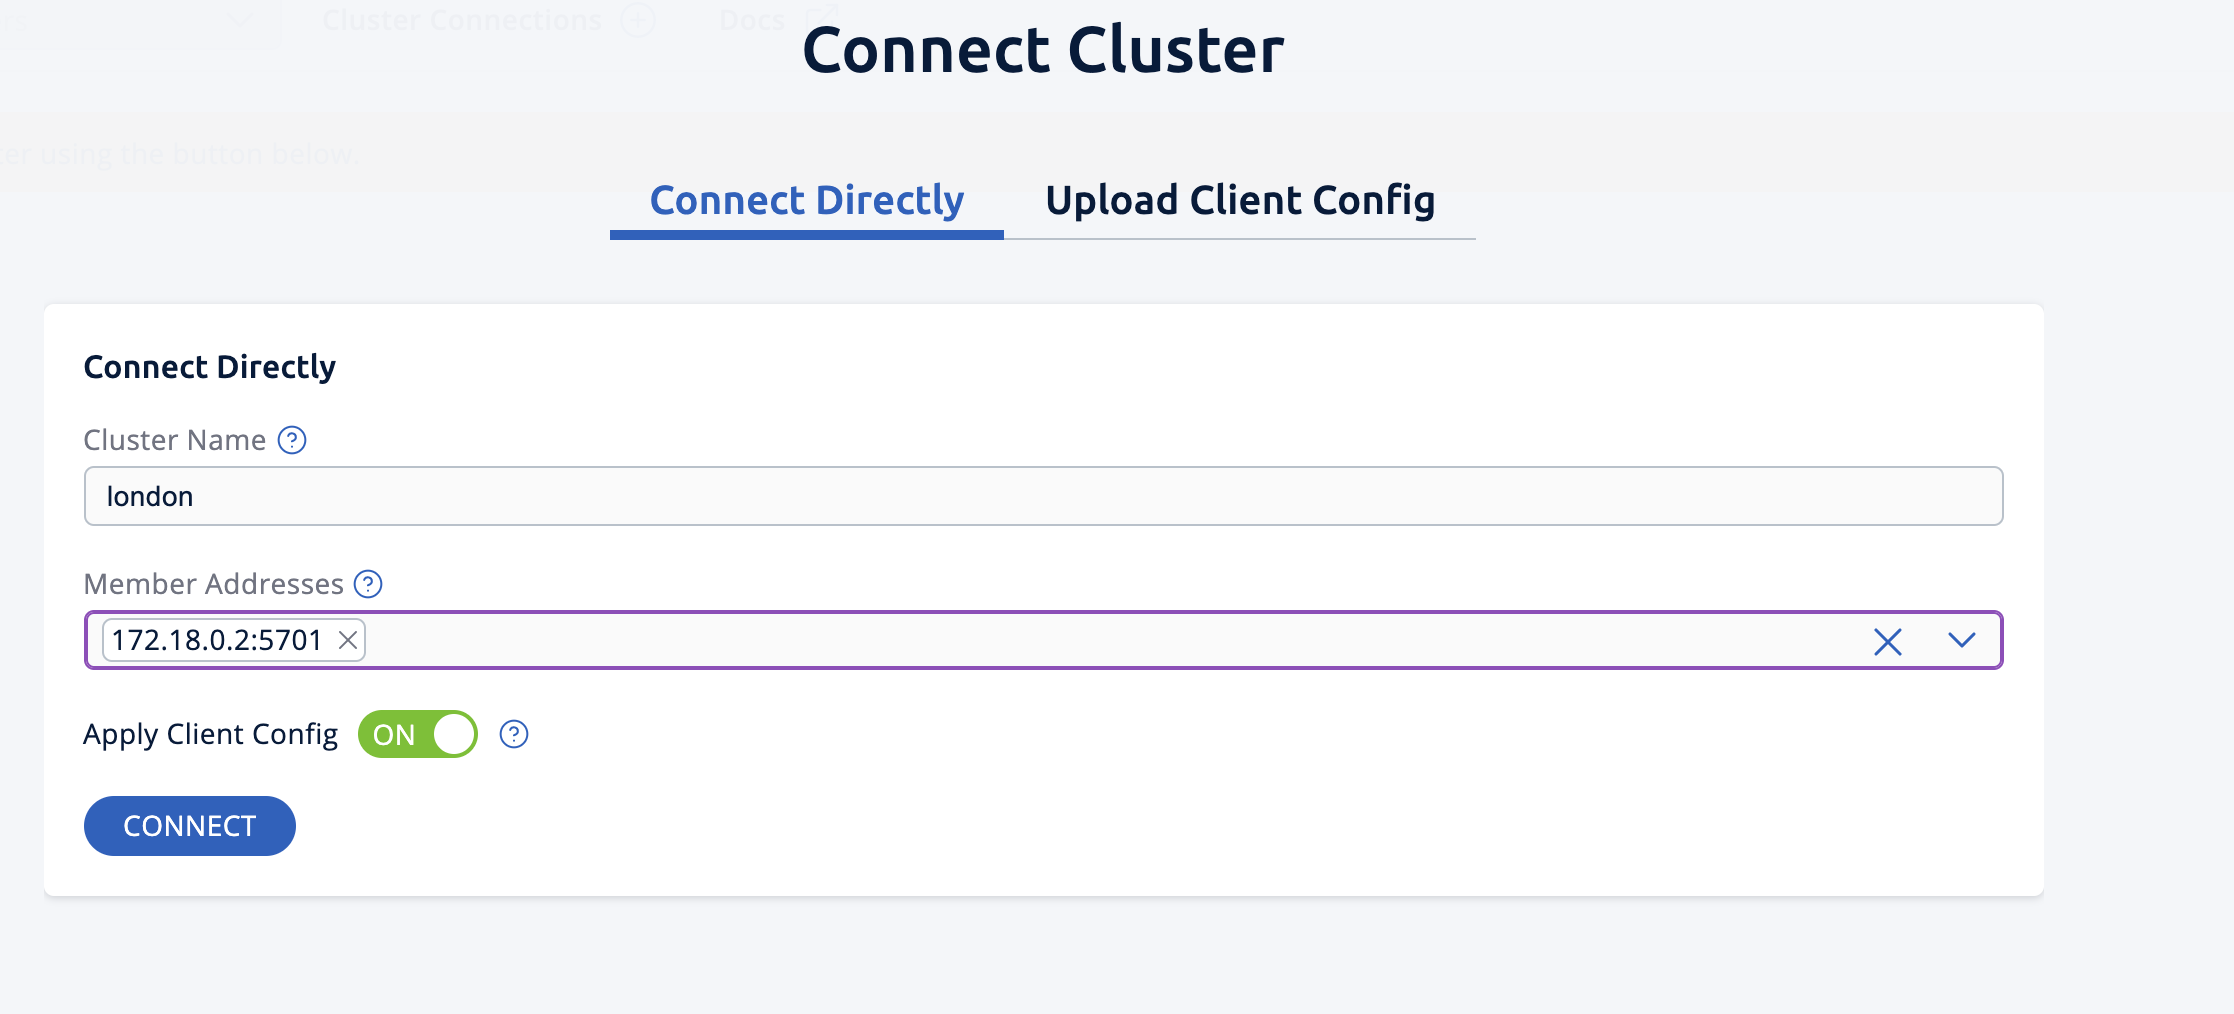 Management Center connection details for the
 Londoncluster. -
Click Connect again and enter the active cluster’s name (
Tokyo) and the IP address and port e.g.172.18.0.3:5701.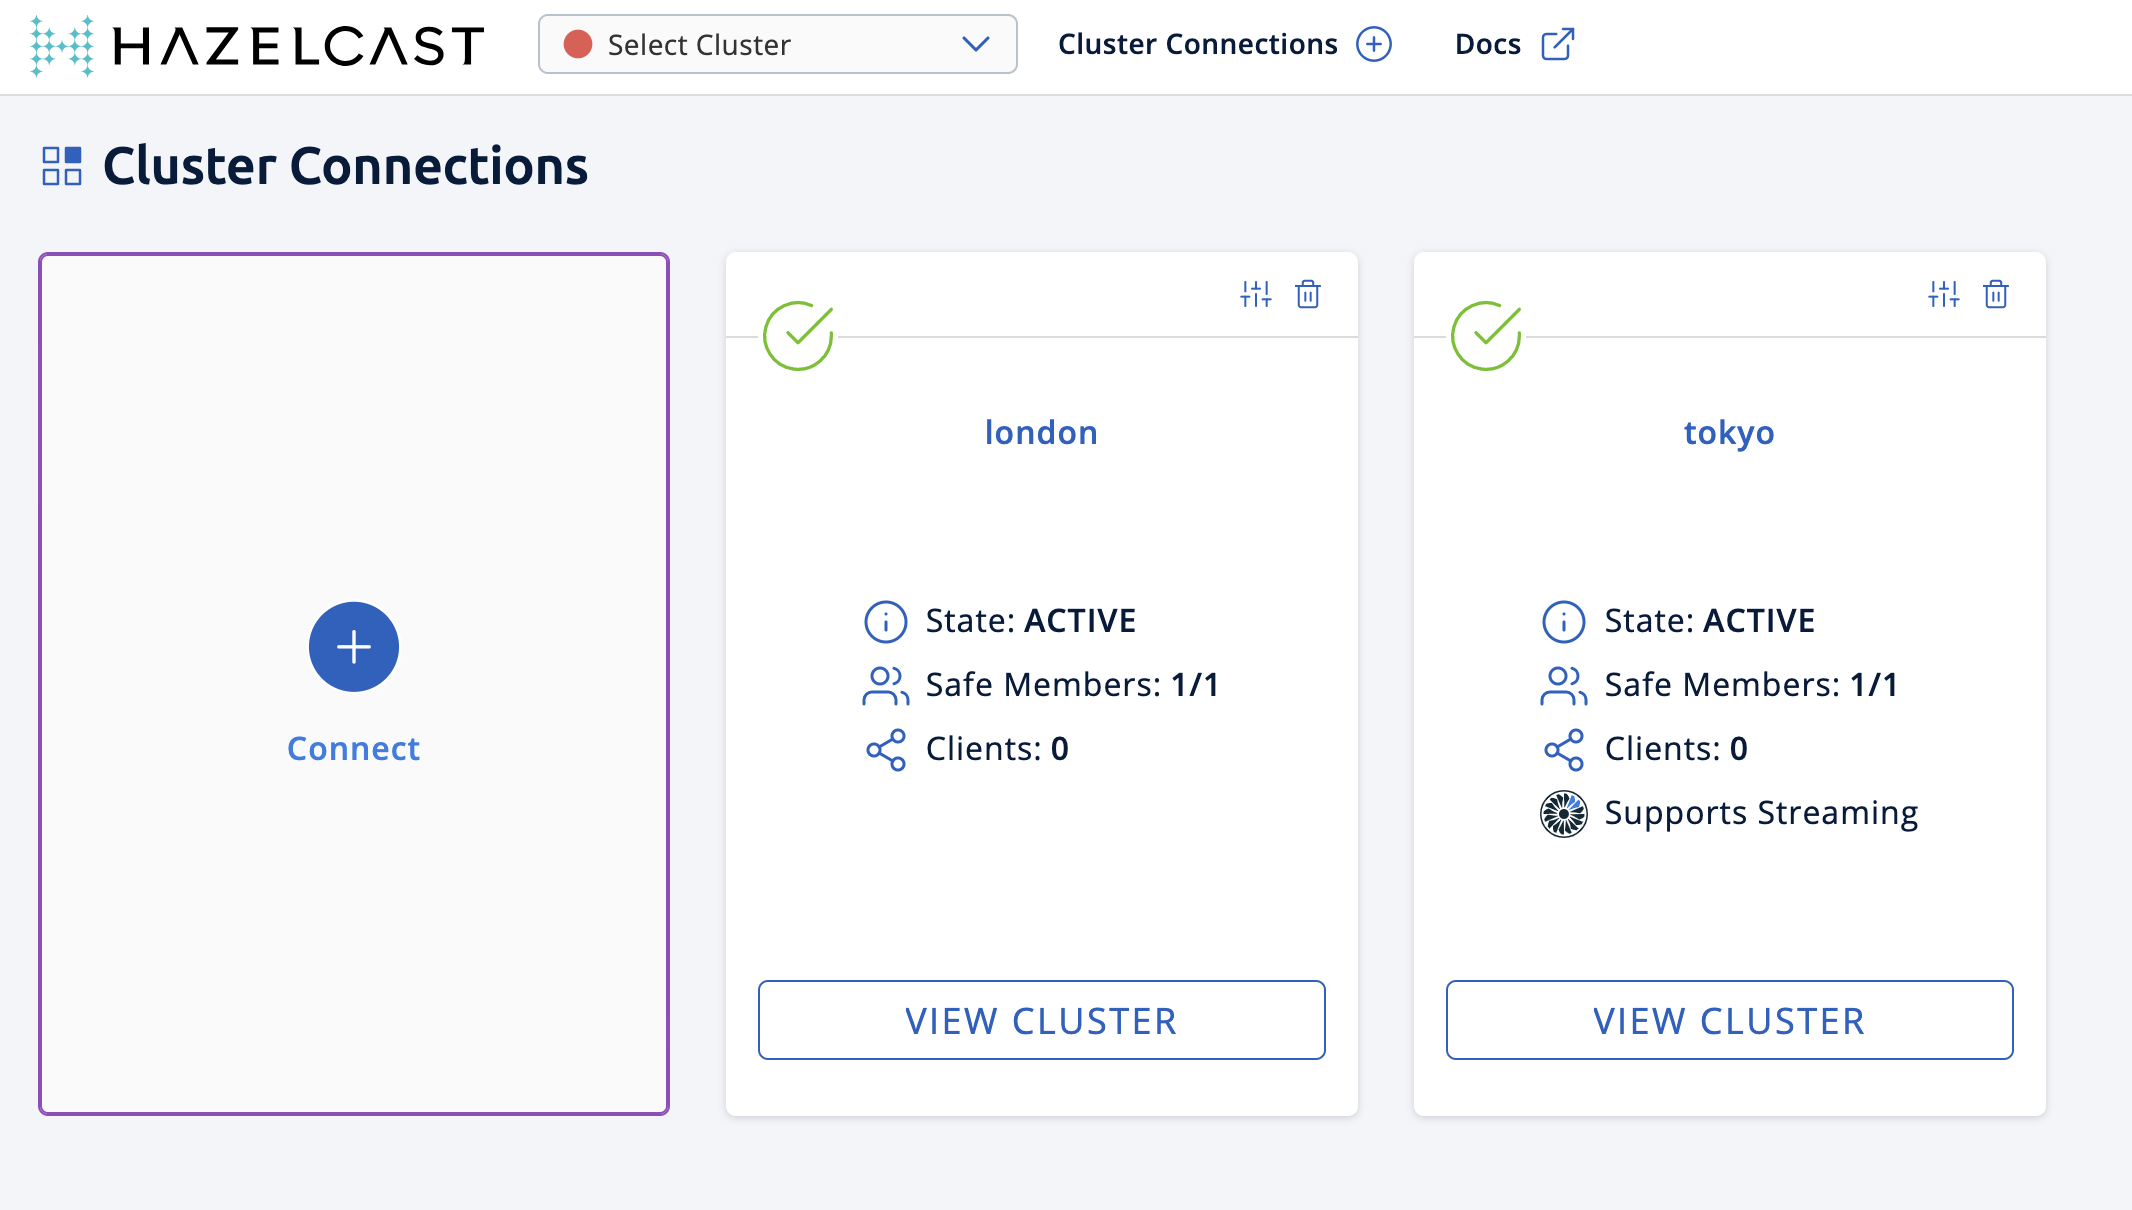 Management Center connections active to both clusters.
 -
Select Tokyo from the Cluster dropdown in the Top Menu.
-
Open the Settings window from the top right of the screen.
-
Select the License tab, paste your Enterprise license key in and click Update License.
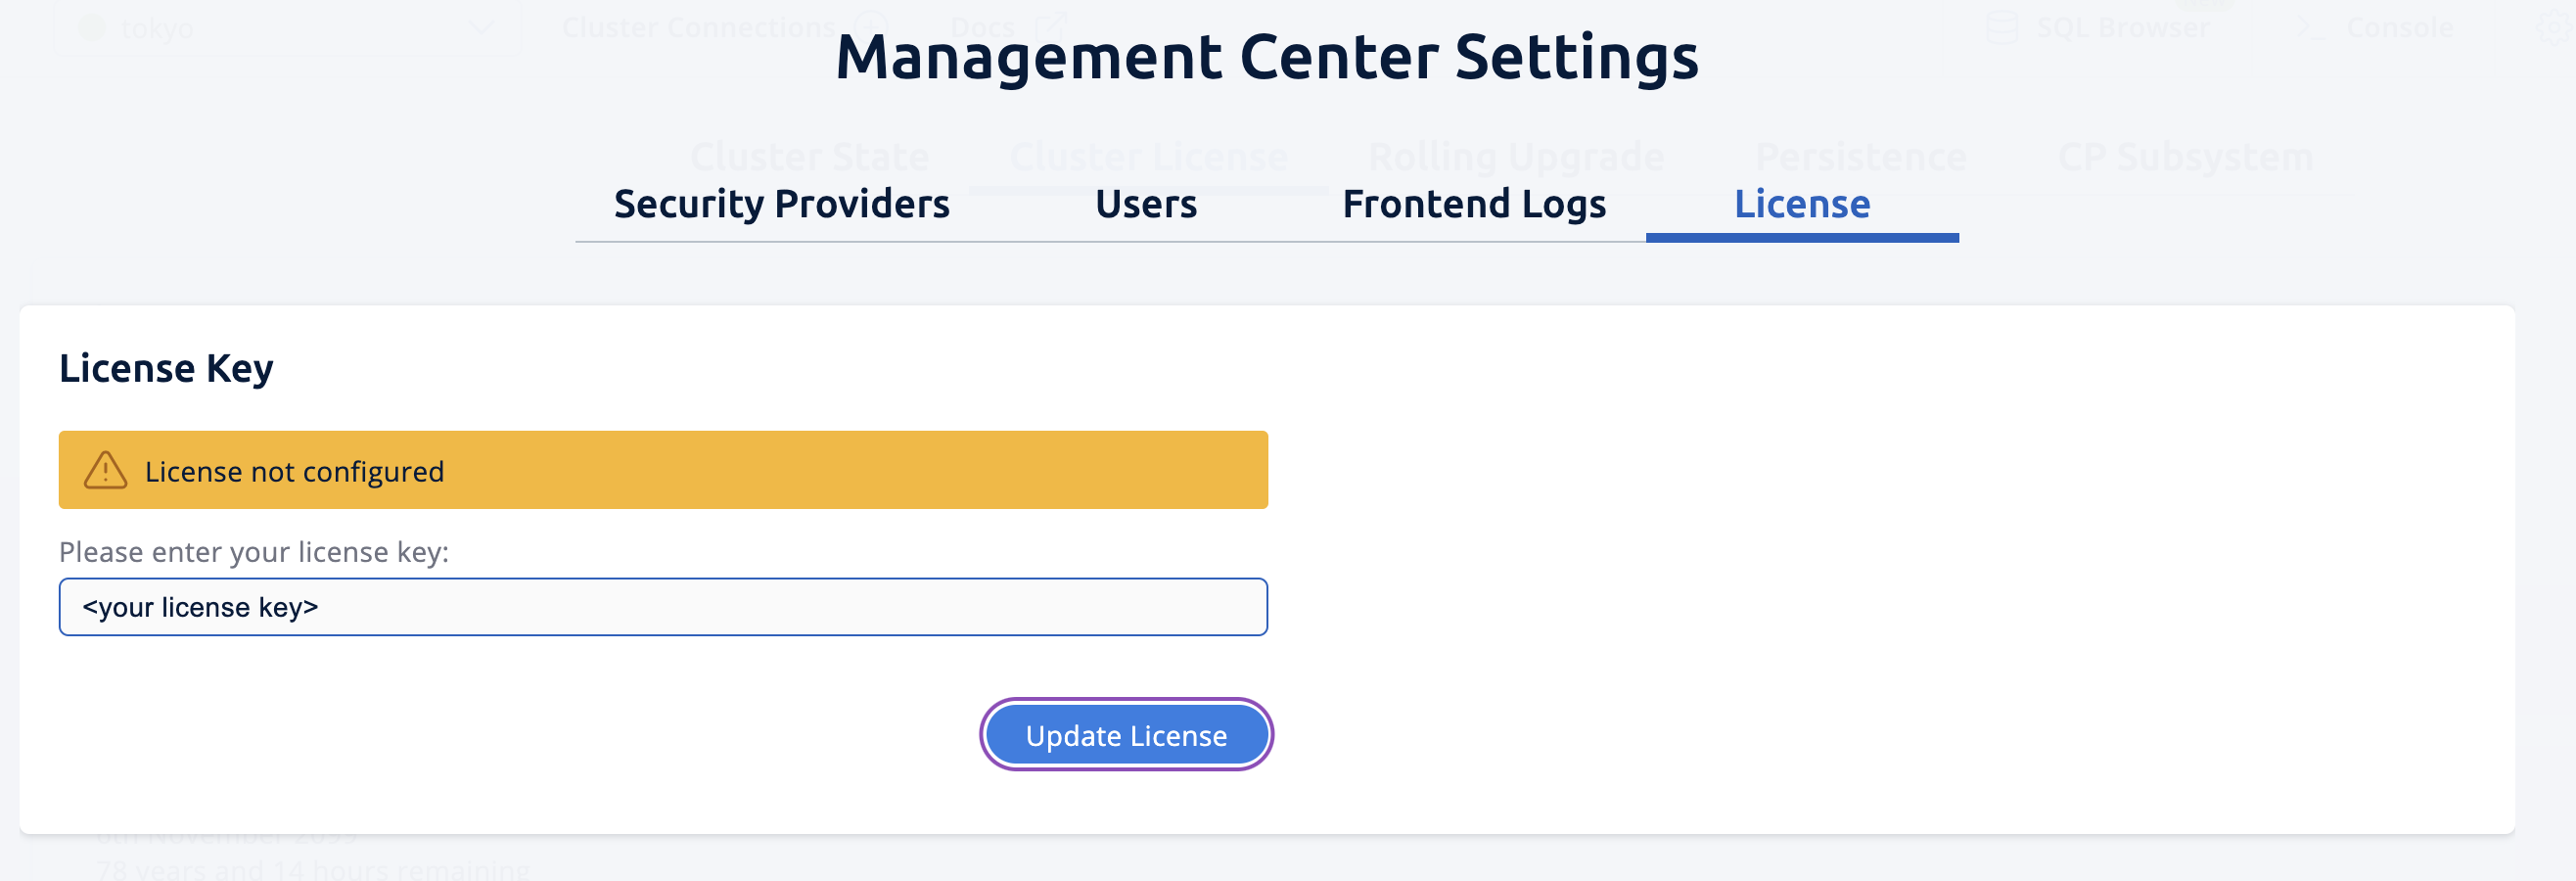 Add your license key to enable this Enterprise feature.
 -
You can verify that the
Tokyocluster has WAN Replication enabled by clicking Cluster > WAN Replication.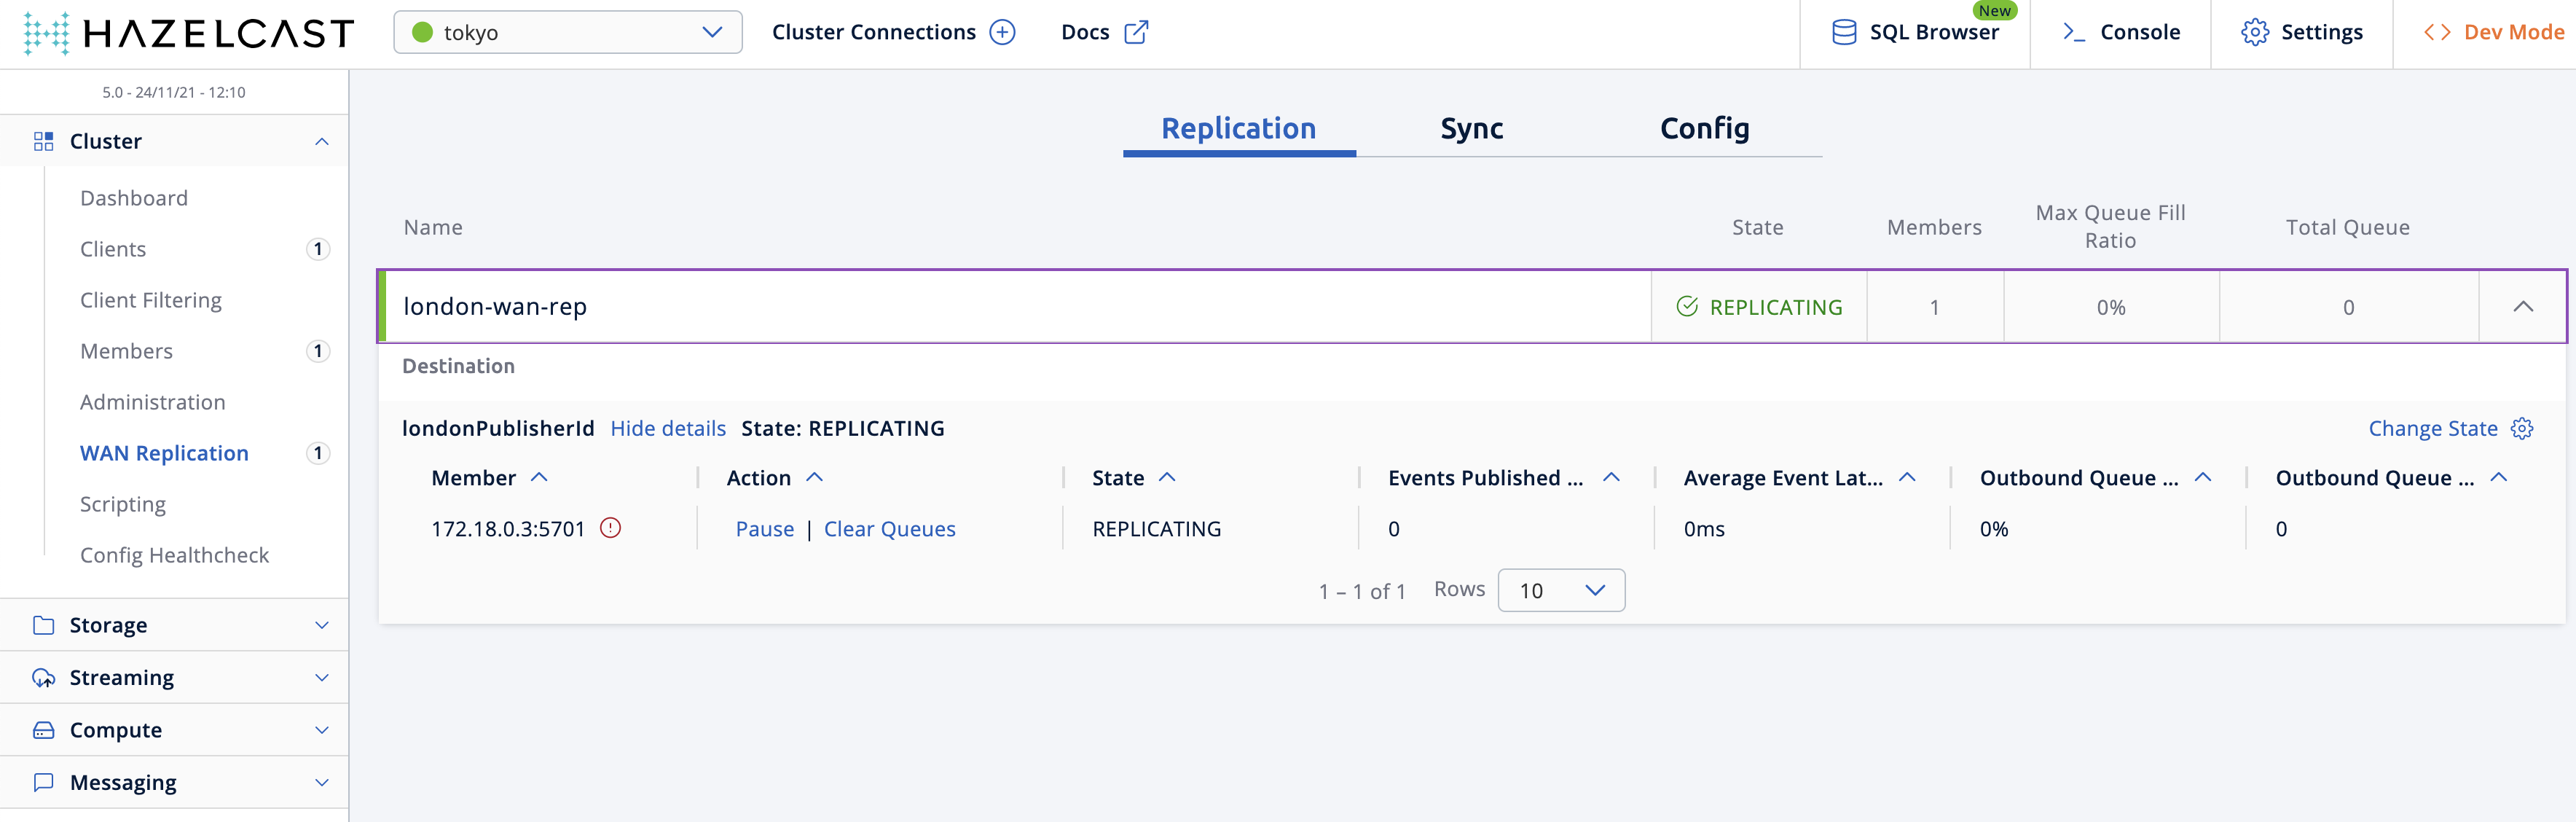
Step 4: Create a map
In this step you’ll use the SQL shell to create a map called cities for the Tokyo cluster, and add data to it.
-
In a new terminal, start the SQL shell for the Tokyo cluster, replacing the IP address if needed i.e. this example assumes Tokyo is running on
172.18.0.3:5701:docker run --network hazelcast-network -it --rm hazelcast/hazelcast-enterprise:5.7.0-SNAPSHOT hz-cli --targets [email protected]:5701 sql -
When you see the SQL shell prompt (
sql>), type the following command and press Enter to create the map:CREATE MAPPING cities (__key INT, country VARCHAR, city VARCHAR) TYPE IMap OPTIONS ('keyFormat'='int', 'valueFormat' = 'json-flat'); -
Next, add city data to the map as follows:
INSERT INTO cities VALUES (1,'Australia','Canberra'), (2,'Croatia','Zagreb'), (3,'Czech Republic','Prague'), (4,'England','London'), (5,'Turkey','Ankara'), (6,'United States','Washington, DC'); -
You can confirm the entries have been added to the map by running:
SELECT * FROM cities; -
You can also see the map and its entries in Management Center, using the SQL browser. Select Tokyo from the Cluster dropdown in the Top Menu.
-
Click Storage > Maps and check you can see the
citiesmap: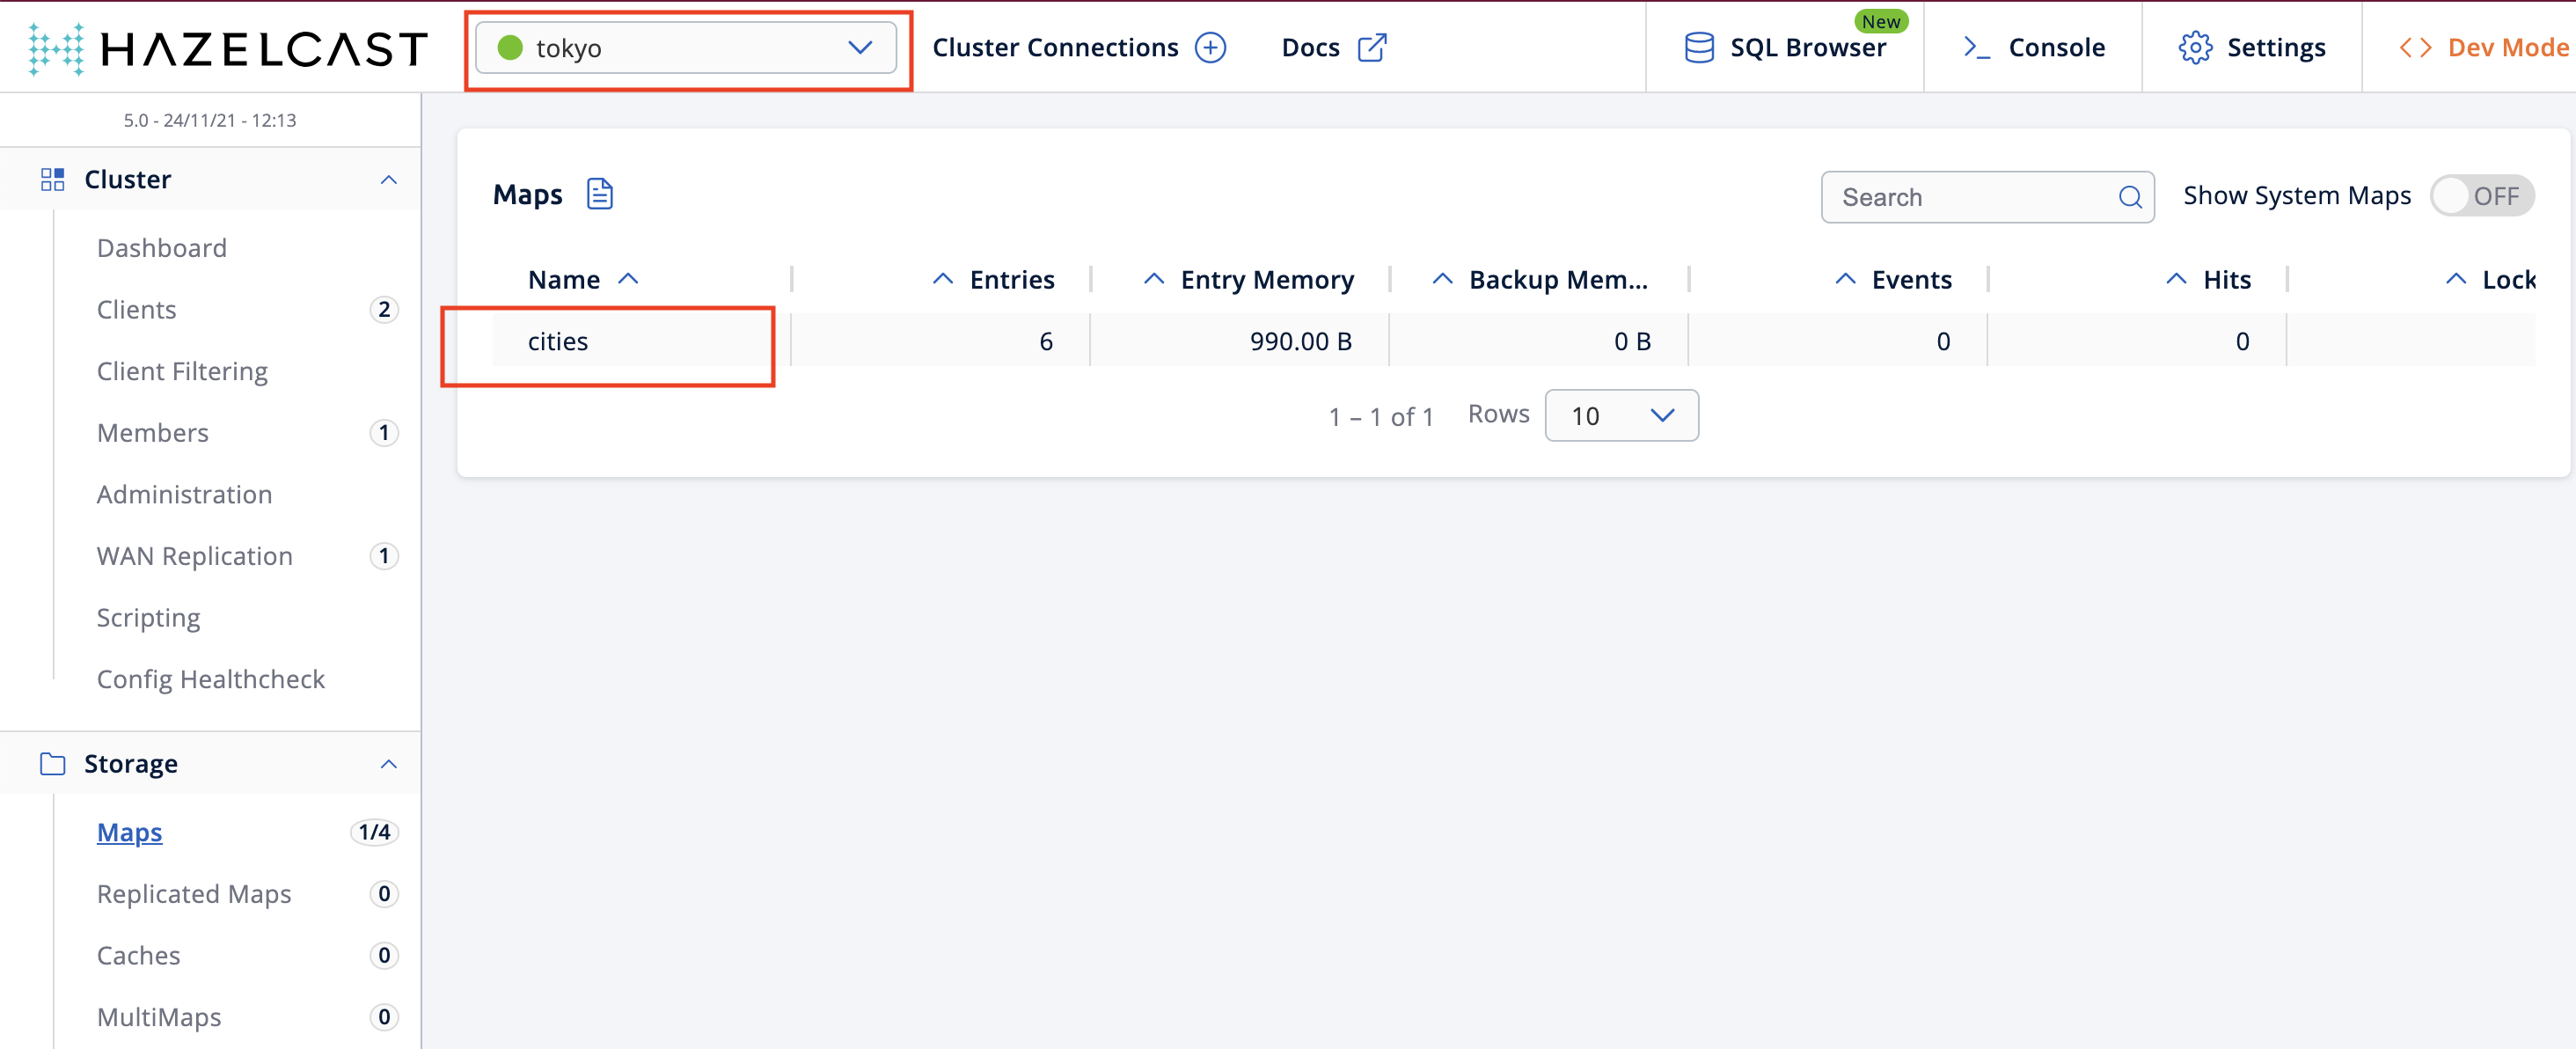
-
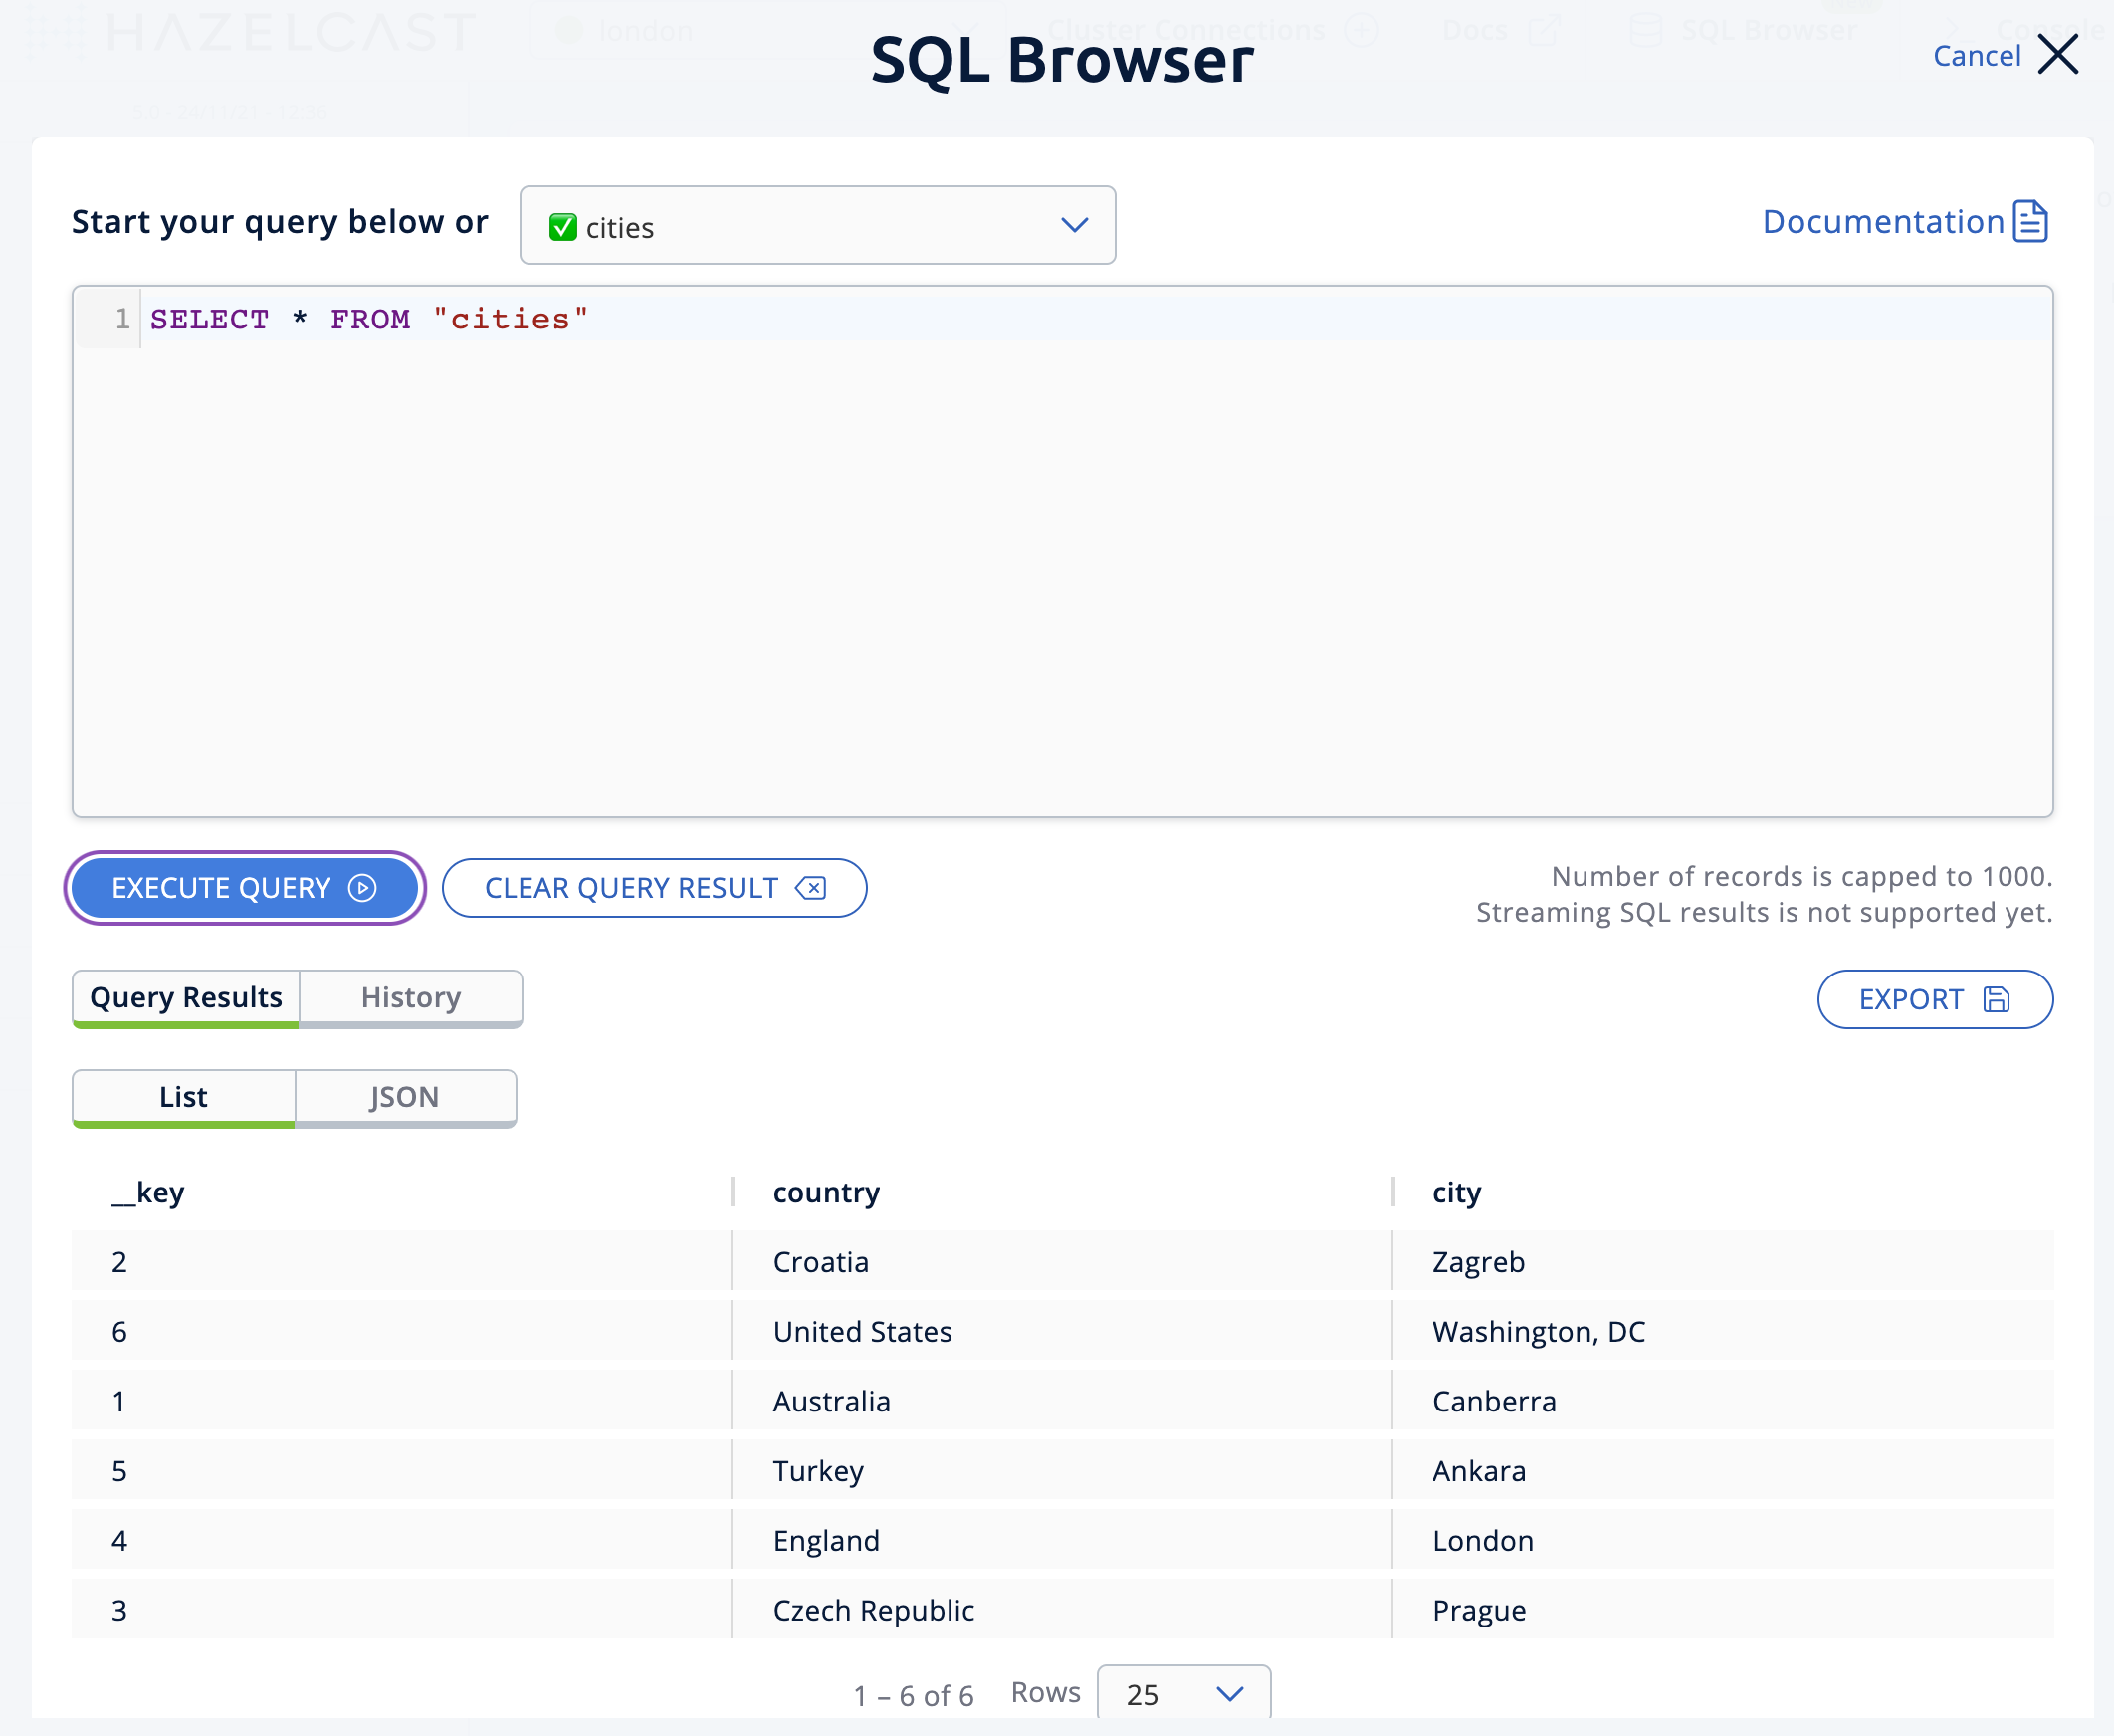
Click SQL Browser from the left-hand Tools menu and enter
SELECT * FROM cities;as your query. -
Click Execute Query and you should see your newly created map containing the city data.
-
Close the SQL browser.
Step 5: Verify the map is replicating
With WAN Replication enabled, your cities map and its data should be replicated from the active Tokyo cluster to the passive London cluster. This section shows you how to check this.
-
Select London from the Cluster dropdown in the Top Menu.
-
Click Storage > Maps and check you can see the
citiesmap. -
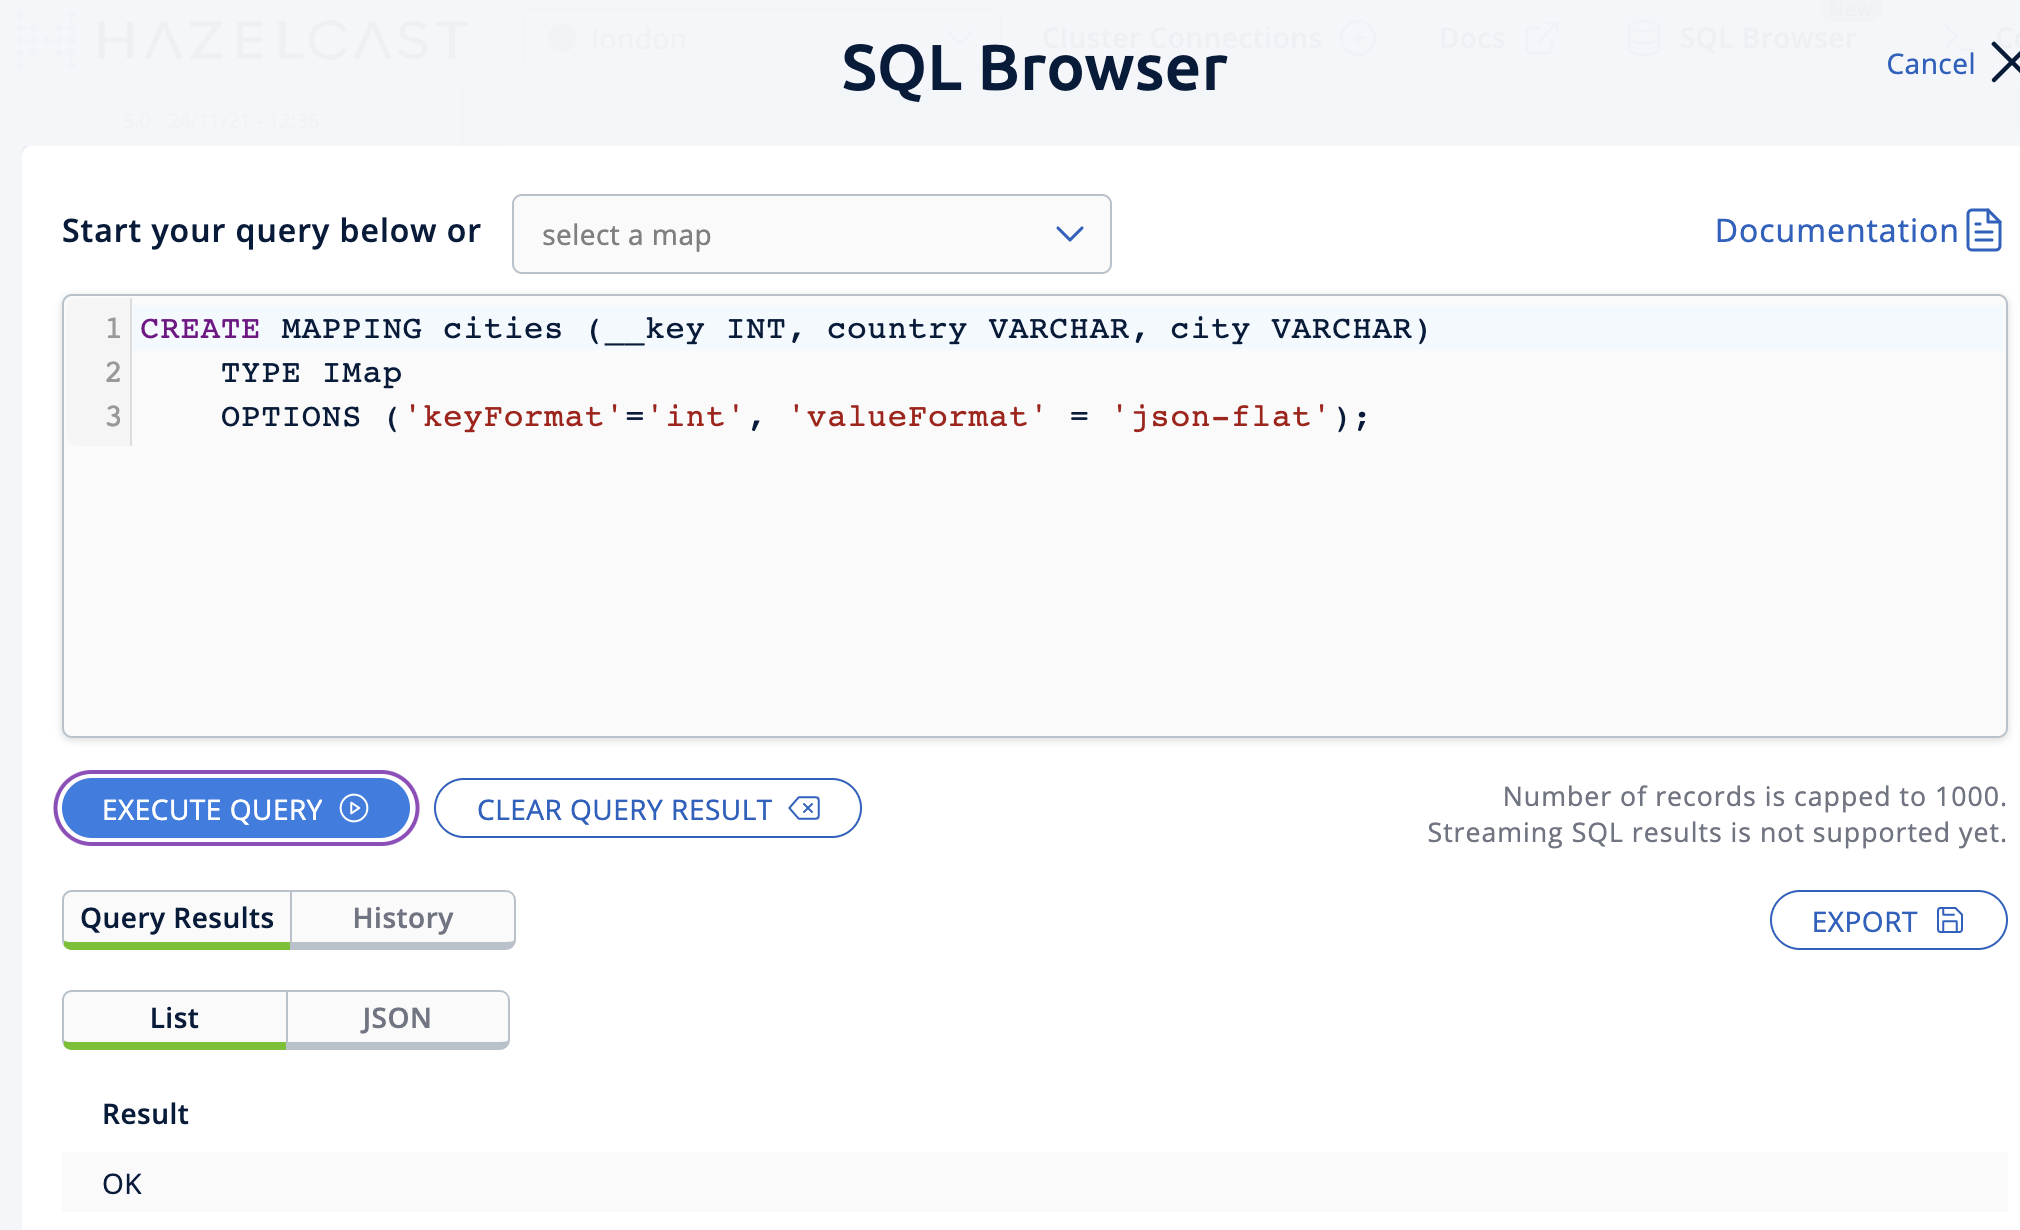
You can query the map entries on the
Londoncluster using the SQL browser in Management Center. First, you need to create a mapping so that theLondoncluster can read the map entries. Open the SQL Browser again and select the Connector Wizard. -
Enter the following query and click CONFIRM AND RUN:
CREATE MAPPING cities (__key INT, country VARCHAR, city VARCHAR) TYPE IMap OPTIONS ('keyFormat'='int', 'valueFormat' = 'json-flat'); -
You should see confirmation the mapping is successful and you can Close the Connector Wizard.
-
You can now enter the
SELECT * FROM cities;query into the SQL Browser and Execute to see the replicatedcitiesmap. -
Close the SQL Browser.
Step 6: Update a map entry on the active cluster
In this step, you’ll update an entry in the cities map on the active cluster (Tokyo) and verify the update is replicated to the passive one (London).
-
Select London from the Cluster dropdown in the Top Menu and open the SQL Browser again.
-
Choose cities in the select a map field and execute the default
SELECT * FROM "cities"query: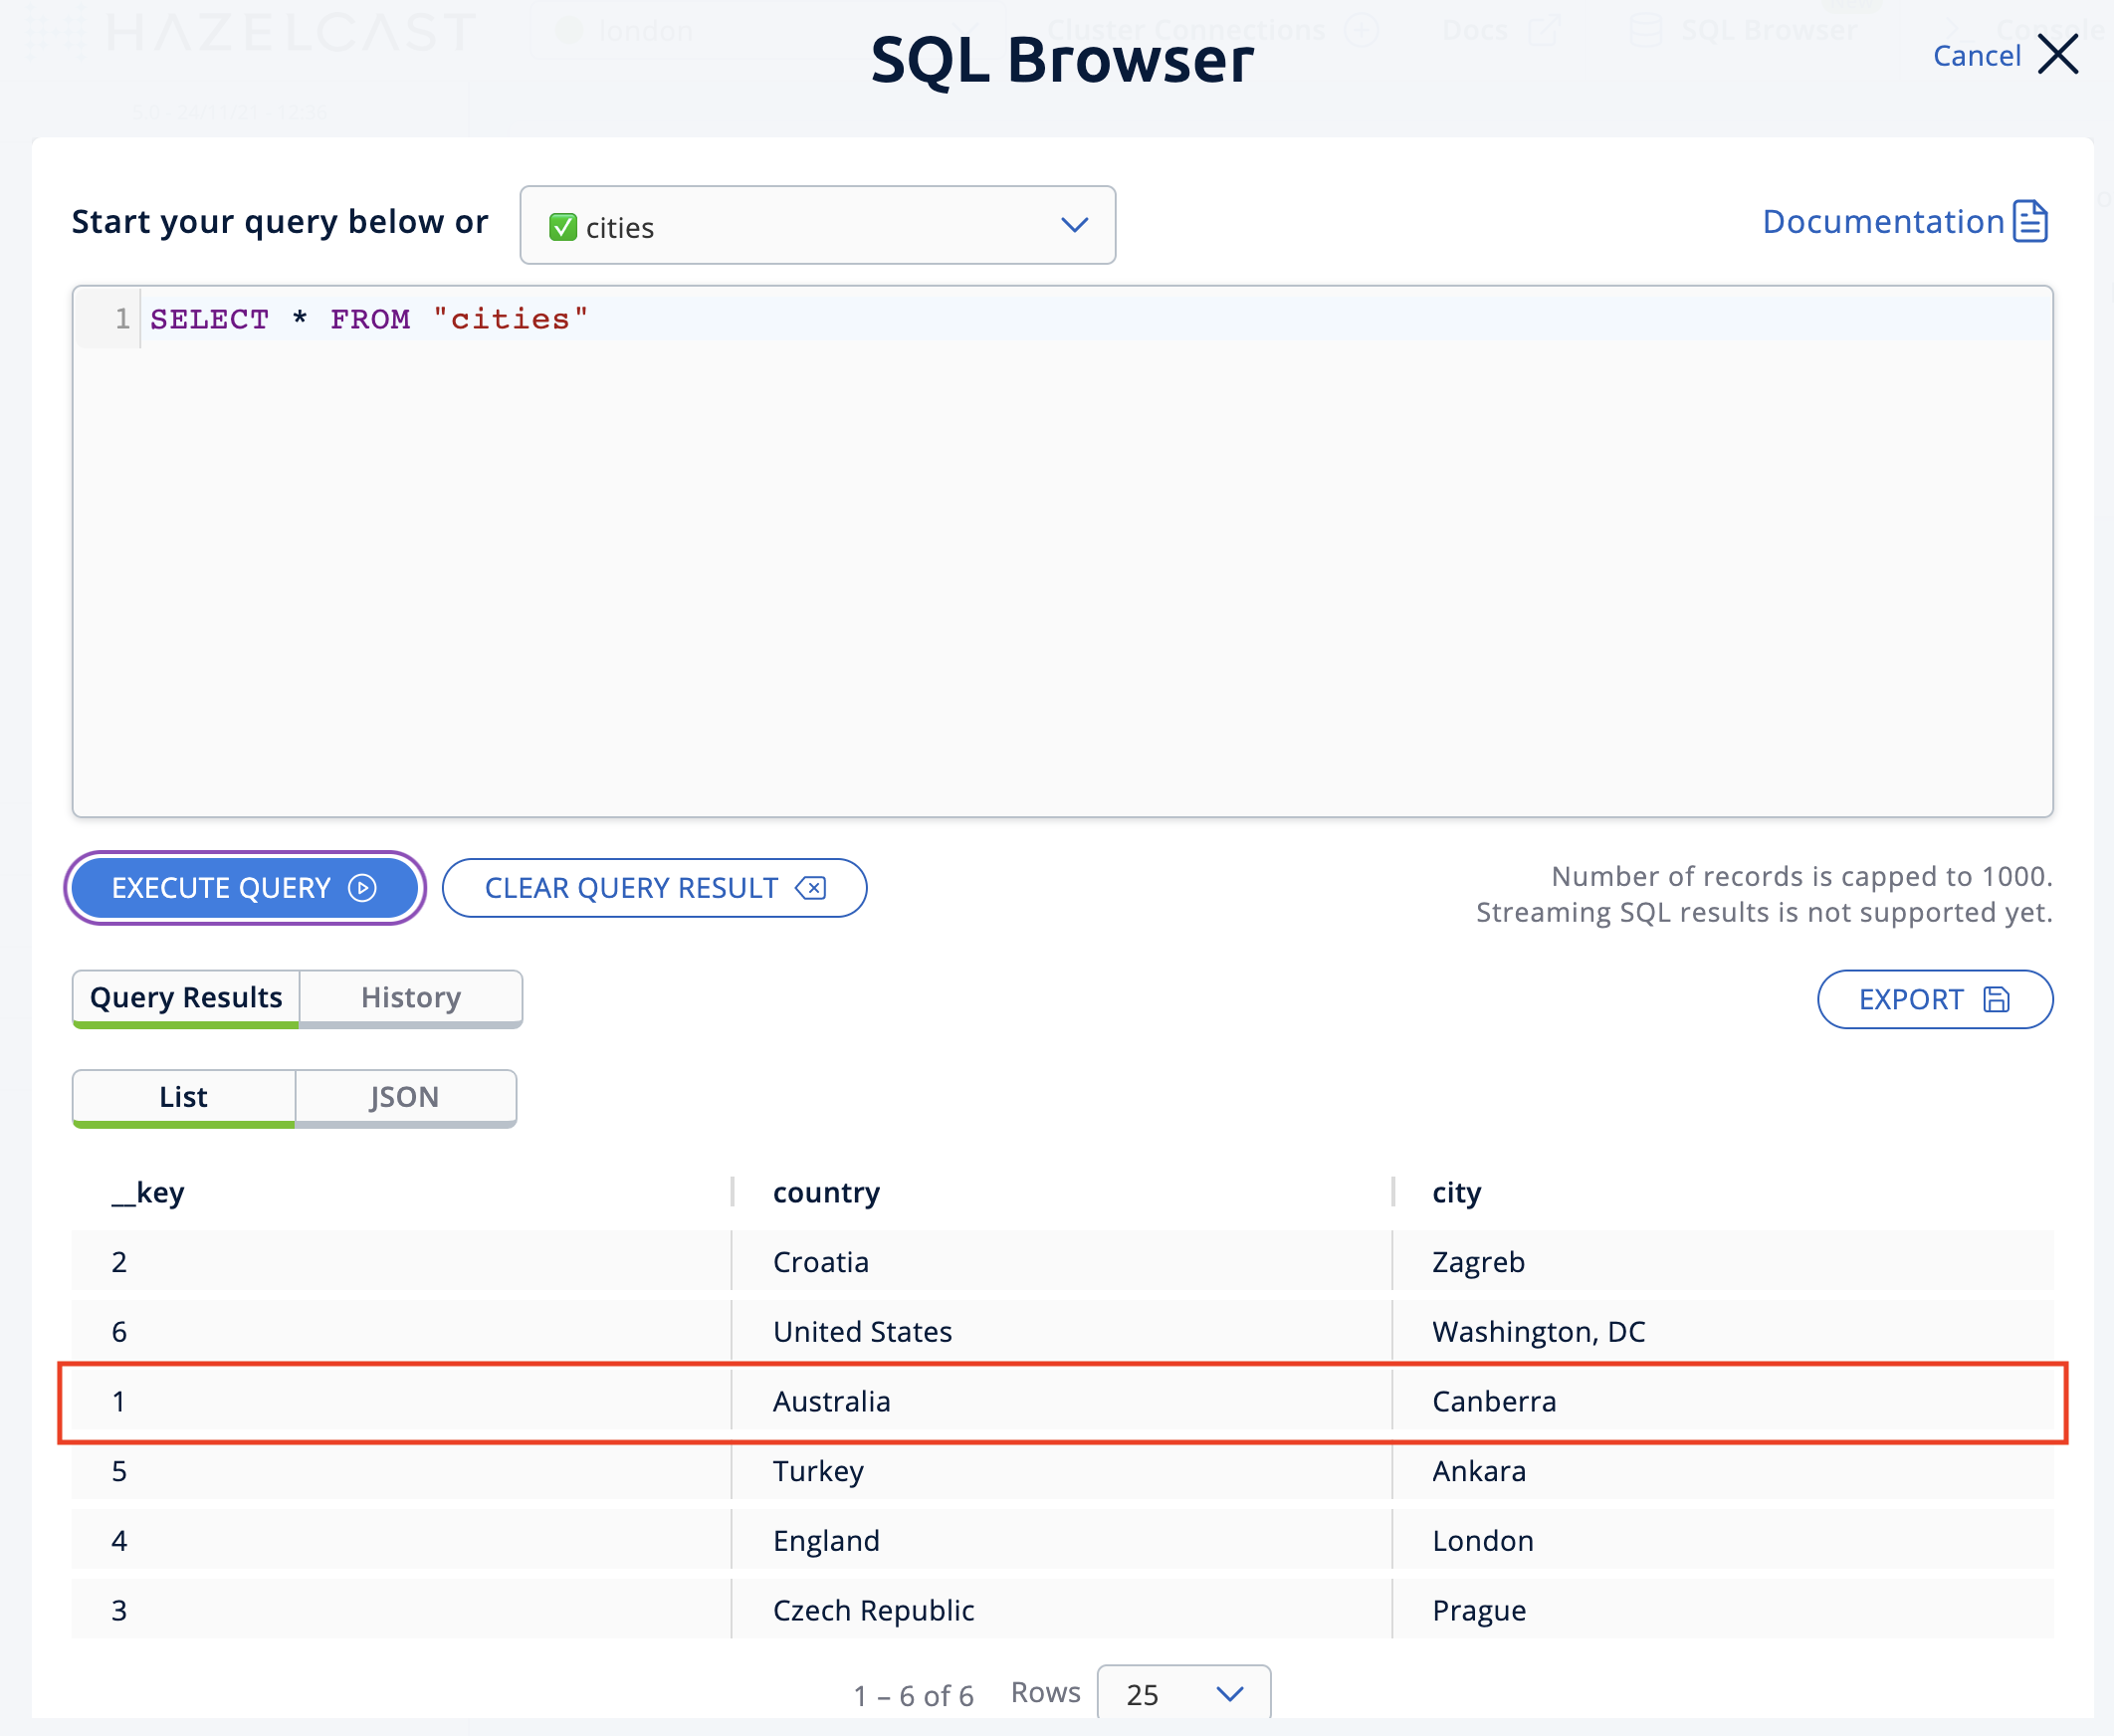
-
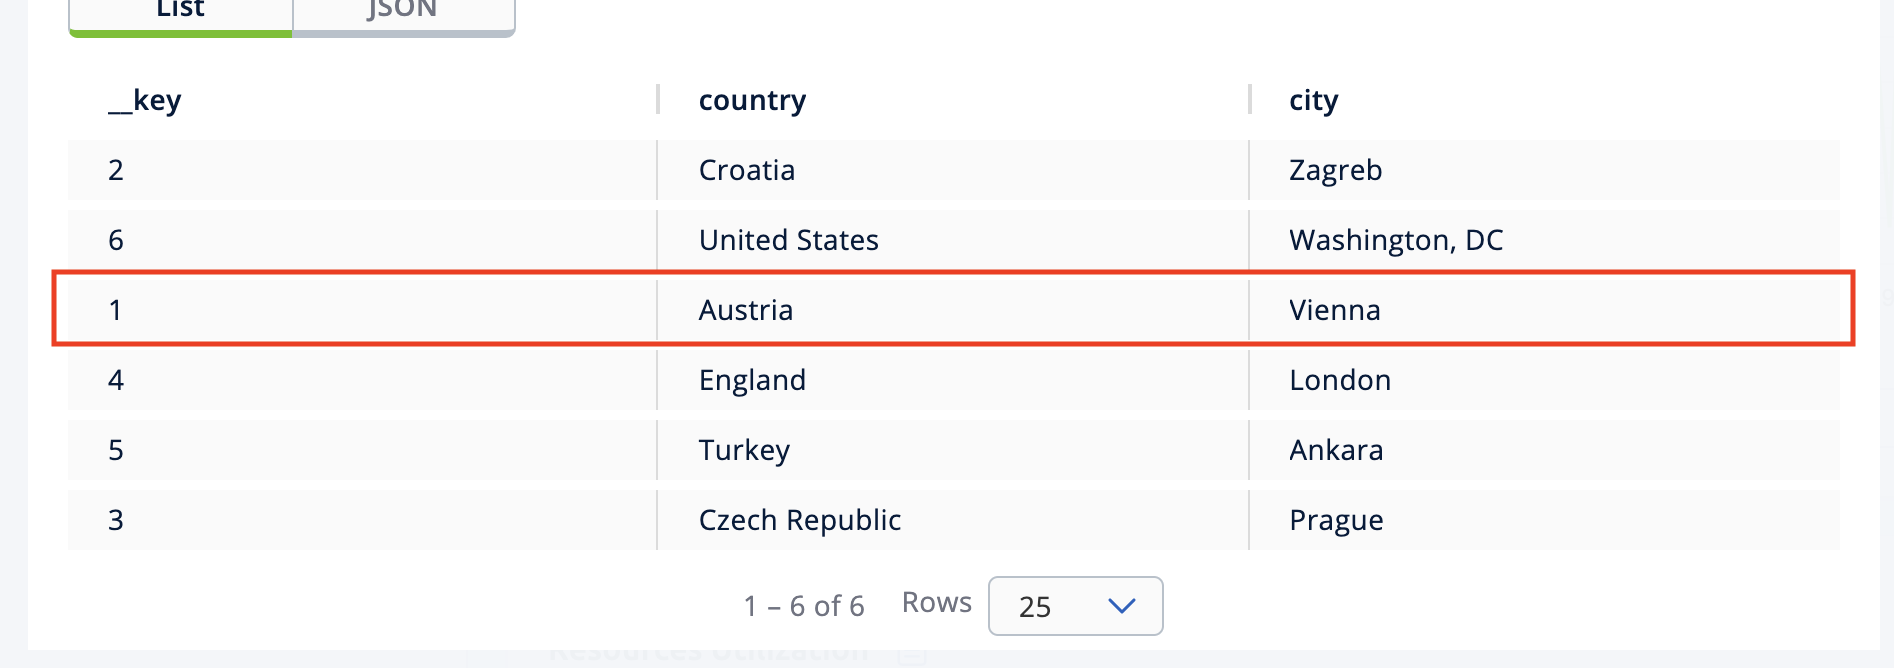
Update one of the map entries using the following query:
SINK INTO cities VALUES
(1, 'Austria', 'Vienna');
Execute the query and confirm the entry has changed (from Australia to Austria).
-
Close the SQL Browser and select the passive cluster (
London) from the Cluster dropdown. -
Open the SQL Browser again, choose cities in the select a map field and execute the default query.
-
You should be able to see the
1_key entry updated through replication.
In this step, you have seen that a data modification in the active cluster is immediately replicated to the passive cluster.
| As an additional learning step, you could try modifying the map data on the passive cluster and confirming the change is not replicated on the active cluster. |
Step 7: Shut down the cluster
As an alternative to terminating the clusters via the terminal, you can use Management Center to shut down clusters. For each cluster:
-
Go to Cluster > Administration, and select the Cluster State tab.
-
Click Shutdown and confirm the dialog that appears.
Summary
In this tutorial, you learned how to:
-
Start a passive Enterprise Edition cluster.
-
Start an active cluster with WAN Replication.
-
Create a map in the active cluster and confirm it’s replicated.
-
Modify some map entries in the active cluster and see the changes replicated in the passive cluster.
Next steps
Learn more about Synchronizing Data Across Clusters or follow another tutorial in this series: