REST API
| To get started with the REST API using Docker or Java, see Get started with REST API using Docker or Get Started with REST API using Java tutorials. |
Introduction
Hazelcast provides a REST API that allows you to access your data structures and cluster using HTTP/HTTPS protocols.
The REST API comes with an integrated Swagger UI for learning about the API and trying out API calls. For more info, see Access the Swagger UI.
|
Deprecation Notice for the Community Edition REST API
The Community Edition REST API has been deprecated and will be removed as of Hazelcast version 7.0. An improved Enterprise version of this feature is available and actively being developed. For more info, see Enterprise REST API |
Enable REST API
To use the REST API, you must have at least one running server instance with REST enabled. Enabling the REST API provides access to various endpoints, which means you can perform data retrieval, cluster and member actions, CP operations, configuration updates and more, by calling the appropriate endpoint.
You must configure security when you enable REST. You need to set up a security realm for the REST API. For more info, see Configure Authentication.
| After enabling the REST API, you must ensure the port for the API is not occupied, or the REST web server will not be able to start. |
REST service is disabled by default; to enable the REST service you must change the configuration as follows:
Change default port
The default port for the REST API is 8443. To change it to another port, update the rest configuration as shown in the following example.
| If the port is occupied, the server instance will fail to start. To run multiple server instances with REST on the same machine, each instance should have a separate configuration file with a unique port assigned to it. |
Enable authentication
You must secure REST API communication by configuring authentication and access control.
Configure Authentication
The REST API supports simple authentication based on username, password and user roles. For more info, see Simple Authentication. To configure simple authentication for the REST API, complete the following steps:
-
Enable REST API: You need to enable the REST API.
-
Define A Security Realm: You need to define the security realm within the REST configuration.
-
Enable Security: You need to enable security to use REST API.
-
Configure Rest Realm: You need to introduce a REST realm as the authentication mechanism. This realm will handle user authentication using a simple method based on username and password.
-
Setup Users and Roles: You should identify users and their roles within the REST realm.
-
Configure AccessControlService: To configure
AccessControlService, you should provide a factory class that creates an instance of the service.AccessControlServicedelegates authentication to the configured security realm. You can either create a custom factory class, or use the default implementation. For the default implementation, you can useDefaultAccessControlServiceFactoryto produceDefaultAccessControlService. Authorization decisions in this service are based on three predefined roles:reader: can make requests via GET endpoints only;writer: can make requests including GET, POST, and DELETE; andadmin: can make all requests and access admin-specific endpoints.
-
The following configuration example includes all the steps listed above:
<hazelcast>
    <rest enabled="true">
        <security-realm>restRealm</security-realm>
    </rest>
    <security enabled="true">
        <realms>
            <realm name="restRealm">
                <authentication>
                    <simple>
                        <user username="restuser" password="restpassword">
                            <role>admin</role>
                        </user>
                    </simple>
                </authentication>
                <access-control-service>
                    <factory-class-name>com.hazelcast.internal.rest.access.DefaultAccessControlServiceFactory</factory-class-name>
                </access-control-service>
            </realm>
        </realms>
    </security>
</hazelcast>
hazelcast:
rest:
enabled: true
security-realm: restRealm
security:
enabled: true
realms:
- name: restRealm
authentication:
simple:
users:
- username: 'restuser'
password: 'restpassword'
roles:
- admin
access-control-service:
factory-class-name: com.hazelcast.internal.rest.access.DefaultAccessControlServiceFactoryConfig config = new Config()
.setRestConfig(new RestConfig()
.setEnabled(true)
.setSecurityRealm("restRealm")
)
.setSecurityConfig(new SecurityConfig()
.setEnabled(true)
.addRealmConfig("restRealm", new RealmConfig()
.setSimpleAuthenticationConfig(
new SimpleAuthenticationConfig()
.addUser("restuser", "restpassword", "admin")
)
.setAccessControlServiceConfig(
new AccessControlServiceConfig()
.setFactoryClassName(DefaultAccessControlServiceFactory.class.getName())
)
)
);Authentication process
You must obtain a token to authenticate against the REST server. For more info, see Obtain a Token. The token request requires a username and password, and the role(s) assigned to the user are included in the token as claims. You can use the token until it expires. You need to use the token in the Authorization header for each subsequent REST API call to ensure the call is authorized appropriately. If a valid token is not included in the header, the API will respond with a 401 Unauthorized error.
HTTPS Support
You can configure TLS/SSL in the REST API. We use Spring Boot underneath to enable Spring web services, and the TLS/SSL related options correspond to the underlying Spring Boot TLS/SSL support capabilities.
The TLS/SSL configuration for the REST server is configured differently to the normal Hazelcast TLS/SSL configuration. For an example of the TLS/SSL configuration settings for REST, see the following code sample:
<hazelcast>
    <rest enabled="true">
        <ssl enabled="true">
            <client-auth>NEED</client-auth>
            <ciphers>TLS_RSA_WITH_AES_128_CBC_SHA, TLS_RSA_WITH_AES_128_CBC_SHA256</ciphers>
            <key-alias>myKeyAlias</key-alias>
            <key-password>myKeyPassword</key-password>
            <key-store>/path/to/keystore</key-store>
            <key-store-password>myKeyStorePassword</key-store-password>
            <key-store-type>JKS</key-store-type>
            <key-store-provider>SUN</key-store-provider>
            <trust-store>/path/to/truststore</trust-store>
            <trust-store-password>myTrustStorePassword</trust-store-password>
            <trust-store-type>JKS</trust-store-type>
            <trust-store-provider>SUN</trust-store-provider>
            <enabled-protocols>TLSv1.2, TLSv1.3</enabled-protocols>
            <protocol>TLS</protocol>
            <certificate>/path/to/certificate</certificate>
            <certificate-key>/path/to/certificate-key</certificate-key>
            <trust-certificate>/path/to/trust-certificate</trust-certificate>
            <trust-certificate-key>/path/to/trust-certificate-key</trust-certificate-key>
        </ssl>
    </rest>
</hazelcast>
hazelcast:
rest:
enabled: true
ssl:
enabled: true
client-auth: NEED
ciphers: TLS_RSA_WITH_AES_128_CBC_SHA, TLS_RSA_WITH_AES_128_CBC_SHA256
enabled-protocols: TLSv1.2, TLSv1.3
key-alias: myKeyAlias
key-password: myKeyPassword
key-store: /path/to/keystore
key-store-password: myKeyStorePassword
key-store-type: JKS
key-store-provider: SUN
trust-store: /path/to/truststore
trust-store-password: myTrustStorePassword
trust-store-type: JKS
trust-store-provider: SUN
protocol: TLS
certificate: /path/to/certificate
certificate-key: /path/to/certificate-key
trust-certificate: /path/to/trust-certificate
trust-certificate-key: /path/to/trust-certificate-keyConfig config = new Config()
.setRestConfig(
new RestConfig()
.setEnabled(true)
.setSsl(new RestConfig.Ssl()
.setEnabled(true)
.setClientAuth(RestConfig.Ssl.ClientAuth.NEED)
.setCiphers("TLS_RSA_WITH_AES_128_CBC_SHA, TLS_RSA_WITH_AES_128_CBC_SHA256")
.setEnabledProtocols("TLSv1.2, TLSv1.3")
.setKeyAlias("myKeyAlias")
.setKeyPassword("myKeyPassword")
.setKeyStore("/path/to/keystore")
.setKeyPassword("myKeyStorePassword")
.setKeyStoreType("JKS")
.setKeyStoreProvider("SUN")
.setTrustStore("/path/to/truststore")
.setTrustStorePassword("myTrustStorePassword")
.setTrustStoreType("JKS")
.setTrustStoreProvider("SUN")
.setProtocol("TLS")
.setCertificate("/path/to/certificate")
.setCertificatePrivateKey("/path/to/certificate-key")
.setTrustCertificate("/path/to/trust-certificate")
.setTrustCertificatePrivateKey("/path/to/trust-certificate-key")
)
);JWT-based authorization
After successfully authenticating by making a request to the token endpoint (see Obtain a Token), you will receive a short-lived JWT token with assigned role names as a claim for authorization checks in subsequent REST calls.
| A token issued by one member is not trusted by other members. |
Tokens are valid for 15 minutes by default. You can update this duration using the token-validity-seconds configuration element as shown in the following example:
<hazelcast>
    <rest enabled="true">
        <token-validity-seconds>300</token-validity-seconds>
    </rest>
</hazelcast>
hazelcast:
rest:
enabled: true
token-validity-seconds: 300Config config = new Config().setRestConfig(
new RestConfig()
.setEnabled(true)
.setTokenValidityDuration(Duration.of(300, ChronoUnit.SECONDS));
);Obtain a Token
To obtain a token, you must send a POST request to the token endpoint at /hazelcast/rest/api/v1/token. The request must include JSON-formatted username and password which you have already configured. If the authentication request is successful, you will get a response which contains a valid token for the duration period. For an example, see the following cURL request and response:
curl -X 'POST' \
  'http://localhost:8443/hazelcast/rest/api/v1/token' \
  -H 'Content-Type: application/json' \
  -d '{
  "username": "restuser",
  "password": "restpassword"
}'
If successful, the following response is returned:
{
  "token": "<JWT Token>"
}
If unsuccessful, the following response is returned:
{
  "statusCode": 401,
  "message": "Username/password provided don't match the expected values."
}
Access the Swagger UI
The REST API’s Swagger UI provides information about each endpoint, including required parameters, request and response structures and types, potential response codes, and example responses. You can use this UI to easily navigate and test different API calls directly from the interface. To access the Swagger UI:
-
Enable the REST API
-
Start a Hazelcast member
-
Go to
http://<host>:<port>/swagger-ui/index.html, replacing <host> and <port> with the running member’s IP address/hostname and port.
On successfully opening the UI, you will see a view such as the following:
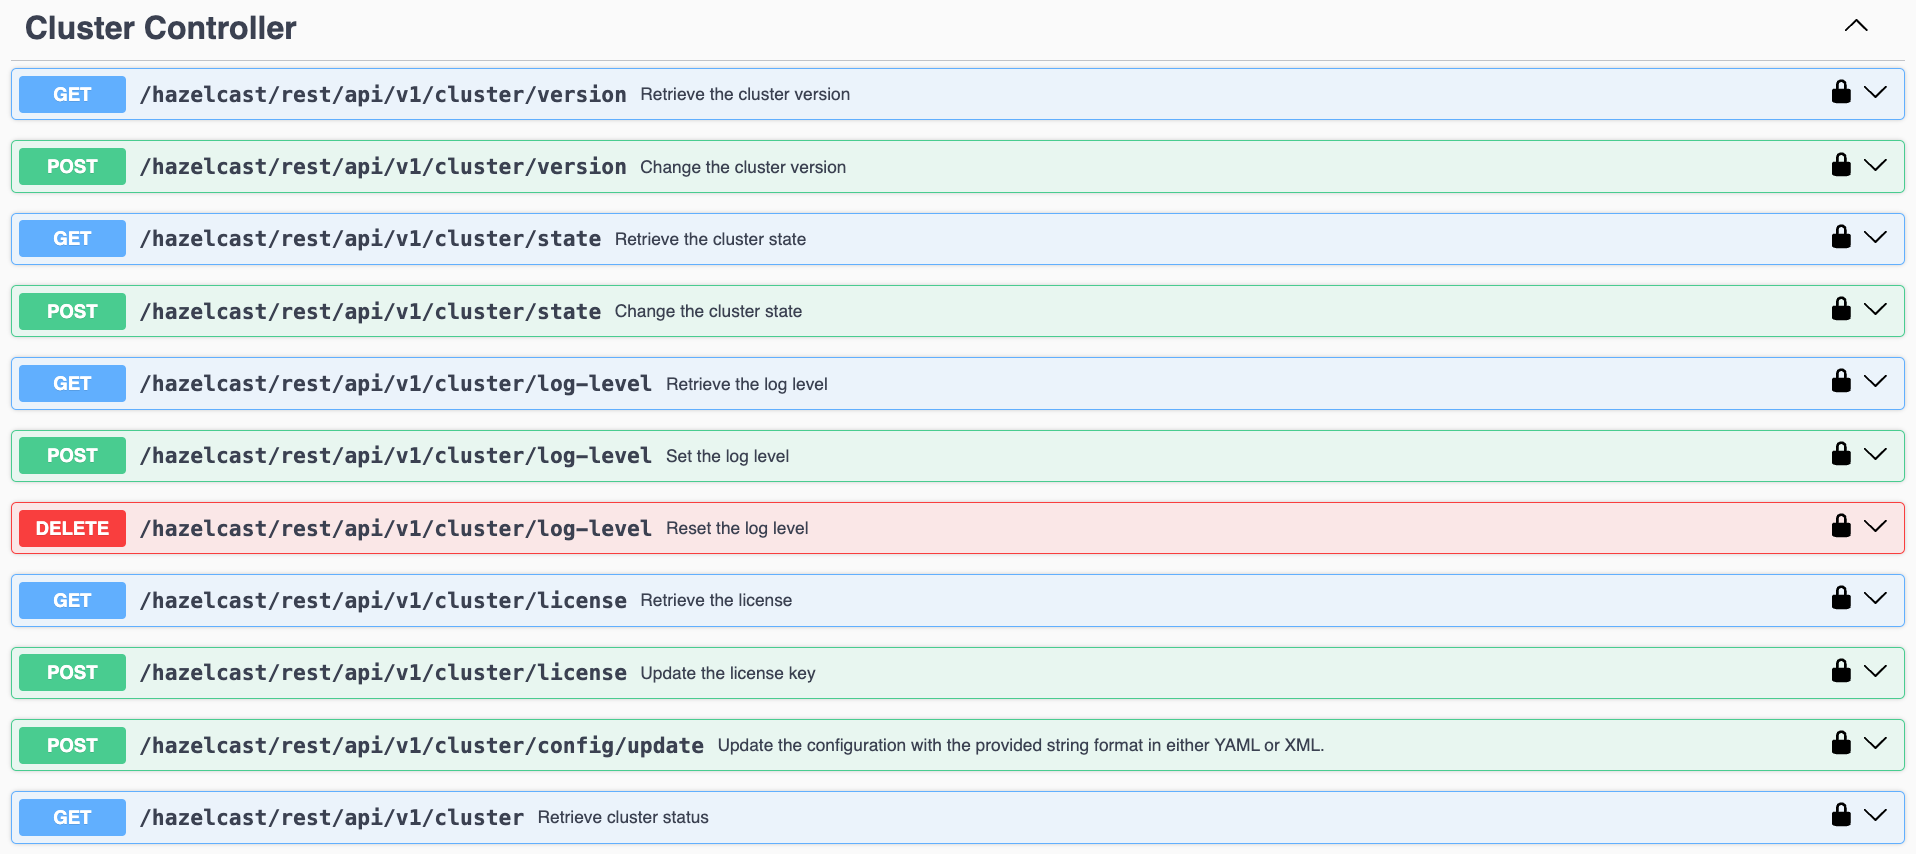
On the Swagger page, each endpoint is listed with a caret icon on the right side. Click the caret icon to expand the details for an endpoint. For this example, let’s expand the GET /hazelcast/rest/api/v1/cluster endpoint:
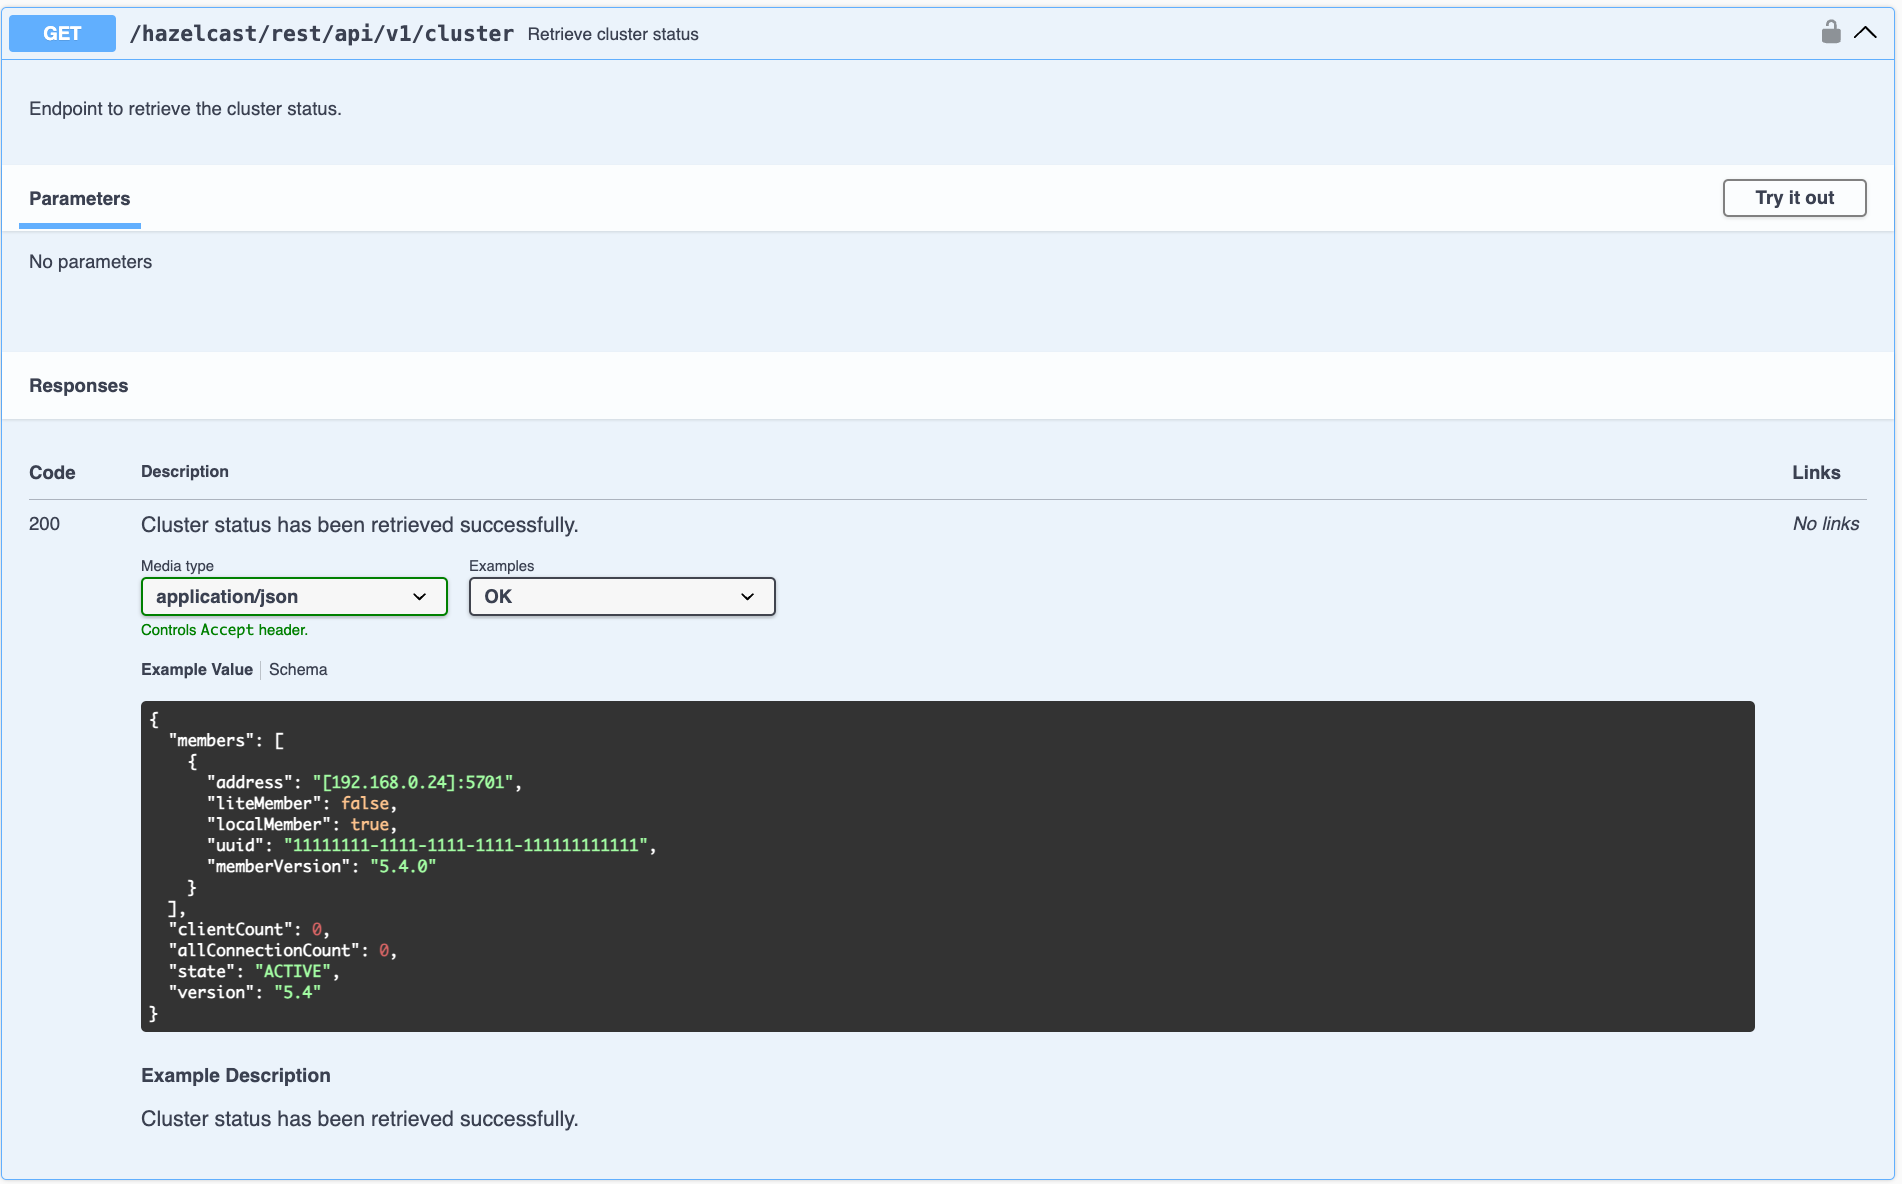
After expanding the endpoint, let’s send a request. Click Try it out. There are no parameters for this example but if there were you could enter these here. Click Execute to send the request.
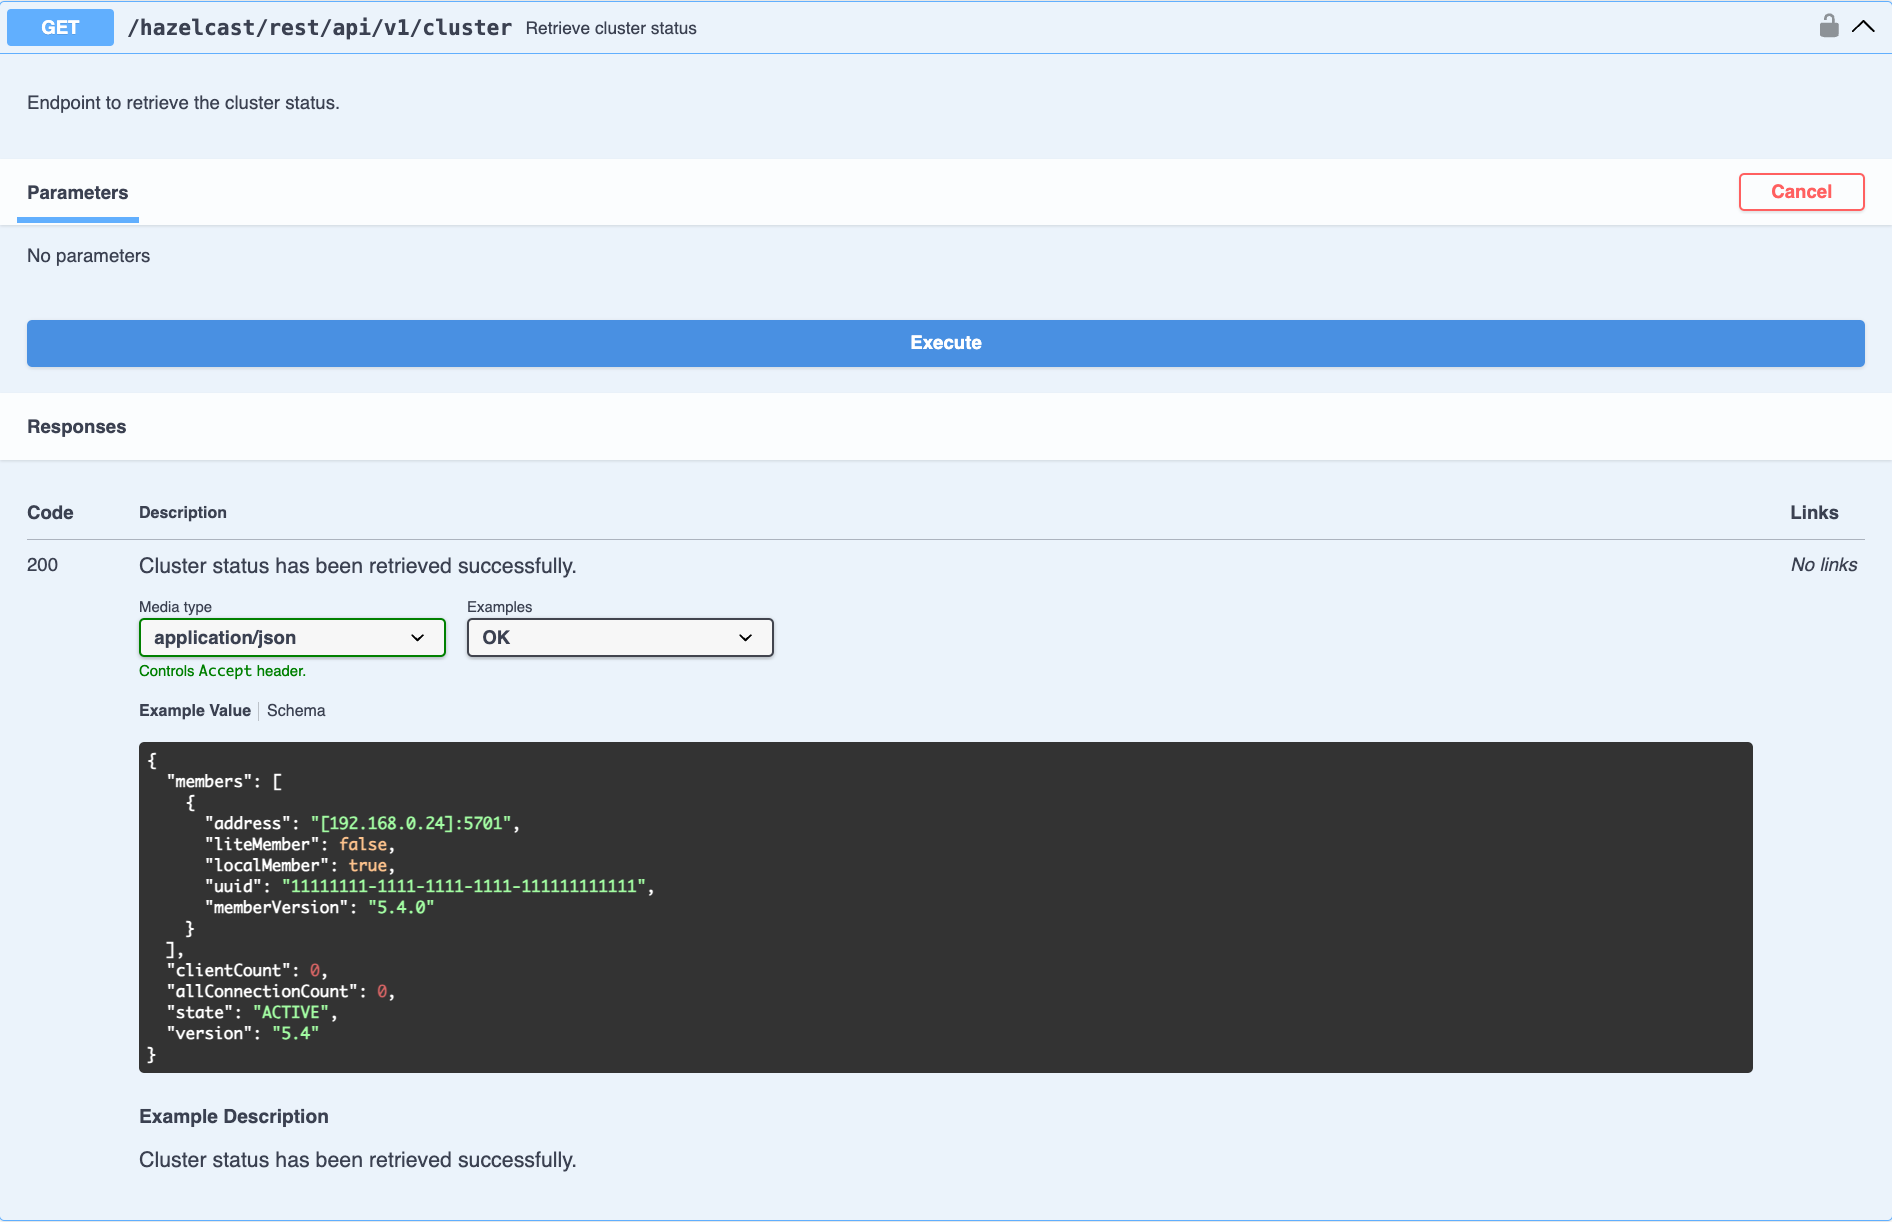
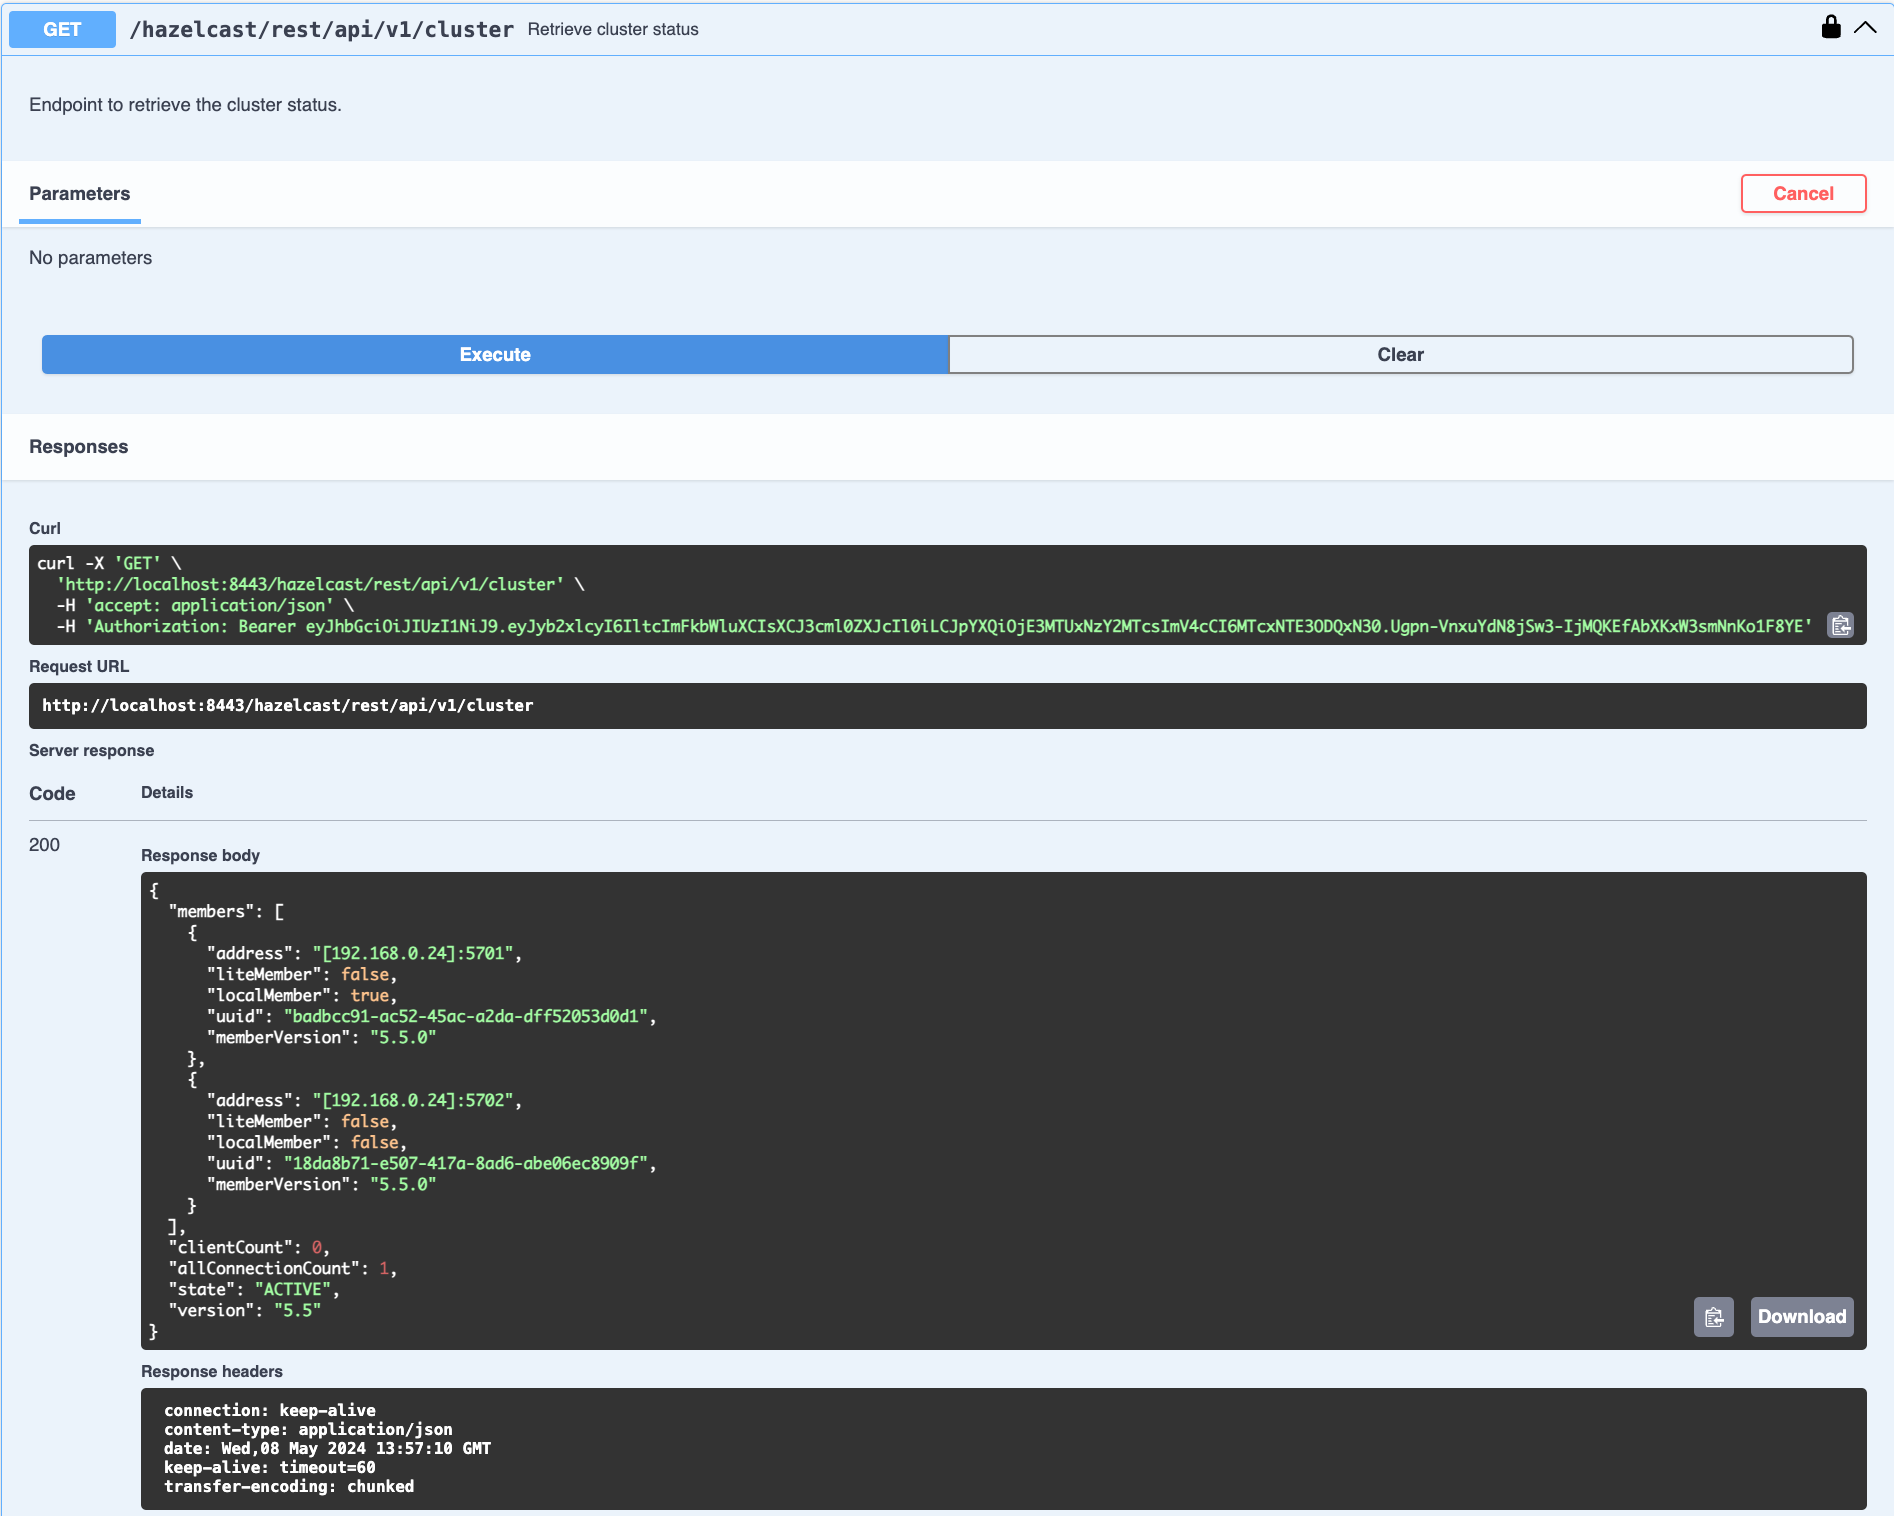
You can see the response in the Server response section shown below. You can also see the executed cURL command in the Curl section.
GET/POST/DELETE HTTP Request Examples
All REST API requests return one of the following response types:
-
Successful void/boolean response which does not have a body.
-
Successful response which returns data in JSON format. For example:
{
  "nodeState": "ACTIVE",
  "clusterState": "ACTIVE",
  "numberOfMembers": 1
}-
Error response in JSON format. For example:
{
  "statusCode": 400,
  "message": "Please provide a valid value."
}
Retrieve cluster status
You can send a GET request to the endpoint at /hazelcast/rest/api/v1/cluster to retrieve the cluster status. For example, using cURL:
curl -X 'GET' \
  'http://localhost:8443/hazelcast/rest/api/v1/cluster' \
  -H 'Authorization: Bearer <JWT Token>'
If successful the following response is returned:
{
  "members": [
    {
      "address": "[192.168.0.24]:5701",
      "liteMember": false,
      "localMember": true,
      "uuid": "3d8b9c35-a35f-461a-9e7f-d64e3f1f0f03",
      "memberVersion": "5.5.0"
    }
  ],
  "clientCount": 0,
  "allConnectionCount": 0,
  "state": "ACTIVE",
  "version": "5.5"
}
Retrieve cluster state
You can send a GET request to the endpoint at /hazelcast/rest/api/v1/cluster/state to retrieve the cluster state. For example, using cURL:
curl -X 'GET' \
  'http://localhost:8443/hazelcast/rest/api/v1/cluster/state' \
  -H 'Authorization: Bearer <JWT Token>'
If successful the following response is returned:
{
  "state": "ACTIVE"
}
Change cluster state
You can send a POST request to the endpoint at /hazelcast/rest/api/v1/cluster/state to change the cluster state. You must provide the new state within the request body in JSON format; valid states are ACTIVE, NO_MIGRATION, FROZEN, PASSIVE.
Example request using cURL:
curl -X 'POST' \
  'http://localhost:8443/hazelcast/rest/api/v1/cluster/state' \
  -H 'Authorization: Bearer Bearer <JWT Token>' \
  -H 'Content-Type: application/json' \
  -d '{
  "state": "PASSIVE"
}'-
If successful, it will return a
200response without body. -
If the provided state is not a valid cluster state, it will return a
400response with a message. For example:
{
  "statusCode": 400,
  "message": "FOOBAR is not a valid ClusterState. Please provide one of the valid values: [ACTIVE, NO_MIGRATION, FROZEN, PASSIVE]"
}
Destroy a CP Group
You can send a DELETE request to the endpoint at /hazelcast/rest/api/v1/cp/groups/{group-name} to unconditionally destroy the given active CP group. For example, using cURL:
curl -X 'DELETE' \
  'http://localhost:8443/hazelcast/rest/api/v1/cp/groups/my-group' \
-H 'Authorization: Bearer Bearer <JWT Token>'-
If successful, it will return a
200response without body. -
If you try to destroy METADATA group, it will return a
400response:
{
  "statusCode": 400,
  "message": "Meta data CP group [METADATA] cannot be destroyed!"
}-
If CP subsystem is not enabled, it will return a
500response:
{
  "statusCode": 500,
  "message": "CP Subsystem is not enabled!"
}
Update dynamic configuration using REST
You can use the /hazelcast/rest/api/v1/config/update REST endpoint to change dynamic server configurations (for more info, see Dynamic Configuration for Members). With dynamic configuration you can dynamically change existing configurations, or add new configurations for Hazelcast data structures.
| For a short tutorial showing how to dynamically add a data structure using the REST API, see Dynamic Configuration using the REST API. |
The endpoint requires that you send a XML/YAML server configuration file with the required changes. The response will be two lists in JSON format:
-
The first
addedConfigslist includes the newly added configuration among the configurations sent to the server. -
The second
ignoredConfigslist includes ignored configurations which were in the sent configuration list but could not be applied by the server. These could include duplicates, or static configurations (which cannot be applied dynamically).
Whether a dynamic configuration can be applied or not depends on the type of request. For some updates, you can change configuration parameters for an existing configuration; for other updates, you cannot change the configuration dynamically. For more detail on which configuration parameters can be changed dynamically and which cannot, see Dynamic Configuration for Members.
Let’s walk through some example requests and responses.
Add new MapConfig using XML configuration
Here is an example POST request for adding a new MapConfig for my-map:
curl -X 'POST' \
  'http://localhost:8443/hazelcast/rest/api/v1/config/update' \
  -H 'Content-Type: text/plain' \
  -d '
        <hazelcast xmlns="http://www.hazelcast.com/schema/config">
                       <map name="my-map">
                           <in-memory-format>BINARY</in-memory-format>
                           <statistics-enabled>true</statistics-enabled>
                           <backup-count>2</backup-count>
                       </map>
        </hazelcast>
        '
This request creates a configuration for a new map named my-map. The in-memory format is set to BINARY, statistics are enabled, and the backup count is set to 2.
In response to this request we should receive a response body such as:
{
  "addedConfigs": [
    {
      "sectionName": "map",
      "configName": "my-map"
    }
  ],
  "ignoredConfigs": []
}
As the response indicates, a new map config is added to the map section with the name my-map and the requested dynamic configurations are applied.
Add new MapConfig using YAML configuration
Here is an example POST request for adding a new MapConfig for my-map-yaml using YAML configuration:
curl -X 'POST' \
  'http://localhost:49567/hazelcast/rest/api/v1/cluster/config/update' \
  -H 'accept: application/json' \
  -H 'Authorization: Bearer eyJhbGciOiJIUzI1NiJ9.eyJyb2xlcyI6IltcImFkbWluXCJdIiwiaWF0IjoxNzE3NTk3MDM1LCJleHAiOjE3MTc1OTc5MzV9.pYtBEvBy2KxrRfFOMSK3k9kS37SayEPCSEcYJlMpHMc' \
  -H 'Content-Type: application/json' \
  -d 'hazelcast:
  map:
    my-map-yaml:
      in-memory-format: BINARY
      statistics-enabled: true
      backup-count: 2'
This request creates a new map config named my-map-yaml. The in-memory format is set to BINARY, statistics are enabled, and the backup count is set to 2.
In response to this request we should receive a response body such as:
{
  "addedConfigs": [
    {
      "sectionName": "map",
      "configName": "my-map-yaml"
    }
  ],
  "ignoredConfigs": []
}
As the response shows, a new map config is added for map with name my-map-yaml and all the requested dynamic configurations are applied.
Add new conflicting MapConfig for an existing map
If you try to add a config with the same map name and a different configuration, then you get a 400 response code indicating an invalid configuration, because you cannot change an existing map configuration. This example would look like the following:
curl -X 'POST' \
  'http://localhost:8443/hazelcast/rest/api/v1/config/update' \
  -H 'Content-Type: text/plain' \
  -d '
        <hazelcast xmlns="http://www.hazelcast.com/schema/config">
                       <map name="my-map">
                           <statistics-enabled>false</statistics-enabled>
                       </map>
        </hazelcast>
        '
The response has a statusCode of 400, and the response body adds further detail. including the explanation as there is already a conflicting configuration 'MapConfig{name='my-map', …:
{
  "statusCode": 400,
  "message": "Cannot add a dynamic configuration 'MapConfig{name='my-map', inMemoryFormat='BINARY', metadataPolicy=CREATE_ON_UPDATE, backupCount=1, asyncBackupCount=0, timeToLiveSeconds=0, maxIdleSeconds=0, readBackupData=false, evictionConfig=EvictionConfig{size=2147483647, maxSizePolicy=PER_NODE, evictionPolicy=NONE, comparatorClassName=null, comparator=null}, merkleTree=MerkleTreeConfig{enabled=null, depth=10}, eventJournal=EventJournalConfig{enabled=false, capacity=10000, timeToLiveSeconds=0}, hotRestart=HotRestartConfig{enabled=false, fsync=false}, dataPersistenceConfig=DataPersistenceConfig{enabled=false, fsync=false}, nearCacheConfig=null, mapStoreConfig=MapStoreConfig{enabled=false, className='null', factoryClassName='null', writeDelaySeconds=0, writeBatchSize=1, implementation=null, factoryImplementation=null, properties={}, initialLoadMode=LAZY, writeCoalescing=true, offload=true}, mergePolicyConfig=MergePolicyConfig{policy='com.hazelcast.spi.merge.PutIfAbsentMergePolicy', batchSize=100}, wanReplicationRef=null, entryListenerConfigs=null, indexConfigs=null, attributeConfigs=null, splitBrainProtectionName=null, queryCacheConfigs=null, cacheDeserializedValues=INDEX_ONLY, statisticsEnabled=false, entryStatsEnabled=false, tieredStoreConfig=TieredStoreConfig{enabled=false, memoryTierConfig=MemoryTierConfig{capacity=256 MEGABYTES}, diskTierConfig=DiskTierConfig{enabled=false, deviceName='default-tiered-store-device'}}, partitioningAttributeConfigs=null, userCodeNamespace=null}' as there is already a conflicting configuration 'MapConfig{name='my-map', inMemoryFormat='BINARY', metadataPolicy=CREATE_ON_UPDATE, backupCount=2, asyncBackupCount=0, timeToLiveSeconds=0, maxIdleSeconds=0, readBackupData=false, evictionConfig=EvictionConfig{size=2147483647, maxSizePolicy=PER_NODE, evictionPolicy=NONE, comparatorClassName=null, comparator=null}, merkleTree=MerkleTreeConfig{enabled=null, depth=10}, eventJournal=EventJournalConfig{enabled=false, capacity=10000, timeToLiveSeconds=0}, hotRestart=HotRestartConfig{enabled=false, fsync=false}, dataPersistenceConfig=DataPersistenceConfig{enabled=false, fsync=false}, nearCacheConfig=null, mapStoreConfig=MapStoreConfig{enabled=false, className='null', factoryClassName='null', writeDelaySeconds=0, writeBatchSize=1, implementation=null, factoryImplementation=null, properties={}, initialLoadMode=LAZY, writeCoalescing=true, offload=true}, mergePolicyConfig=MergePolicyConfig{policy='com.hazelcast.spi.merge.PutIfAbsentMergePolicy', batchSize=100}, wanReplicationRef=null, entryListenerConfigs=null, indexConfigs=null, attributeConfigs=null, splitBrainProtectionName=null, queryCacheConfigs=null, cacheDeserializedValues=INDEX_ONLY, statisticsEnabled=true, entryStatsEnabled=false, tieredStoreConfig=TieredStoreConfig{enabled=false, memoryTierConfig=MemoryTierConfig{capacity=256 MEGABYTES}, diskTierConfig=DiskTierConfig{enabled=false, deviceName='default-tiered-store-device'}}, partitioningAttributeConfigs=null, userCodeNamespace=null}'"
}
Add new MapConfig without configuration change for an existing map
As detailed above, you cannot add a map configuration with the same map name. If you send an update request with the same configuration and map name, this request will be ignored as there is no change. This example would look like the following:
curl -X 'POST' \
  'http://localhost:8443/hazelcast/rest/api/v1/config/update' \
  -H 'Content-Type: text/plain' \
  -d '
        <hazelcast xmlns="http://www.hazelcast.com/schema/config">
                       <map name="my-map">
                           <in-memory-format>BINARY</in-memory-format>
                           <statistics-enabled>true</statistics-enabled>
                           <backup-count>2</backup-count>
                       </map>
        </hazelcast>
        '
This request receives an OK (200) response code and the following body:
{
  "addedConfigs": [],
  "ignoredConfigs": [
    {
      "sectionName": "map",
      "configName": "my-map"
    }
  ]
}
As the response confirms, no configs are added and the provided config is ignored.
Add new MapConfig with duplicate config
You can send an update request with the same configuration and map name, but this update will be ignored because there is no change. This example would look like the following:
curl -X 'POST' \
  'http://localhost:8443/hazelcast/rest/api/v1/config/update' \
  -H 'Content-Type: text/plain' \
  -d '
        <hazelcast xmlns="http://www.hazelcast.com/schema/config">
                       <map name="my-duplicate-map">
                           <statistics-enabled>true</statistics-enabled>
                       </map>
                       <map name="my-duplicate-map">
                           <statistics-enabled>true</statistics-enabled>
                       </map>
        </hazelcast>
        '
This request receives an OK (200) response code and the following body:
{
  "addedConfigs": [
    {
      "sectionName": "map",
      "configName": "my-duplicate-map"
    }
  ],
  "ignoredConfigs": []
}
As you can see from the response, only one MapConfig is added because the duplicate has exactly the same configuration.
Try adding non-dynamic static configuration
You can try to change a static configuration and you will observe that it is ignored silently. An example using cluster-name would look like the following:
curl -X 'POST' \
  'http://localhost:8443/hazelcast/rest/api/v1/config/update' \
  -H 'Content-Type: text/plain' \
  -d '
        <hazelcast xmlns="http://www.hazelcast.com/schema/config">
                       <instance-name>newInstanceName</instance-name>
        </hazelcast>
        '
This request receives an OK (200) response code and the following body, with no entries under either the added or ignored section:
{
  "addedConfigs": [],
  "ignoredConfigs": []
}