What You’ll Learn
In this tutorial, you will deploy two Spring Boot applications that use Hazelcast as a HTTP session store and hence share sessions among each other.
Spring Session manages users' session information and supports clustered sessions rather than an application container-specific solution only. That is, more than one application instance can use the same store for user sessions. You can find more details in the Spring Session Documentation.
Enable HazelcastHttpSession
Before using Hazelcast session repository, let’s add the required dependencies:
<dependency>
    <groupId>com.hazelcast</groupId>
    <artifactId>hazelcast</artifactId>
    <version>${hazelcast.version}</version>
</dependency>
<dependency>
    <groupId>org.springframework.boot</groupId>
    <artifactId>spring-boot-starter-web</artifactId>
</dependency>
<dependency>
    <groupId>com.hazelcast.spring</groupId>
    <artifactId>hazelcast-spring-session</artifactId>
</dependency>
Now configure the app to use Hazelcast as HTTP session store:
@Configuration
@EnableHazelcastHttpSession
class SessionConfiguration {
    // ...
}
Alternatively, you may extend HazelcastHttpSessionConfiguration to have more advanced configurations
rather than using annotation based configuration:
@Configuration
class SessionConfiguration extends HazelcastHttpSessionConfiguration {
    // ...
}
Create a Hazelcast Instance Bean
After enabling Hazelcast HTTP Session, you need to provide a Hazelcast instance to be used by the session repository. This instance can be either a Hazelcast client or an embedded Hazelcast instance. You can see the details of client and embedded modes here on the documentation.
    @Bean
    @ConditionalOnExpression("${guide.useClientServer:false} == false")
    public HazelcastInstance hazelcastInstance() {
        Config config = new Config();
        config.getNetworkConfig().getJoin().getTcpIpConfig()
              .setEnabled(true)
              .addMember("127.0.0.1");

        return Hazelcast.newHazelcastInstance(applySerializationConfig(config));
} @Bean
@ConditionalOnExpression("${guide.useClientServer:false}")
public HazelcastInstance hazelcastClient() {
ClientConfig clientConfig = new ClientConfig();
clientConfig.getNetworkConfig().addAddress("127.0.0.1:5701");
return HazelcastClient.newHazelcastClient(applySerializationConfig(clientConfig));
}
You need to have a running Hazelcast cluster before starting a client. Also, to use all
session repository functionalities (e.g. findByPrincipalName), Hazelcast members in a cluster
must have the map configuration shown in the Embedded tab before they start. See the next
section for starting a Hazelcast cluster.
|
Start a Hazelcast Cluster
If you use Hazelcast client, you need to have a running cluster first. You can start Hazelcast members with one of the following methods:
You can easily create a Hazelcast cluster on Hazelcast Cloud with just a few clicks. See Getting Started documentation for details.
You can start members inside Docker containers. See the documentation for details.
$ docker run hazelcast/hazelcast:$HAZELCAST_VERSIONYou can start members via Hazelcast CLI. See the documentation for the installation instructions and details.
$ hz startYou can start members via start script. See the documentation for the installation instructions and details.
$ sh bin/start.shUsing an Existing Instance
Let’s say you already have a Hazelcast instance created elsewhere in your application. You can configure Spring Session to use that instance instead of creating a new one:
@Bean
@SpringSessionHazelcastInstance
public HazelcastInstance hazelcastInstance() {
    return Hazelcast.getHazelcastInstanceByName("existing-instance-name");
}
@Bean
@SpringSessionHazelcastInstance
public HazelcastInstance hazelcastInstance() {
return HazelcastClient.getHazelcastClientByName("existing-client-name");
}Customize the Session Repository
Now that you have provided a Hazelcast instance, let’s configure the session repository further. Note that these configurations are optional and they will fall back to the defaults when not provided:
    @Bean
    public SessionRepositoryCustomizer<HazelcastIndexedSessionRepository> customize() {
        return (sessionRepository) -> {
            sessionRepository.setFlushMode(FlushMode.IMMEDIATE);
            sessionRepository.setSaveMode(SaveMode.ALWAYS);
            sessionRepository.setSessionMapName(SESSIONS_MAP_NAME);
            sessionRepository.setDefaultMaxInactiveInterval(Duration.ofMinutes(2));
        };
    }
@Configuration
class SessionConfiguration extends HazelcastHttpSessionConfiguration {
SessionConfiguration() {
setFlushMode(FlushMode.IMMEDIATE);
setSaveMode(SaveMode.ALWAYS);
setSessionMapName(SESSIONS_MAP_NAME);
setMaxInactiveInterval(Duration.ofSeconds(900));
}
// ...
}Interactions with User Sessions
Once you completed the configurations, you can reach to the session repository by autowiring it:
@Autowired
FindByIndexNameSessionRepository<?> sessionRepository;
Although you do not need to reach this repository explicitly to store or load sessions, some of the methods might be
needed such as findByIndexNameAndIndexValue or findByPrincipalName. Other than these, the following snippet will
load and store the sessions for you:
@GetMapping("/check")
public String check(HttpServletRequest request) {
    HttpSession session = request.getSession(false);
    if (session == null) {
        return "No session found.";
    } else {
        session.setAttribute("attr1", 1);
        session.setMaxInactiveInterval(300);
        return "Session found: " + session.getId();
    }
}
And we are ready to test Hazelcast session store now!
Create the Endpoints
To test our session store behavior, create a few endpoints.
In SessionController.java you can find 3 of them all of which are GET mappings for simplicity:
-
/create: If there is no session associated with the request, creates a new one with the principal attribute sent as the request parameter. -
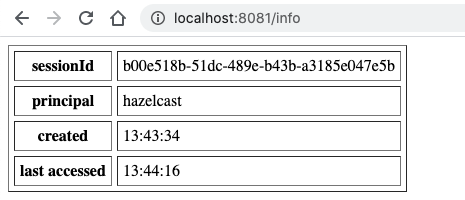
/info: Gives the session details if the request has a session. -
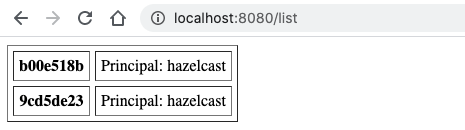
/list: Lists all the sessions with the same principalName of the request’s session.
Start the Applications
Let’s now start two application instances to verify that both use the same session store:
SERVER_PORT=8080 mvn spring-boot:run
SERVER_PORT=8081 mvn spring-boot:run
Test the Applications
-
Create a new session on the port 8080:

-
See session info on the port 8081:
-
Now create another session with the same principal. But be aware that you need to use a different browser or use the private mode of your browser to use separate cookies:

-
Let’s list all the sessions with the principal
hazelcast. You can imagine this scenario - for example, finding all the active sessions of a user: