| This guide uses Helm and Kubectl for deploying the Hazelcast cluster. If you want to use the Hazelcast Platform Operator instead, see Connect to Hazelcast from Outside Kubernetes. |
What You’ll Learn
Deploy a Hazelcast Kubernetes cluster and connect to it, using a client outside Kubernetes.
Before you Begin
-
Up and running Kubernetes cluster (Minikube is good enough)
-
Kubernetes command line tool, kubectl
Introduction
There are two approaches you may want to use when setting up on-premises Hazelcast cluster in Kubernetes:
-
Unisocket Client - client sends requests to a random Hazelcast member
-
Smart Client - client connects to all members and sends requests directly to the members owning the data
Let’s see both approaches.
Unisocket Client
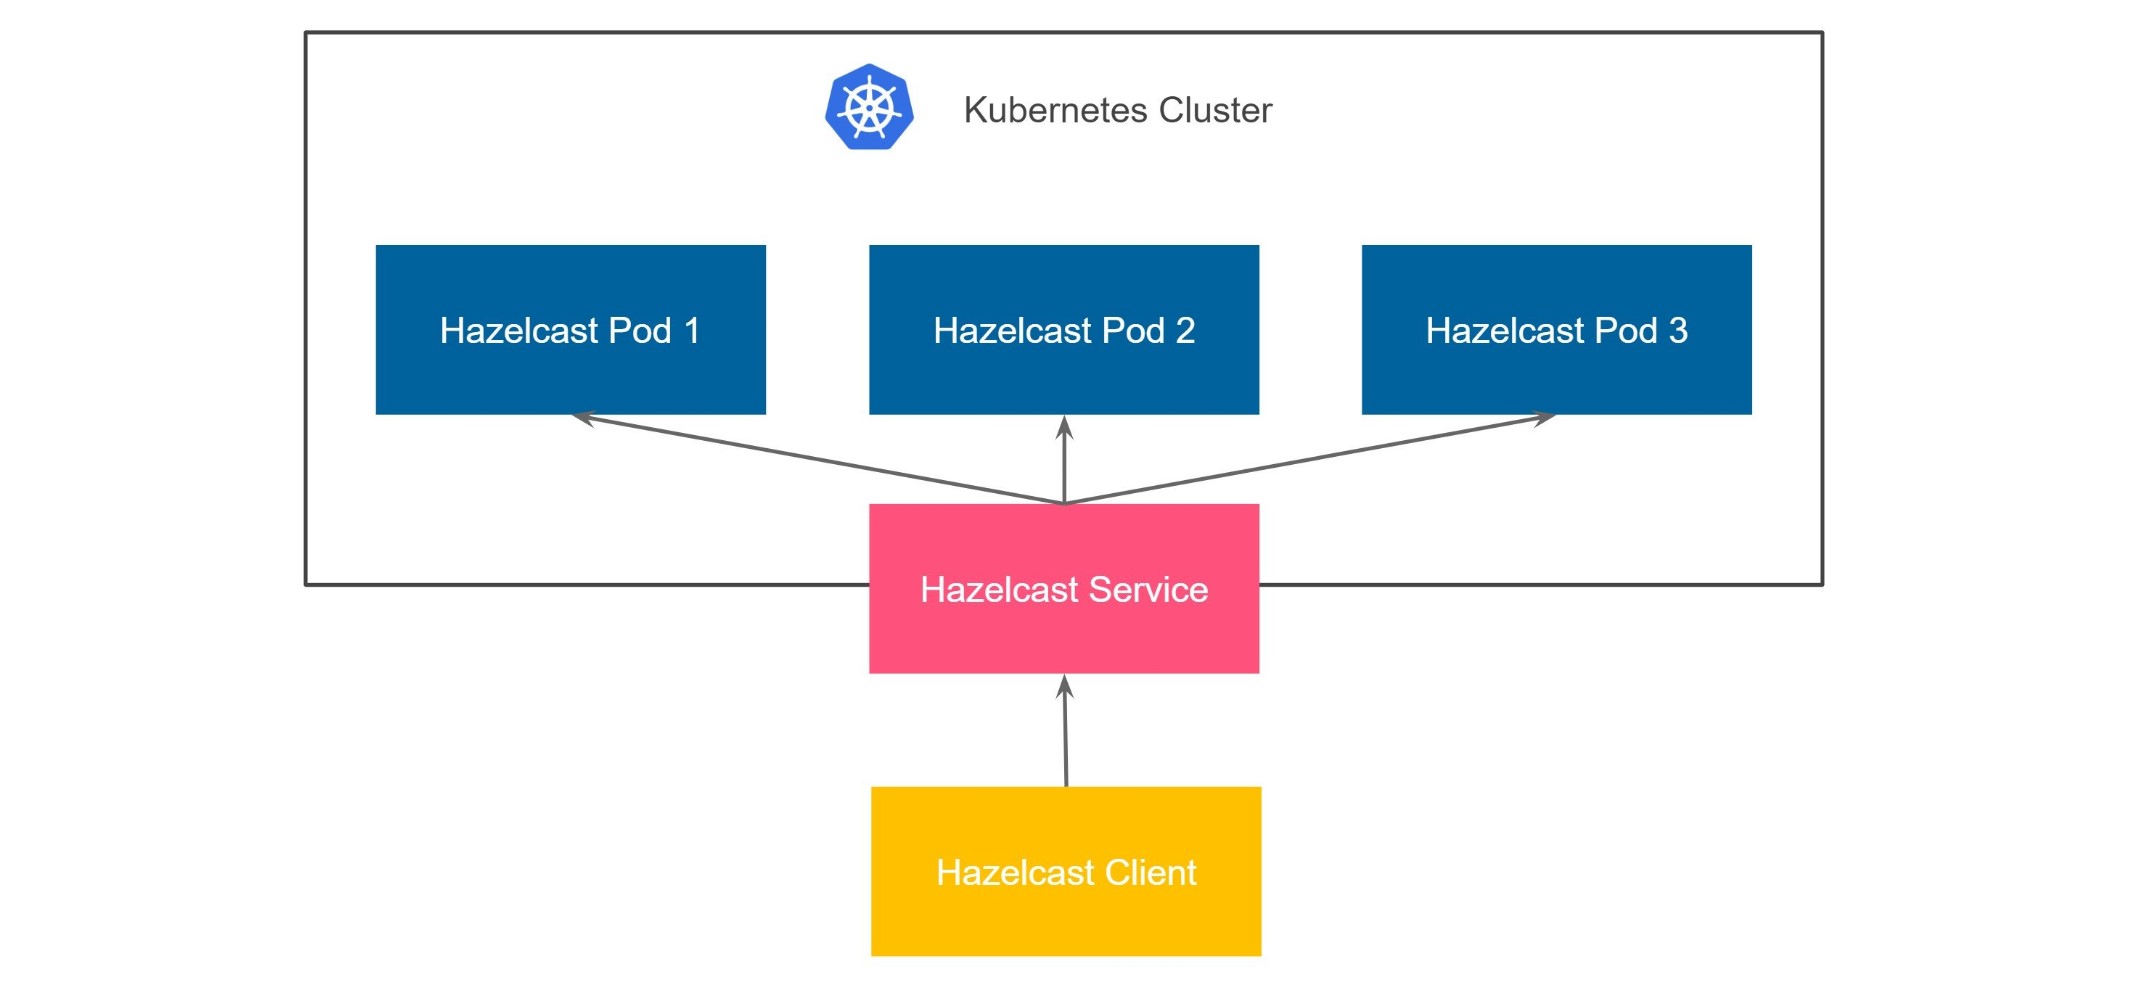
The simplest possible scenario is to deploy the Hazelcast cluster on Kubernetes and expose all Hazelcast pods with one LoadBalancer (or NodePort) service. With that approach, we piggyback on the standard Kubernetes mechanism, which automatically load balances the traffic to Hazelcast members.
Starting Hazelcast cluster
There are different ways of deploying Hazelcast to Kubernetes. For the production environment we recommend using Helm.
kubectl apply -f https://raw.githubusercontent.com/hazelcast/hazelcast/master/kubernetes-rbac.yaml

kubectl run hz-hazelcast-0 --image=hazelcast/hazelcast -l "role=hazelcast"
kubectl run hz-hazelcast-1 --image=hazelcast/hazelcast -l "role=hazelcast"
kubectl run hz-hazelcast-2 --image=hazelcast/hazelcast -l "role=hazelcast"

kubectl create service loadbalancer hz-hazelcast --tcp=5701 -o yaml --dry-run=client | kubectl set selector --local -f - "role=hazelcast" -o yaml | kubectl create -f -
helm repo add hazelcast https://hazelcast-charts.s3.amazonaws.com/
helm repo update
helm install hz-hazelcast --set service.type=LoadBalancer hazelcast/hazelcastVerifying Hazelcast cluster
You can check that the Hazelcast cluster is up and running.
kubectl get pods
NAME             READY   STATUS    RESTARTS   AGE
hz-hazelcast-0   1/1     Running   0          32s
hz-hazelcast-1   1/1     Running   0          30s
hz-hazelcast-2   1/1     Running   0          29s
You can also check that all Hazelcast members formed a cluster.
kubectl logs hz-hazelcast-0
...
Members {size:3, ver:3} [
        Member [10.216.6.7]:5701 - 6d2100e0-8dcf-4e7c-ab40-8e98e23475e3 this
        Member [10.216.5.6]:5701 - 5ab4d554-fd7d-4929-8475-0ddf79a21076
        Member [10.216.8.6]:5701 - 7f7dd5f4-e732-4575-89d6-a6e823da38da
]
At this point you have a Hazelcast cluster exposed with a single LoadBalancer service called hz-hazelcast. You can find it’s address with the following command.
kubectl get service hz-hazelcast
NAME           TYPE           CLUSTER-IP       EXTERNAL-IP       PORT(S)          AGE
hz-hazelcast LoadBalancer 10.108.141.178 10.96.184.178 5701:31434/TCP 5m44s|
If you are using Minikube, you need to execute |
The field EXTERNAL-IP is the address of your Hazelcast cluster.
Connecting with Hazelcast Client
To access all examples, clone the following repository
git clone https://github.com/hazelcast-guides/kubernetes-external-client.git
cd kubernetes-external-client
Configure the Hazelcast client with the external address and disable smart routing to use the unisocket connection.
ClientConfig config = new ClientConfig();
config.getNetworkConfig().addAddress("<EXTERNAL-IP>")
                         .setSmartRouting(false);
const { Client } = require('hazelcast-client');
const clientConfig = {
network: {
clusterMembers: [
'<EXTERNAL-IP>'
],
smartRouting: false
}
};
const client = await Client.newHazelcastClient(clientConfig);import (
"log"
"github.com/hazelcast/hazelcast-go-client"
)
func main() {
config := hazelcast.Config{}
cc := &config.Cluster
cc.Network.SetAddresses("<EXTERNAL-IP>")
cc.Unisocket = true
ctx := context.TODO()
client, err := hazelcast.StartNewClientWithConfig(ctx, config)
if err != nil {
panic(err)
}
}import logging
import hazelcast
logging.basicConfig(level=logging.INFO)
client = hazelcast.HazelcastClient(
cluster_members=["<EXTERNAL-IP>"],
smart_routing=False,
)hazelcast::client::client_config config;
config.get_network_config().add_address(hazelcast::client::address{"<EXTERNAL-IP>", 5701})
.set_smart_routing(false); var options = new HazelcastOptionsBuilder()
.With(args)
.With((configuration, options) =>
{
// configure logging factory and add the console provider
options.LoggerFactory.Creator = () => LoggerFactory.Create(loggingBuilder =>
loggingBuilder
.AddConfiguration(configuration.GetSection("logging"))
.AddConsole());
options.Networking.Addresses.Add("<EXTERNAL IP>");
options.Networking.SmartRouting = false;
})
.WithDefault("Logging:LogLevel:Hazelcast", "Debug")
.Build();Finally, start the client application using the following command.
cd java-unisocket
mvn package
java -jar target/*jar-with-dependencies*.jar
cd nodejs-unisocket
npm install
npm startcd go-unisocket
go run main.gocd python-unisocket
pip install -r requirements.txt
python main.pycd cpp-unisocket
cmake -B build -S . -DCMAKE_BUILD_TYPE=Release -DCMAKE_TOOLCHAIN_FILE=/path/to/vcpkg/scripts/buildsystems/vcpkg.cmake
cmake --build build --verbose
./build/cpp-unisocketcd dotnet-unisocket
dotnet build
dotnet runYou should see the following output.
Successful connection!
Starting to fill the map with random entries.
Current map size: 2
Current map size: 3
Current map size: 4
Current map size: 5
Current map size: 6
Current map size: 7
Current map size: 8
Current map size: 9
Current map size: 10
Clean Up
To clean up the environment execute the following commands.
kubectl delete pod/hz-hazelcast-0 pod/hz-hazelcast-1 pod/hz-hazelcast-2 service/hz-hazelcast
kubectl delete -f https://raw.githubusercontent.com/hazelcast/hazelcast/master/kubernetes-rbac.yaml
helm uninstall hz-hazelcastUnisocket is very simple to configure; however, it has one significant drawback - low performance. Using a load balancer is perfect for traffic distribution across stateless services; however, Hazelcast is not stateless. Actually, Hazelcast is more like a sharded database in which each member contains a different part of the data. That is why it’s suboptimal to randomly load balance the traffic. It effectively means that each operation needs to be internally migrated, because your data may be load balanced to member 1, while the partition for its key is stored in member 2. All in all, if performance is important for your use case, then you need to use smart client.
Smart Client
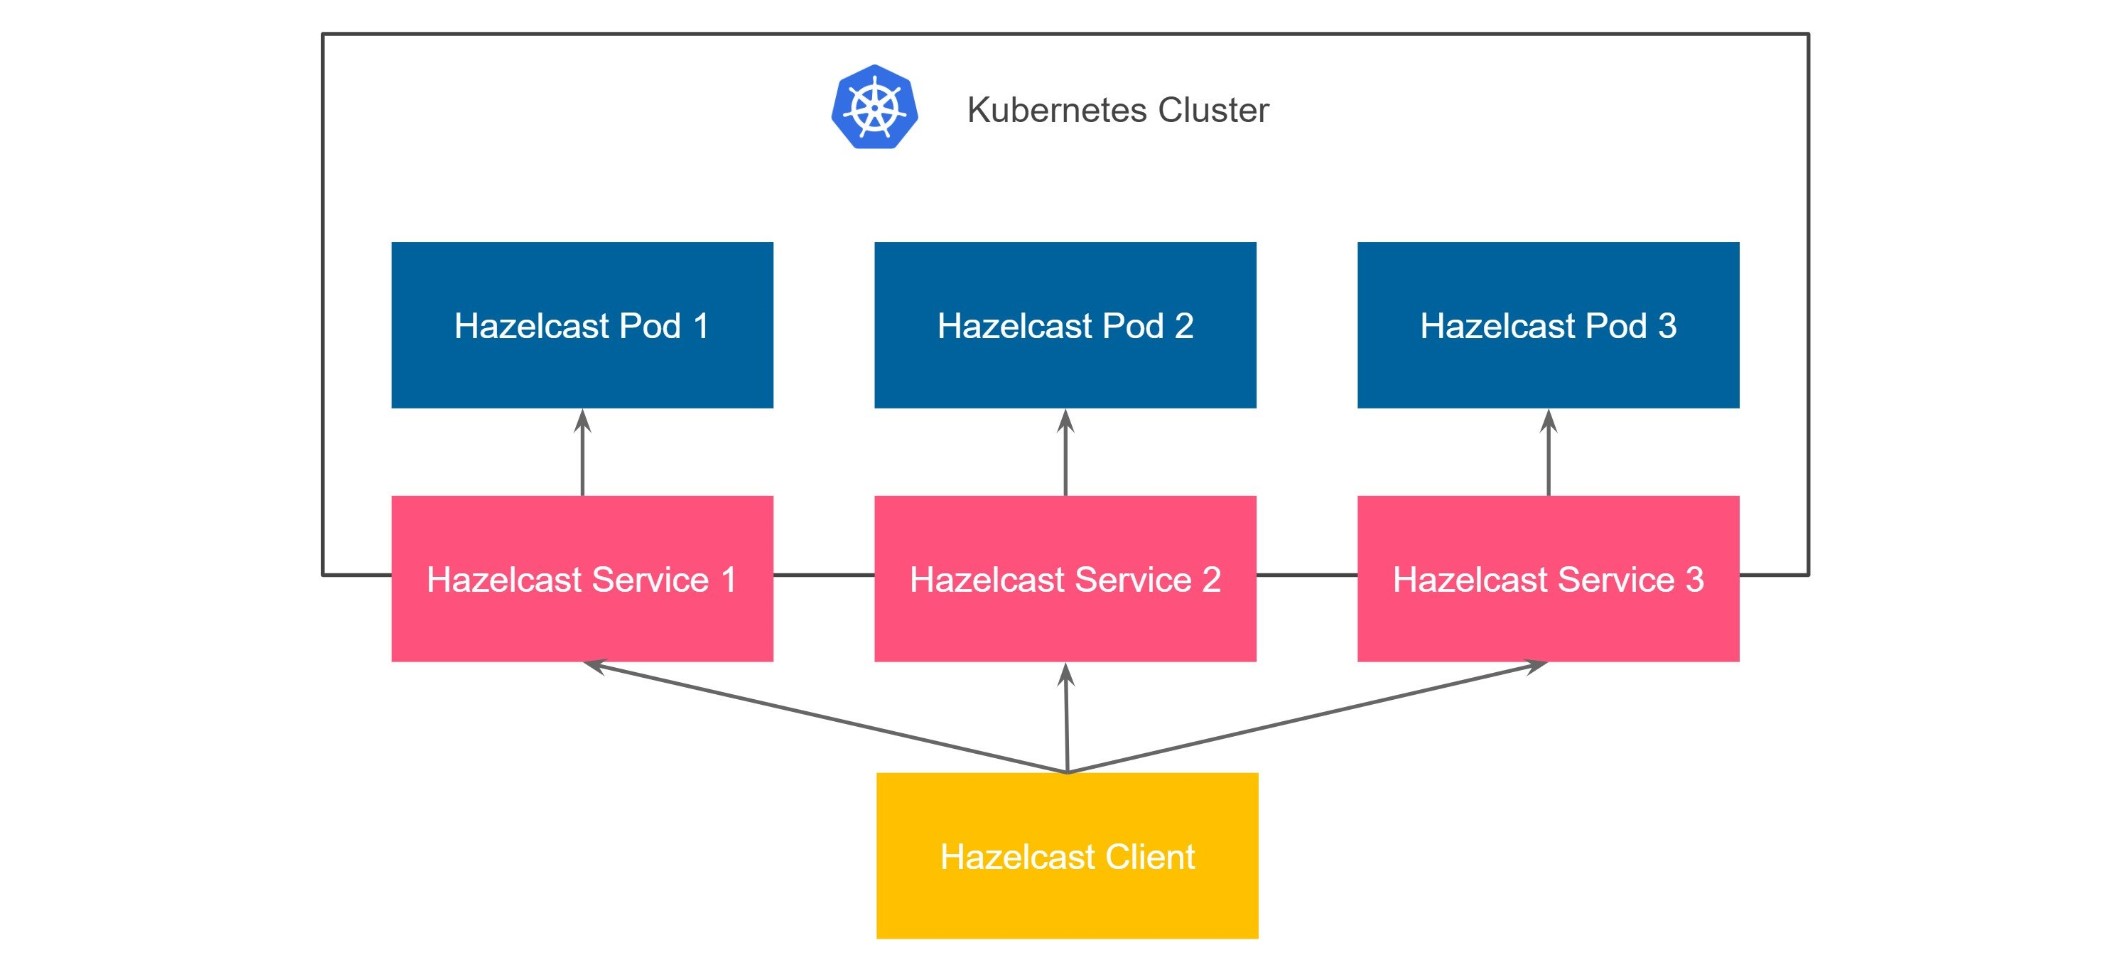
Hazelcast smart client is capable of mapping the given key with its owner member, which means that it sends the data directly to the member which contains the right data partition. This fact implies that in the Kubernetes environment, we need to provide access to each Hazelcast pod from the outside. A dynamic approach to this problem is to expose each pod with a separate service. Again, the service can be either LoadBalancer or NodePort. In a real-life scenario, that would probably be NodePort, since having a separate public IP for each pod is expensive.
Kubernetes does not offer a feature for automatically creating a service for each pod. That is why to set up a cluster this way we need to either expose each pod manually with kubectl or use Helm by enabling externalAccess feature.
|
If you are using Minikube, you need to execute |
To create a loadbalancer for each running Hazelcast pod you need to run the following commands:
kubectl apply -f https://raw.githubusercontent.com/hazelcast/hazelcast/master/kubernetes-rbac.yaml

kubectl create service loadbalancer hz-hazelcast-0 --tcp=5701
kubectl run hz-hazelcast-0 --image=hazelcast/hazelcast --port=5701 -l "app=hz-hazelcast-0,role=hazelcast"
kubectl create service loadbalancer hz-hazelcast-1 --tcp=5701
kubectl run hz-hazelcast-1 --image=hazelcast/hazelcast --port=5701 -l "app=hz-hazelcast-1,role=hazelcast"
kubectl create service loadbalancer hz-hazelcast-2 --tcp=5701
kubectl run hz-hazelcast-2 --image=hazelcast/hazelcast --port=5701 -l "app=hz-hazelcast-2,role=hazelcast"

kubectl create service loadbalancer hz-hazelcast --tcp=5701 -o yaml --dry-run=client | kubectl set selector --local -f - "role=hazelcast" -o yaml | kubectl create -f -
To start the Hazelcast cluster with external access feature enabled, you need to make the following configuration in the values.yaml file:
service:
  type: "LoadBalancer"

hazelcast:
  yaml:
    hazelcast:
      network:
        join:
          kubernetes:
            service-per-pod-label-name: com.hazelcast/external-access
            service-per-pod-label-value: "true"

externalAccess:
  enabled: true
  service:
    labels:
     com.hazelcast/external-access: "true"

initContainers:
  - name: wait-for-lb
    image: bitnami/kubectl:1.22
    env:
      - name: POD_NAMESPACE
        valueFrom:
          fieldRef:
            fieldPath: metadata.namespace
      - name: POD_NAME
        valueFrom:
          fieldRef:
            fieldPath: metadata.name
    command:
      - "sh"
      - "-c"
    args:
      - until [ -n "$$(kubectl get svc -n $${POD_NAMESPACE} -l com.hazelcast/external-access="true" -ojsonpath="{.items[?(@.spec.selector.statefulset\.kubernetes\.io/pod-name==\"$${POD_NAME}\")].status.loadBalancer.ingress[0].ip}")" ]; do sleep 8; done
helm repo add hazelcast https://hazelcast-charts.s3.amazonaws.com/
helm repo update
helm install hz-hazelcast -f service-per-pod/values.yaml hazelcast/hazelcast|
Note that each service created per pod must start before the Hazelcast pod itself. Otherwise Hazelcast won’t be able to resolve its public addresses. We are achieving this by running init containers to ensure each member’s matching service has its external address. |
Verifying Hazelcast cluster
You can check that the Hazelcast cluster is up and running.
kubectl get pods
NAME             READY   STATUS    RESTARTS   AGE
hz-hazelcast-0   1/1     Running   0          32s
hz-hazelcast-1   1/1     Running   0          30s
hz-hazelcast-2   1/1     Running   0          29s
At this point, you should also have every Hazelcast member exposed with a separate externally accessible address.
kubectl get service
NAME             TYPE           CLUSTER-IP       EXTERNAL-IP      PORT(S)          AGE
hz-hazelcast     LoadBalancer   10.219.246.40    35.230.84.127    5701:30443/TCP   4m2s
hz-hazelcast-0   LoadBalancer   10.219.255.141   34.145.108.167   5701:30091/TCP   4m7s
hz-hazelcast-1   LoadBalancer   10.219.241.203   34.82.71.106     5701:30687/TCP   4m5s
hz-hazelcast-2   LoadBalancer   10.219.247.106   35.247.93.190    5701:32452/TCP   4m4s
We’ll use the hz-hazelcast service for the discovery.
kubectl get service hz-hazelcast
NAME           TYPE           CLUSTER-IP      EXTERNAL-IP     PORT(S)          AGE
hz-hazelcast   LoadBalancer   10.219.246.40   35.230.84.127   5701:30443/TCP   5m29s
The field EXTERNAL-IP is the address of your Hazelcast cluster.
Connecting with Hazelcast Client
Configure the Hazelcast client to connect to the cluster external address.
ClientConfig config = new ClientConfig();
config.getNetworkConfig().addAddress("<EXTERNAL-IP>");
config.getProperties().setProperty(ClientProperty.DISCOVERY_SPI_PUBLIC_IP_ENABLED.toString(), "true");
const { Client } = require('hazelcast-client');
const clientConfig = {
network: {
clusterMembers: [
'<EXTERNAL-IP>'
]
},
properties: {
['hazelcast.discovery.public.ip.enabled']: true
}
};
const client = await Client.newHazelcastClient(clientConfig);import (
"log"
"github.com/hazelcast/hazelcast-go-client"
)
func main() {
config := hazelcast.Config{}
cc := &config.Cluster
cc.Network.SetAddresses("<EXTERNAL-IP>")
cc.Discovery.UsePublicIP = true
ctx := context.TODO()
client, err := hazelcast.StartNewClientWithConfig(ctx, config)
if err != nil {
panic(err)
}
}import logging
import hazelcast
logging.basicConfig(level=logging.INFO)
client = hazelcast.HazelcastClient(
cluster_members=["<EXTERNAL-IP>"],
use_public_ip=True,
) hazelcast::client::client_config config;
config.get_network_config().use_public_address(true)
.add_address(hazelcast::client::address{"<EXTERNAL-IP>", 5701});var options = new HazelcastOptionsBuilder()
.With(args)
.With((configuration, options) =>
{
// configure logging factory and add the console provider
options.LoggerFactory.Creator = () => LoggerFactory.Create(loggingBuilder =>
loggingBuilder
.AddConfiguration(configuration.GetSection("logging"))
.AddConsole());
options.Networking.Addresses.Add("<EXTERNAL IP>");
options.Networking.UsePublicAddresses = true;
})
.WithDefault("Logging:LogLevel:Hazelcast", "Debug")
.Build();Finally, start the client application using the following command.
cd java
mvn package
java -jar target/*jar-with-dependencies*.jar
cd nodejs
npm install
npm startcd go
go run main.gocd python
pip install -r requirements.txt
python main.pycd cpp
cmake -B build -S . -DCMAKE_BUILD_TYPE=Release -DCMAKE_TOOLCHAIN_FILE=/path/to/vcpkg/scripts/buildsystems/vcpkg.cmake
cmake --build build --verbose
./build/cppcd dotnet
dotnet build
dotnet runYou should see the following output.
Successful connection!
Starting to fill the map with random entries.
Current map size: 2
Current map size: 3
Current map size: 4
Current map size: 5
Current map size: 6
Current map size: 7
Current map size: 8
Current map size: 9
Current map size: 10
Clean Up
To clean up the environment execute the following commands.
kubectl delete pod/hz-hazelcast-0 service/hz-hazelcast-0 pod/hz-hazelcast-1 service/hz-hazelcast-1 pod/hz-hazelcast-2 service/hz-hazelcast-2 service/hz-hazelcast
kubectl delete -f https://raw.githubusercontent.com/hazelcast/hazelcast/master/kubernetes-rbac.yaml
helm uninstall hz-hazelcast