What You’ll Learn
In this tutorial, you’ll connect to a Hazelcast cluster running in Kubernetes from outside of the Kubernetes environment.
Before you Begin
-
Up and running Kubernetes cluster
-
Kubernetes command-line tool, kubectl
-
Deployed Hazelcast Platform Operator
-
Create a license secret:
Create a secret with your Hazelcast Enterprise License.
kubectl create secret generic hazelcast-license-key --from-literal=license-key=<hz-license-key>
| Starting with version 5.13, Hazelcast Platform Operator only supports Hazelcast Enterprise cluster creation. Even the feature can be used in Hazelcast Open Source clusters, Hazelcast Platform Operator requires license key to run a cluster. |
| This tutorial uses LoadBalancer services to connect to Hazelcast from outside of the Kubernetes cluster. Therefore, it is essential to ensure that your Kubernetes cluster can assign public IPs to LoadBalancer services. This is particularly important if you are using a local Kubernetes cluster such as Minikube or Kind. |
Introduction
There are two available options for Expose Externally feature of Hazelcast Platform Operator:
-
Unisocket - client requests are load balanced between Hazelcast members.
-
Smart - client connects to all members and sends requests directly to the members owning the data.
Let’s see both approaches.
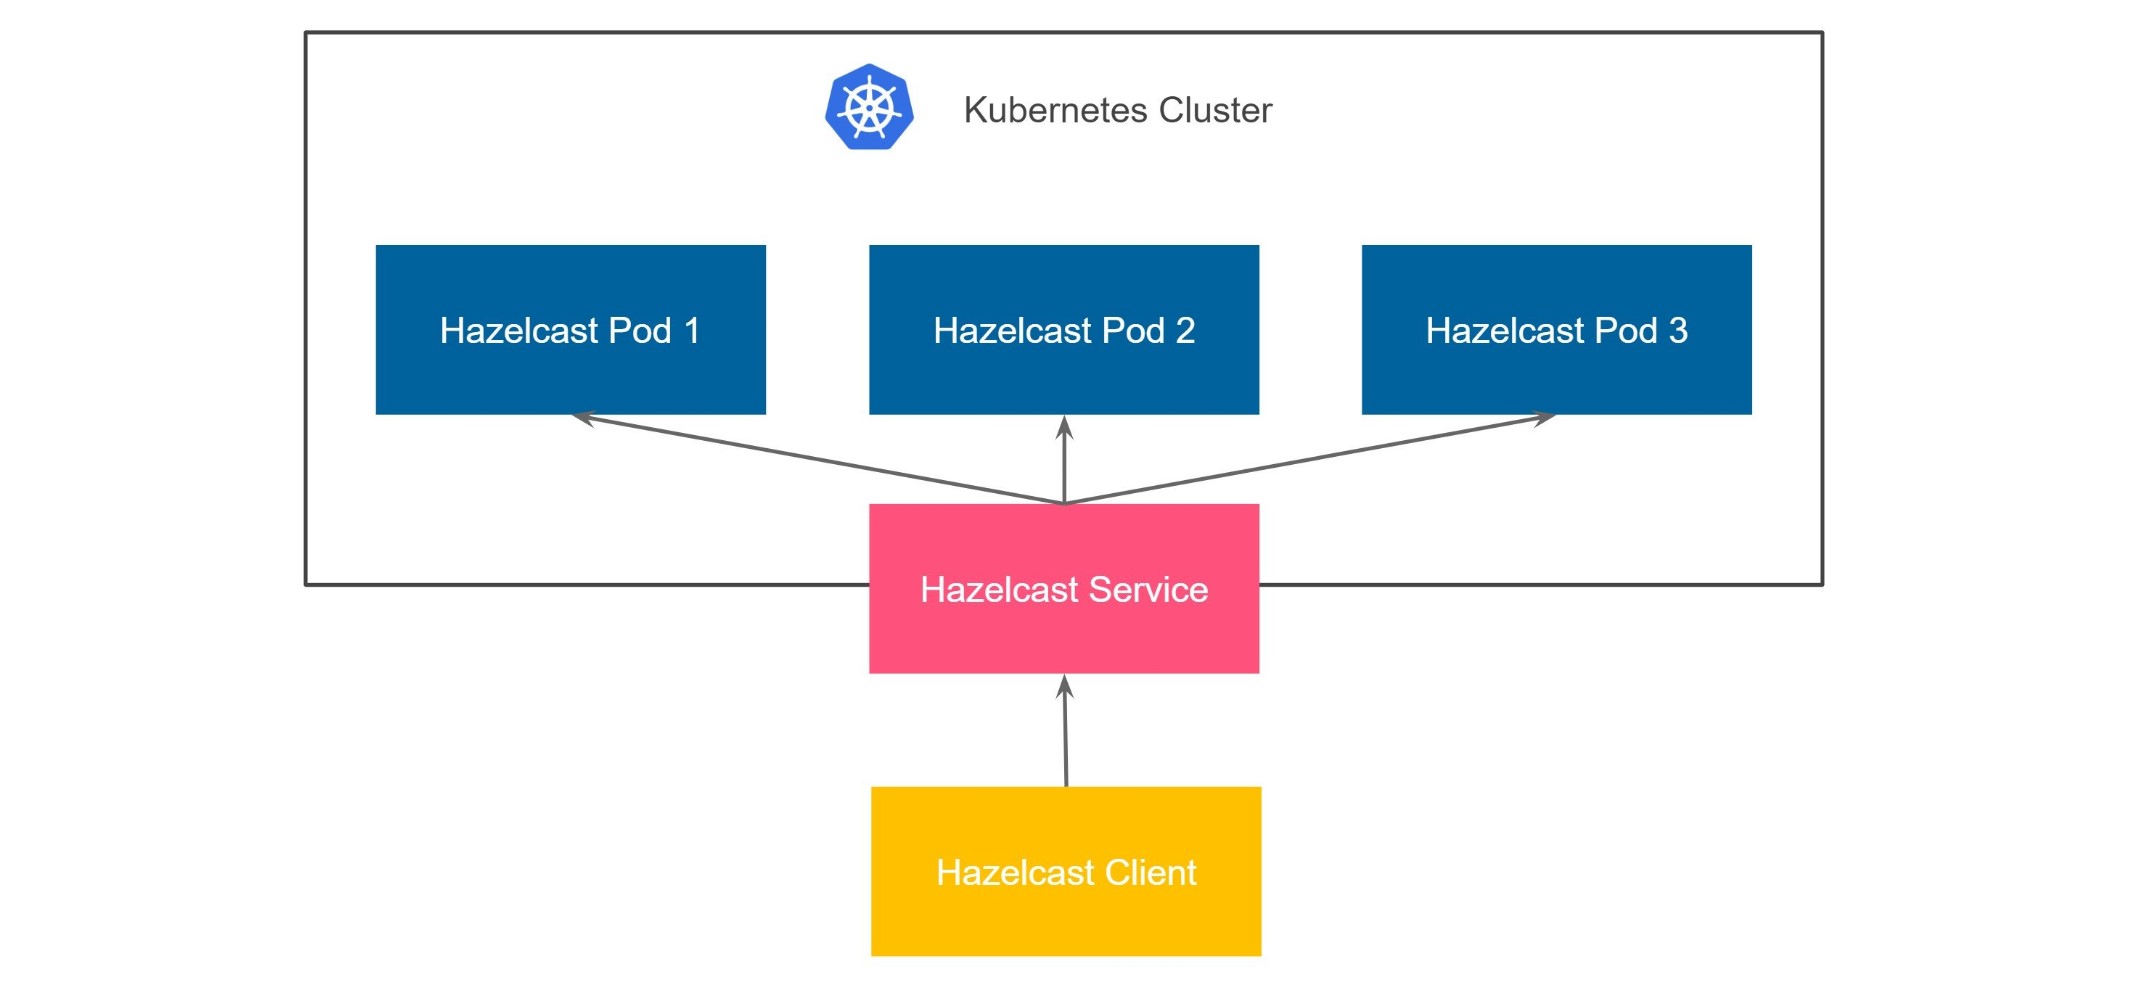
Unisocket
The first option is to use the Unisocket type. This option will use the standard Kubernetes mechanism that automatically load balances the traffic to Hazelcast members.
Start the Hazelcast Cluster
Run the following command to create the Hazelcast cluster with Expose Externally feature enabled using Unisocket type.
kubectl apply -f - <<EOF
apiVersion: hazelcast.com/v1alpha1
kind: Hazelcast
metadata:
  name: my-hazelcast-unisocket
spec:
  licenseKeySecretName: hazelcast-license-key
  exposeExternally:
    type: Unisocket
    discoveryServiceType: LoadBalancer
EOF
For discoveryServiceType you can use:
-
LoadBalancer- will create an externalLoadBalancerfor discovery service; -
NodePort- will expose the discovery service viaNodePort.
Verify the Hazelcast Cluster
Check the cluster status by running the following command.
$ kubectl get hazelcast my-hazelcast-unisocket
NAME           STATUS    MEMBERS
my-hazelcast   Running   3/3
After verifying that the cluster is Running and all the members are ready (3/3), run the following command to find the discovery address.
$ kubectl get hazelcastendpoint my-hazelcast-unisocket
NAME                     TYPE        ADDRESS
my-hazelcast-unisocket   Discovery   34.135.7.75:5701
The ADDRESS column displays the external address of your Hazelcast cluster.
Connect Hazelcast Clients to the Cluster
To access all sample clients, clone the following repository:
git clone https://github.com/hazelcast-guides/hazelcast-platform-operator-expose-externally.git
cd hazelcast-platform-operator-expose-externally/docs/modules/ROOT/examples/operator-expose-externally-
The sample code(excluding CLC) for this tutorial is in the
docs/modules/ROOT/examples/operator-expose-externallydirectory.
Configure the Hazelcast client with the external address and disable smart routing to use the unisocket connection.
| Before using CLC, it should be installed in your system. Check the installation instructions for CLC: Installing the Hazelcast CLC. |
Run the following command for adding the cluster config to the CLC.
clc config add hz cluster.name=dev cluster.address=<EXTERNAL-IP>package com.hazelcast;
import java.util.Random;
import com.hazelcast.client.HazelcastClient;
import com.hazelcast.client.config.ClientConfig;
import com.hazelcast.client.config.ClientNetworkConfig;
import com.hazelcast.client.impl.connection.tcp.RoutingMode;
import com.hazelcast.core.HazelcastInstance;
import com.hazelcast.map.IMap;
public class Main {
public static void main(String[] args) throws Exception {
ClientConfig clientConfig = new ClientConfig();
ClientNetworkConfig networkConfig = clientConfig.getNetworkConfig();
networkConfig.addAddress("<EXTERNAL-IP>");
networkConfig.getClusterRoutingConfig().setRoutingMode(RoutingMode.SINGLE_MEMBER);
HazelcastInstance client = HazelcastClient.newHazelcastClient(clientConfig);
System.out.println("Successful connection!");
System.out.println("Starting to fill the map with random entries.");
IMap<String, String> map = client.getMap("map");
Random random = new Random();
while (true) {
int randomKey = random.nextInt(100_000);
map.put("key-" + randomKey, "value-" + randomKey);
System.out.println("Current map size: " + map.size());
}
}
}'use strict';
const { Client } = require('hazelcast-client');
const clientConfig = {
network: {
clusterMembers: [
'<EXTERNAL-IP>'
],
smartRouting: false
}
};
(async () => {
try {
const client = await Client.newHazelcastClient(clientConfig);
const map = await client.getMap('map');
await map.put('key', 'value');
const res = await map.get('key');
if (res !== 'value') {
throw new Error('Connection failed, check your configuration.');
}
console.log('Successful connection!');
console.log('Starting to fill the map with random entries.');
while (true) {
const randomKey = Math.floor(Math.random() * 100000);
await map.put('key' + randomKey, 'value' + randomKey);
const size = await map.size();
console.log(`Current map size: ${size}`);
}
} catch (err) {
console.error('Error occurred:', err);
}
})();package main
import (
"context"
"fmt"
"math/rand"
"github.com/hazelcast/hazelcast-go-client"
)
func main() {
config := hazelcast.Config{}
cc := &config.Cluster
cc.Network.SetAddresses("<EXTERNAL-IP>")
cc.Unisocket = true
ctx := context.TODO()
client, err := hazelcast.StartNewClientWithConfig(ctx, config)
if err != nil {
panic(err)
}
fmt.Println("Successful connection!")
fmt.Println("Starting to fill the map with random entries.")
m, err := client.GetMap(ctx, "map")
if err != nil {
panic(err)
}
for {
num := rand.Intn(100_000)
key := fmt.Sprintf("key-%d", num)
value := fmt.Sprintf("value-%d", num)
if _, err = m.Put(ctx, key, value); err != nil {
fmt.Println("ERR:", err.Error())
} else {
if mapSize, err := m.Size(ctx); err != nil {
fmt.Println("ERR:", err.Error())
} else {
fmt.Println("Current map size:", mapSize)
}
}
}
}import logging
import random
import hazelcast
logging.basicConfig(level=logging.INFO)
client = hazelcast.HazelcastClient(
cluster_members=["<EXTERNAL-IP>"],
smart_routing=False,
)
print("Successful connection!", flush=True)
print("Starting to fill the map with random entries.", flush=True)
m = client.get_map("map").blocking()
while True:
random_number = str(random.randrange(0, 100000))
m.put("key-" + random_number, "value-" + random_number)
print("Current map size:", m.size())using Hazelcast;
using Microsoft.Extensions.Logging;
class CsharpExample
{
static async Task Main(string[] args)
{
var options = new HazelcastOptionsBuilder()
.With(args)
.With((configuration, options) =>
{
options.LoggerFactory.Creator = () => LoggerFactory.Create(loggingBuilder => loggingBuilder.AddConfiguration(configuration.GetSection("logging")).AddConsole());
options.Networking.Addresses.Add("<EXTERNAL-IP>");
options.Networking.SmartRouting = false;
})
.Build();
var client = await HazelcastClientFactory.StartNewClientAsync(options);
Console.WriteLine("Successful connection!");
Console.WriteLine("Starting to fill the map with random entries.");
var map = await client.GetMapAsync<string, string>("map");
var random = new Random();
while (true)
{
var randomKey = random.Next(100_000);
await map.PutAsync("key-" + randomKey, "value-" + randomKey);
Console.WriteLine("Current map size: " + await map.GetSizeAsync());
}
}
}Now you can start the application.
Run the following command to fill a map.
for i in {1..10};
do
   clc -c hz map set --name map1 key-$i value-$i;
done
Run the following command to check the map size.
clc -c hz map size --name map1cd java-unisocket
mvn package
java -jar target/*jar-with-dependencies*.jarYou should see the following output.
Successful connection!
Starting to fill the map with random entries.
Current map size: 2
Current map size: 3
Current map size: 4
....
....
cd nodejs-unisocket
npm install
npm startYou should see the following output.
Successful connection!
Starting to fill the map with random entries.
Current map size: 2
Current map size: 3
Current map size: 4
....
....
cd go-unisocket
go run main.goYou should see the following output.
Successful connection!
Starting to fill the map with random entries.
Current map size: 2
Current map size: 3
Current map size: 4
....
....
cd python-unisocket
pip install -r requirements.txt
python main.pyYou should see the following output.
Successful connection!
Starting to fill the map with random entries.
Current map size: 2
Current map size: 3
Current map size: 4
....
....
cd dotnet-unisocket
dotnet build
dotnet runYou should see the following output.
Successful connection!
Starting to fill the map with random entries.
Current map size: 2
Current map size: 3
Current map size: 4
....
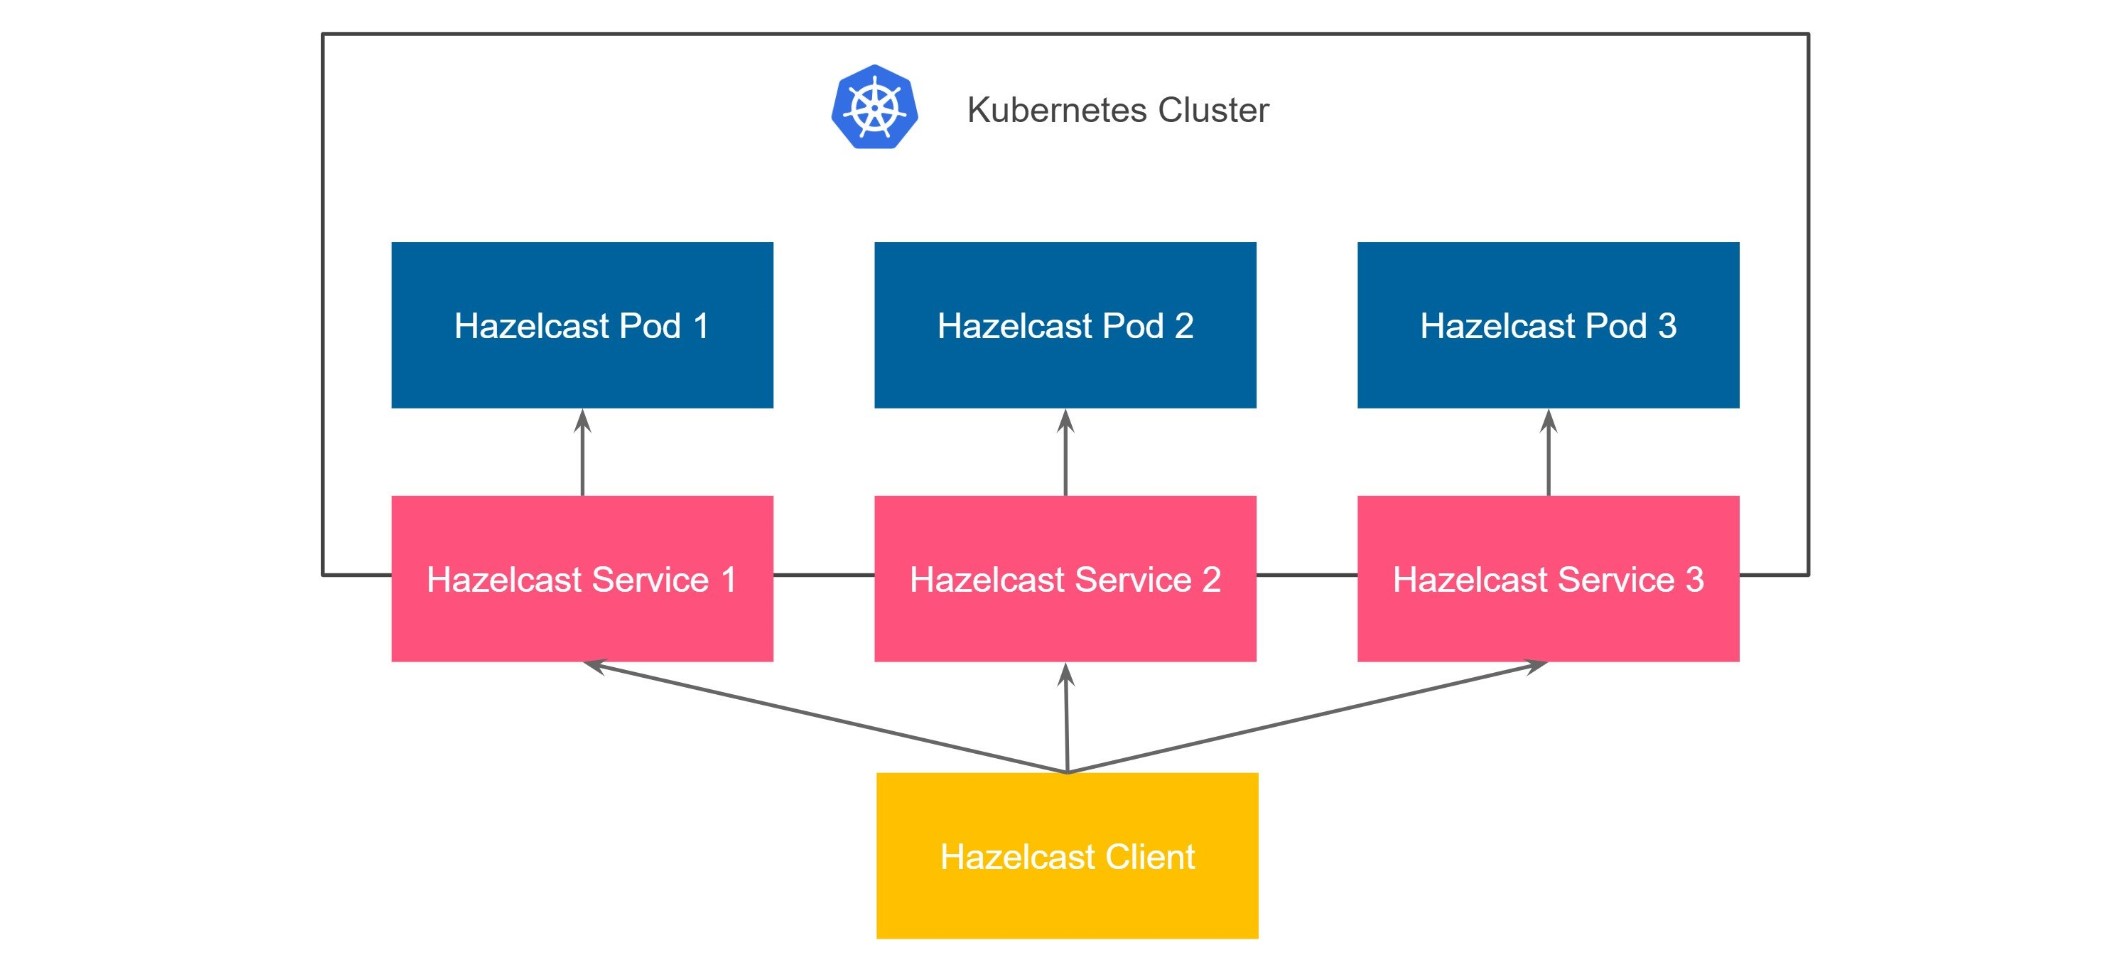
....Smart Client
The second option is to use the Smart type. With this option, each Hazelcast member will be exposed with its own service (it can be either LoadBalancer or NodePort). Hazelcast smart client is capable of mapping the given key with its owner member, which means that it sends the data directly to the member which contains the right data partition.
Start the Hazelcast Cluster
Run the following command to create the Hazelcast cluster with Expose Externally feature enabled using Smart type.
kubectl apply -f - <<EOF
apiVersion: hazelcast.com/v1alpha1
kind: Hazelcast
metadata:
  name: my-hazelcast-smart
spec:
  licenseKeySecretName: hazelcast-license-key
  exposeExternally:
    type: Smart
    discoveryServiceType: LoadBalancer
    memberAccess: LoadBalancer
EOF
This will create the Hazelcast cluster and one LoadBalancer service for discovery and one LoadBalancer service for each pod.
For discoveryServiceType you can use:
-
LoadBalancer- will create an externalLoadBalancerfor discovery service; -
NodePort- will expose the discovery service viaNodePort.
For memberAccess you can use the following options:
-
LoadBalancer- lets the client access Hazelcast member with theLoadBalancerservice; -
NodePortNodeName- lets the client access Hazelcast member with theNodePortservice and the node name; -
NodePortExternalIP- lets the client access Hazelcast member with theNodePortservice and the node external IP/hostname.
Verify the Hazelcast Cluster
Check the cluster status by running the following command.
$ kubectl get hazelcast my-hazelcast-smart
NAME           STATUS    MEMBERS
my-hazelcast   Running   3/3
After verifying that the cluster is Running and all the members are ready (3/3), run the following command to find the discovery and member addresses.
$ kubectl get hazelcastendpoint --selector="app.kubernetes.io/instance=my-hazelcast-smart"
NAME               TYPE        ADDRESS
my-hazelcast       Discovery   35.184.21.18:5701
my-hazelcast-0     Member      34.121.197.134:5701
my-hazelcast-1     Member      35.238.20.134:5701
my-hazelcast-2     Member      34.30.60.128:5701
my-hazelcast-wan   WAN         35.184.21.18:5701
The ADDRESS column displays the external addresses of your Hazelcast cluster and members.
Connect Hazelcast Clients to the Cluster
Configure the Hazelcast client to connect to the cluster external address.
| Before using CLC, it should be installed in your system. Check the installation instructions for CLC: Installing the Hazelcast CLC. |
Run the following command for adding the cluster config to the CLC.
clc config add hz cluster.name=dev cluster.address=<EXTERNAL-IP>package com.hazelcast;
import com.hazelcast.client.HazelcastClient;
import com.hazelcast.client.config.ClientConfig;
import com.hazelcast.client.properties.ClientProperty;
import com.hazelcast.core.HazelcastInstance;
import com.hazelcast.map.IMap;
import java.util.Random;
public class Main {
public static void main(String[] args) throws Exception {
ClientConfig config = new ClientConfig();
config.getNetworkConfig().addAddress("<EXTERNAL-IP>");
config.getProperties().setProperty(ClientProperty.DISCOVERY_SPI_PUBLIC_IP_ENABLED.toString(), "true");
HazelcastInstance client = HazelcastClient.newHazelcastClient(config);
System.out.println("Successful connection!");
System.out.println("Starting to fill the map with random entries.");
IMap<String, String> map = client.getMap("map");
Random random = new Random();
while (true) {
int randomKey = random.nextInt(100_000);
map.put("key-" + randomKey, "value-" + randomKey);
System.out.println("Current map size: " + map.size());
}
}
}'use strict';
const { Client } = require('hazelcast-client');
const clientConfig = {
network: {
clusterMembers: [
'<EXTERNAL-IP>'
]
},
properties: {
['hazelcast.discovery.public.ip.enabled']: true
}
};
(async () => {
try {
const client = await Client.newHazelcastClient(clientConfig);
const map = await client.getMap('map');
await map.put('key', 'value');
const res = await map.get('key');
if (res !== 'value') {
throw new Error('Connection failed, check your configuration.');
}
console.log('Successful connection!');
console.log('Starting to fill the map with random entries.');
while (true) {
const randomKey = Math.floor(Math.random() * 100000);
await map.put('key' + randomKey, 'value' + randomKey);
const size = await map.size();
console.log(`Current map size: ${size}`);
}
} catch (err) {
console.error('Error occurred:', err);
}
})();package main
import (
"context"
"fmt"
"math/rand"
"github.com/hazelcast/hazelcast-go-client"
)
func main() {
config := hazelcast.Config{}
cc := &config.Cluster
cc.Network.SetAddresses("<EXTERNAL-IP>")
cc.Discovery.UsePublicIP = true
ctx := context.TODO()
client, err := hazelcast.StartNewClientWithConfig(ctx, config)
if err != nil {
panic(err)
}
fmt.Println("Successful connection!")
fmt.Println("Starting to fill the map with random entries.")
m, err := client.GetMap(ctx, "map")
if err != nil {
panic(err)
}
for {
num := rand.Intn(100_000)
key := fmt.Sprintf("key-%d", num)
value := fmt.Sprintf("value-%d", num)
if _, err = m.Put(ctx, key, value); err != nil {
fmt.Println("ERR:", err.Error())
} else {
if mapSize, err := m.Size(ctx); err != nil {
fmt.Println("ERR:", err.Error())
} else {
fmt.Println("Current map size:", mapSize)
}
}
}
}import logging
import random
import hazelcast
logging.basicConfig(level=logging.INFO)
client = hazelcast.HazelcastClient(
cluster_members=["<EXTERNAL-IP>"],
use_public_ip=True,
)
print("Successful connection!", flush=True)
print("Starting to fill the map with random entries.", flush=True)
m = client.get_map("map").blocking()
while True:
random_number = str(random.randrange(0, 100000))
m.put("key-" + random_number, "value-" + random_number)
print("Current map size:", m.size())using Hazelcast;
using Microsoft.Extensions.Logging;
class CsharpExample
{
static async Task Main(string[] args)
{
var options = new HazelcastOptionsBuilder()
.With(args)
.With((configuration, options) =>
{
options.LoggerFactory.Creator = () => LoggerFactory.Create(loggingBuilder => loggingBuilder.AddConfiguration(configuration.GetSection("logging")).AddConsole());
options.Networking.Addresses.Add("<EXTERNAL-IP>");
options.Networking.SmartRouting = false;
})
.Build();
var client = await HazelcastClientFactory.StartNewClientAsync(options);
Console.WriteLine("Successful connection!");
Console.WriteLine("Starting to fill the map with random entries.");
var map = await client.GetMapAsync<string, string>("map");
var random = new Random();
while (true)
{
var randomKey = random.Next(100_000);
await map.PutAsync("key-" + randomKey, "value-" + randomKey);
Console.WriteLine("Current map size: " + await map.GetSizeAsync());
}
}
}Now you can start the application.
Run the following command to fill a map.
for i in {1..10};
do
   clc -c hz map set --name map1 key-$i value-$i;
done
Run the following command to check the map size.
clc -c hz map size --name map1cd java
mvn package
java -jar target/*jar-with-dependencies*.jarYou should see the following output.
Successful connection!
Starting to fill the map with random entries.
Current map size: 2
Current map size: 3
Current map size: 4
....
....
cd nodejs
npm install
npm startYou should see the following output.
Successful connection!
Starting to fill the map with random entries.
Current map size: 2
Current map size: 3
Current map size: 4
....
....
cd go
go run main.goYou should see the following output.
Successful connection!
Starting to fill the map with random entries.
Current map size: 2
Current map size: 3
Current map size: 4
....
....
cd python
pip install -r requirements.txt
python main.pyYou should see the following output.
Successful connection!
Starting to fill the map with random entries.
Current map size: 2
Current map size: 3
Current map size: 4
....
....
cd dotnet
dotnet build
dotnet runYou should see the following output.
Successful connection!
Starting to fill the map with random entries.
Current map size: 2
Current map size: 3
Current map size: 4
....
....