In this tutorial, you’ll build an application that writes changes made to a map back to MongoDB Atlas.
Context
In a write-through cache, data is updated in both the cache and the data source together. This caching pattern is useful when writes to the cache are infrequent.
To build a write-through cache in Hazelcast, you can use the MapStore API. The MapStore interface includes methods that are triggered when operations are invoked on a map. You can implement your own logic in these methods to connect to an external data store, load data from it, and write data back to it. For example, you can use a MapStore to load data from a MongoDB, MySQL, or PostgreSQL database.

In this tutorial, you’ll deploy the following to a Cloud Standard cluster:
-
A MapStore that connects to a MongoDB Atlas database and is integrated into the lifecycle of a map.
-
A
Personclass that you will store in the cache.
You’ll then use SQL to write new Person objects to a Hazelcast map, at which point the MapStore will replicate those objects to the MongoDB Atlas database.
| The code in this tutorial is available as a sample app on GitHub. |
Before you Begin
You’ll need the following to complete this tutorial:
-
JDK 17 or later installed and set up as the
JAVA_HOMEenvironment variable.
Step 1. Create a MongoDB Atlas Database
You need a database that your cluster can connect to and store your data in. MongoDB Atlas is a multi-cloud database service that’s quick, free, and easy to set up without any payment details.
If you already have a MongoDB database that is accessible to the Internet, you can skip this step. Otherwise, see the following instructions.
-
Sign up to a MongoDB Atlas account if you don’t have one already.
-
Create an organization and a new project inside that organization.
-
Click Build a Database and select the free Shared option.
-
Select the AWS cloud provider and the region that’s closest to the one that you chose when you created your Cloud Serverless cluster. The closer the database is to Serverless, the faster the connection.
-
Leave the other options as the defaults and click Create Cluster.
-
Enter a username and password for your database and click Create User.
Make a note of these credentials because you will need to give them to Cloud Standard later. -
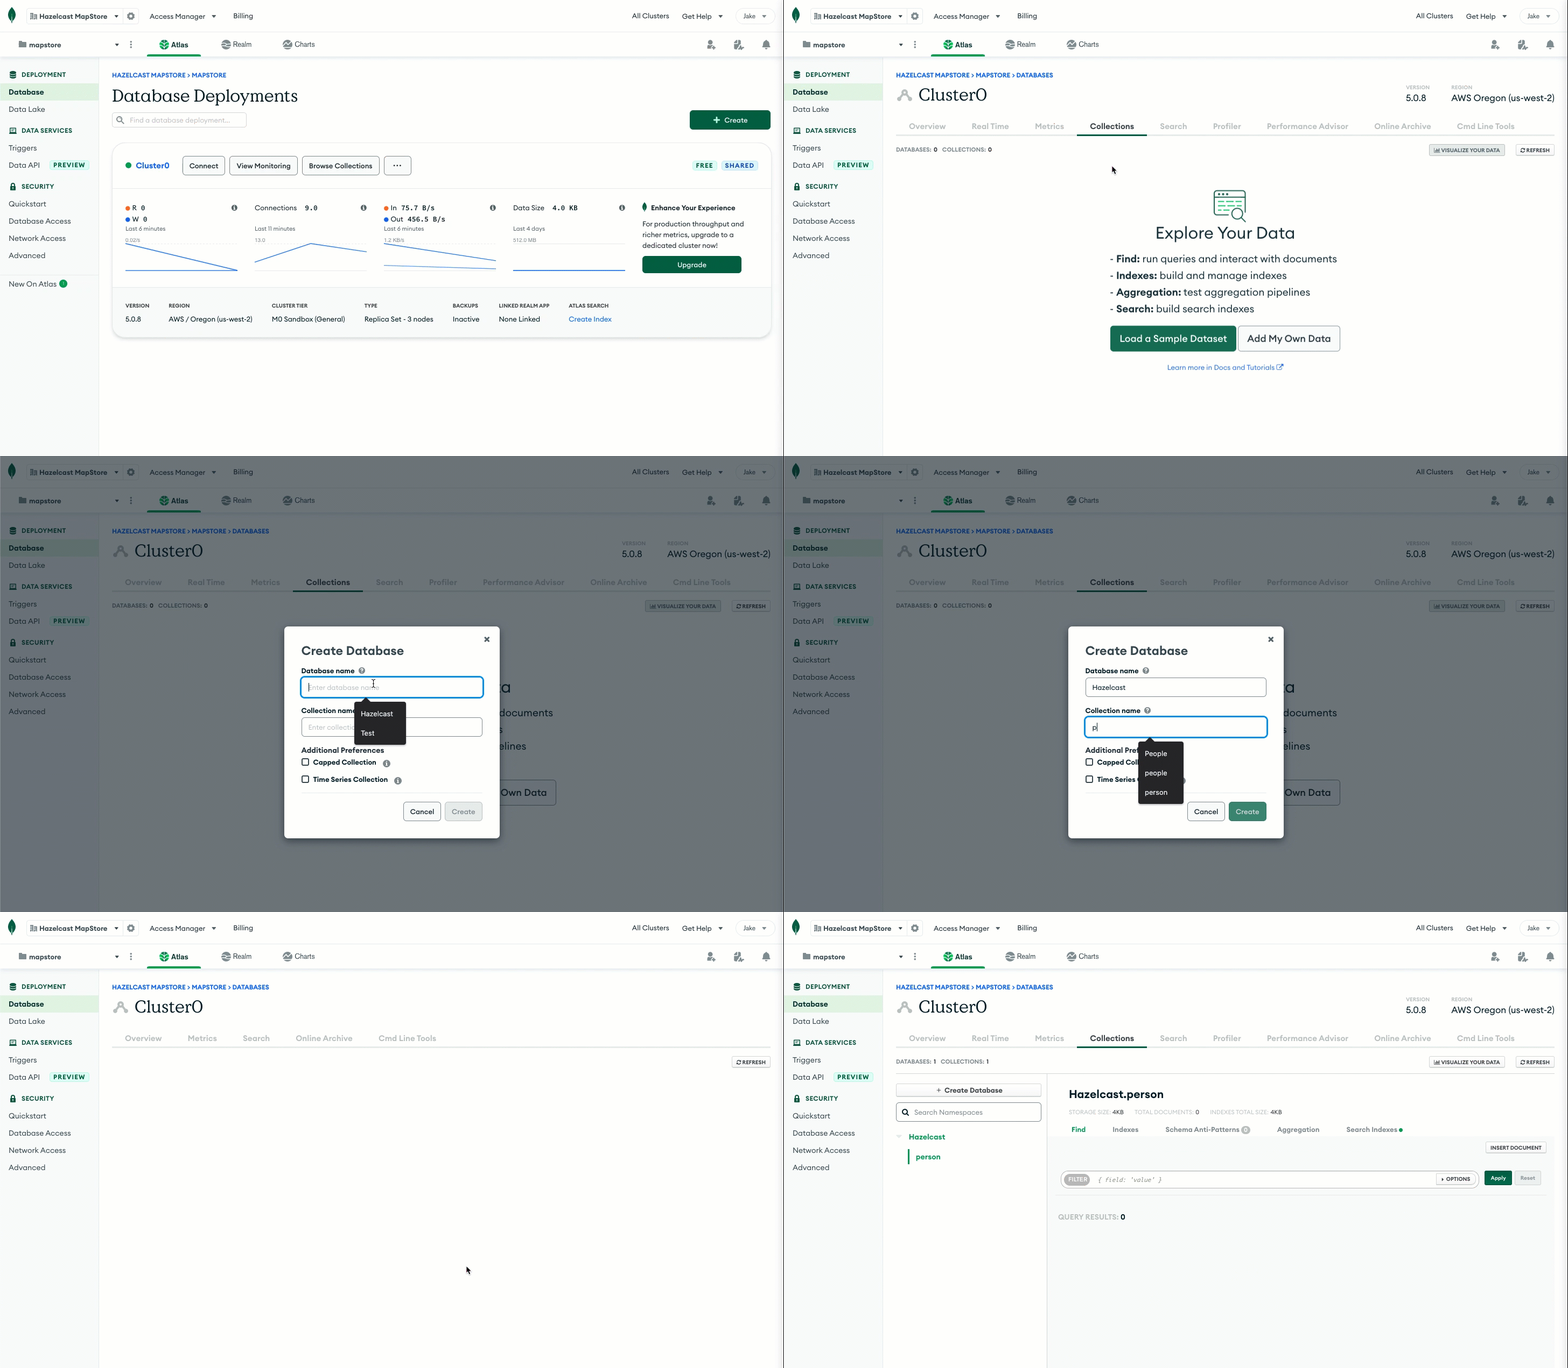
Go to Database in the left navigation under Deployment.
-
Go to the Collections tab, click Add My Own Data, and create a database called Hazelcast with a collection called person.
Your Cloud Standard cluster will store your data in this person collection.

-
Go to Network Access in the left navigation under Security, and click Add IP Address.
-
Select Allow Access From Anywhere and click Confirm.
Now your database is ready. Your Cloud Standard cluster will be able to connect to it and write data to your collection.
Step 2. Clone the Sample Project
All the code for this project is available on GitHub. In this step, you’ll clone the project and learn how it works.
Clone the GitHub repository.
git clone https://github.com/hazelcast-guides/write-through-cache-mongodb-mapstore.git

cd write-through-cache-mongodb-mapstore
git clone [email protected]:hazelcast-guides/write-through-cache-mongodb-mapstore.git
cd write-through-cache-mongodb-mapstoreThe sample code for this tutorial is in the src/main/java/sample/com/hz/demos/mapstore/mongo/ directory:
Person.java
This class is for the objects that you will store in a Hazelcast map and that will be replicated to Atlas.
The Person class uses the Java Serializable interface as a serializer so that Hazelcast can send it to clients and other members as well as deserialize it.
To allow you to query the object fields with SQL, the fields include getters and setters. Although, you can also make the fields public.
public class Person implements Serializable {

    private Integer id;

    private String name;

    private String lastname;

    public String getLastname() {
        return lastname;
    }

    public void setLastname(String lastname) {
        this.lastname = lastname;
    }

    public String getName() {
        return name;
    }

    public void setName(String name) {
        this.name = name;
    }

    public Integer getId() {
        return id;
    }

    public void setId(Integer id) {
        this.id = id;
    }

}MongoPersonRepository.java
This class declares methods for interacting with the MongoDB database, using the MongoDB Java driver. These methods are invoked by the MapStore, which is defined in the MongoPersonMapStore.java file.
public class MongoPersonRepository implements PersonRepository {

    private final String name;

    private final MongoDatabase db;

    @Override
    public void save(Person person) {
        MongoCollection<Document> collection = db.getCollection(this.name);
        Document document = new Document("name", person.getName())
            .append("lastname", person.getLastname())
            .append("id", person.getId());
        collection.replaceOne(Filters.eq("id", person.getId()), document, new ReplaceOptions().upsert(true));
    }

    @Override
    public void deleteAll() {
        MongoCollection<Document> collection = db.getCollection(this.name);
        collection.deleteMany(new Document());
    }

    @Override
    public void delete(Collection<Integer> ids) {
        MongoCollection<Document> collection = db.getCollection(this.name);
        collection.deleteMany(Filters.in("id", ids));
    }

    @Override
    public List<Person> findAll(Collection<Integer> ids) {
        List<Person> persons = new ArrayList<>();
        MongoCollection<Document> collection = db.getCollection(this.name);
        try (MongoCursor<Document> cursor = collection.find(Filters.in("id", ids)).iterator()) {
            while (cursor.hasNext()) {
                Document document = cursor.next();
                persons.add(Person.builder()
                    .id(document.get("id", Integer.class))
                    .name(document.get("name", String.class))
                    .lastname(document.get("lastname", String.class))
                    .build());
            }
        }
        return persons;
    }

    @Override
    public Collection<Integer> findAllIds() {
        Set<Integer> ids = new LinkedHashSet<>();
        MongoCollection<Document> collection = db.getCollection(this.name);
        try (MongoCursor<Document> cursor = collection.find().projection(Projections.include("id")).iterator()) {
            while (cursor.hasNext()) {
                Document document = cursor.next();
                ids.add(document.get("id", Integer.class));
            }
        }
        return ids;
    }

}MongoPersonMapStore.java
This class declares the trigger methods for the MapStore that will work with a map that has integer keys and Person object values.
The class implements the MapLoaderLifecycleSupport interface to manage the connection to the database, using the init() and destroy() methods.
The init() method reads the database connection credentials from the Java properties. You’ll provide these in the Cloud console when you configure the MapStore.
public class MongoPersonMapStore implements MapStore<Integer, Person>, MapLoaderLifecycleSupport {

    private MongoClient mongoClient;

    private PersonRepository personRepository;

    @Override
    public void init(HazelcastInstance hazelcastInstance, Properties properties, String mapName) {
        this.mongoClient = new MongoClient(new MongoClientURI(properties.getProperty("uri")));
        MongoDatabase database = this.mongoClient.getDatabase(properties.getProperty("database"));
        this.personRepository = new MongoPersonRepository(mapName, database);
        log.info("MongoPersonMapStore::initialized");
    }

    @Override
    public void destroy() {
        MongoClient mongoClient = this.mongoClient;
        if (mongoClient != null) {
            mongoClient.close();
        }
        log.info("MongoPersonMapStore::destroyed");
    }

    @Override
    public void store(Integer key, Person value) {
        log.info("MongoPersonMapStore::store key {} value {}", key, value);
        getRepository().save(Person.builder()
            .id(key)
            .name(value.getName())
            .lastname(value.getLastname())
            .build());
    }

    @Override
    public void storeAll(Map<Integer, Person> map) {
        log.info("MongoPersonMapStore::store all {}", map);
        for (Map.Entry<Integer, Person> entry : map.entrySet()) {
            store(entry.getKey(), entry.getValue());
        }
    }

    @Override
    public void delete(Integer key) {
        log.info("MongoPersonMapStore::delete key {}", key);
        getRepository().delete(key);
    }

    @Override
    public void deleteAll(Collection<Integer> keys) {
        log.info("MongoPersonMapStore::delete all {}", keys);
        getRepository().delete(keys);
    }

    @Override
    public Person load(Integer key) {
        log.info("MongoPersonMapStore::load by key {}", key);
        return getRepository().find(key).orElse(null);
    }

    @Override
    public Map<Integer, Person> loadAll(Collection<Integer> keys) {
        log.info("MongoPersonMapStore::loadAll by keys {}", keys);
        return getRepository().findAll(keys).stream()
            .collect(Collectors.toMap(Person::getId, Function.identity()));
    }

    @Override
    public Iterable<Integer> loadAllKeys() {
        log.info("MongoPersonMapStore::loadAllKeys");
        return getRepository().findAllIds();
    }

    private PersonRepository getRepository() {
        PersonRepository personRepository = this.personRepository;
        if (personRepository == null) {
            throw new IllegalStateException("Person Repository must not be null!");
        }
        return this.personRepository;
    }

}Step 3. Deploy the Classes to the Cluster
In this step, you’ll use the Hazelcast Cloud Maven plugin to package the project into a single JAR file and upload that file to your cluster.
-
Open the
pom.xmlfile. -
Configure the Maven plugin with values for the following elements:
Element Location in the Cloud console <clusterName>Next to Connect Client, select any client, and then go to Advanced Setup. The cluster name/ID is at the top of the list.
<apiKey>and<apiSecret>You can create only one API key and secret pair on your account. If you need to change your API credentials, you must first remove your existing credentials, and then create new credentials. To create a set of API credentials, do the following:
-
Sign into the Cloud console
-
Select Account from the side navigation bar
-
Select Developer from the Account options
The Developer screen displays.
-
Select the Generate New API Key button
Use these credentials in your applications to manage all clusters in your account.
After creating your credentials, ensure that you applications are correctly configured to use the API credentials.
<plugin> <groupId>com.hazelcast.cloud</groupId> <artifactId>hazelcast-cloud-maven-plugin</artifactId> <version>0.2.0</version> <configuration> <apiBaseUrl>https://api.cloud.hazelcast.com</apiBaseUrl> <clusterId></clusterId> <apiKey></apiKey> <apiSecret></apiSecret> </configuration> </plugin> -
-
Execute the following goal of the Maven plugin to package the project into a JAR file and deploy that file to your Cloud Standard cluster:
mvn clean package hazelcast-cloud:deploy
You should see that the file was uploaded and is ready to be used.
BUILD SUCCESSStep 4. Configure the MapStore
To use a MapStore, it must be configured for a specific map in your Cloud Standard cluster. When a map is configured with a MapStore, Hazelcast plugs the MapStore implementation into the lifecycle of the map so that the MapStore is triggered when certain map operations are invoked.
-
Open the Cloud console.
-
Click Add + under Data Structures on the cluster dashboard.
-
Click Add New Configuration in the top right corner.
-
Enter person in the Map Name field.
-
In the bottom left corner, select Enable MapStore.
-
Select the sample.com.hazelcast.cloud.mapstore5.mongo.MongoPersonMapStore classname from the dropdown. If you don’t see a classname, you need to deploy the MapStore to your Cloud Standard cluster.
-
Leave the Write Delay Seconds field set to 0 to configure a write-through cache.
In this configuration, when you add new entries to the person map, Hazelcast will invoke the MapStore’s
store()method before adding the entry to the map. -
In the Properties section, enter the following.
Hazelcast encrypts these properties to keep them safe.
Name Value uri
Your MongoDB connection string. You can find this connection string in the Atlas console.
database
The name of the database that you created in step 1.
Hazelcast -
Click Save Configuration.
Step 5. Test the MapStore
To test that the MapStore is working, you need to create a map, add some entries to it, and check that those entries are replicated to your MongoDB database.
-
Sign into the Cloud console.
-
Click Management Center.
-
Click SQL Browser in the toolbar at the top of the page.
-
Execute the following queries to set up a connection to the map and add an entry to it.
CREATE MAPPING person
TYPE IMap
OPTIONS (
    'keyFormat' = 'int',
    'valueFormat' = 'java',
    'valueJavaClass' = 'sample.com.hz.demos.mapstore.mongo.Person')
INSERT INTO person VALUES ( 1, 1, 'Cahill', 'Jake' ); -
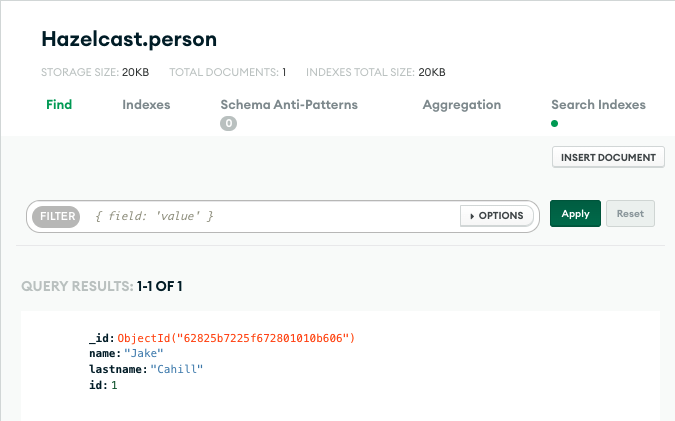
Open your database in MongoDB Atlas and click on the person collection.
You should see that the collection has a new document, which contains the same data as the map entry you added to the map in Serverless.

If your test fails, do the following:
-
Update the MapStore implementation or the configuration and start the process again.
Summary
In this tutorial, you learned how to do the following:
-
Use a Mapstore to write changes made in a Cloud Standard cluster back to a MongoDB Atlas database.
-
Deploy the MapStore to a Cloud Standard cluster, using the Hazelcast Cloud Maven plugin.
-
Trigger the MapStore by adding data to a map, using SQL.
