In this tutorial, you’ll build a solution for detecting fraudulent transactions using AWS Lambda, Hazelcast Viridian Cloud, and Node.js.
Context
Every time your credit or debit card initiates a transaction, the underlying payment system validates the transaction with a series of checks. Some checks are simple, such as making sure that you have enough funds. Other checks are more advanced, such as filtering the history of card payments to identify a personalized pattern and validating the given transaction against that pattern.
In this tutorial, you’ll build an application that validates transactions made at airports, using the following process:
-
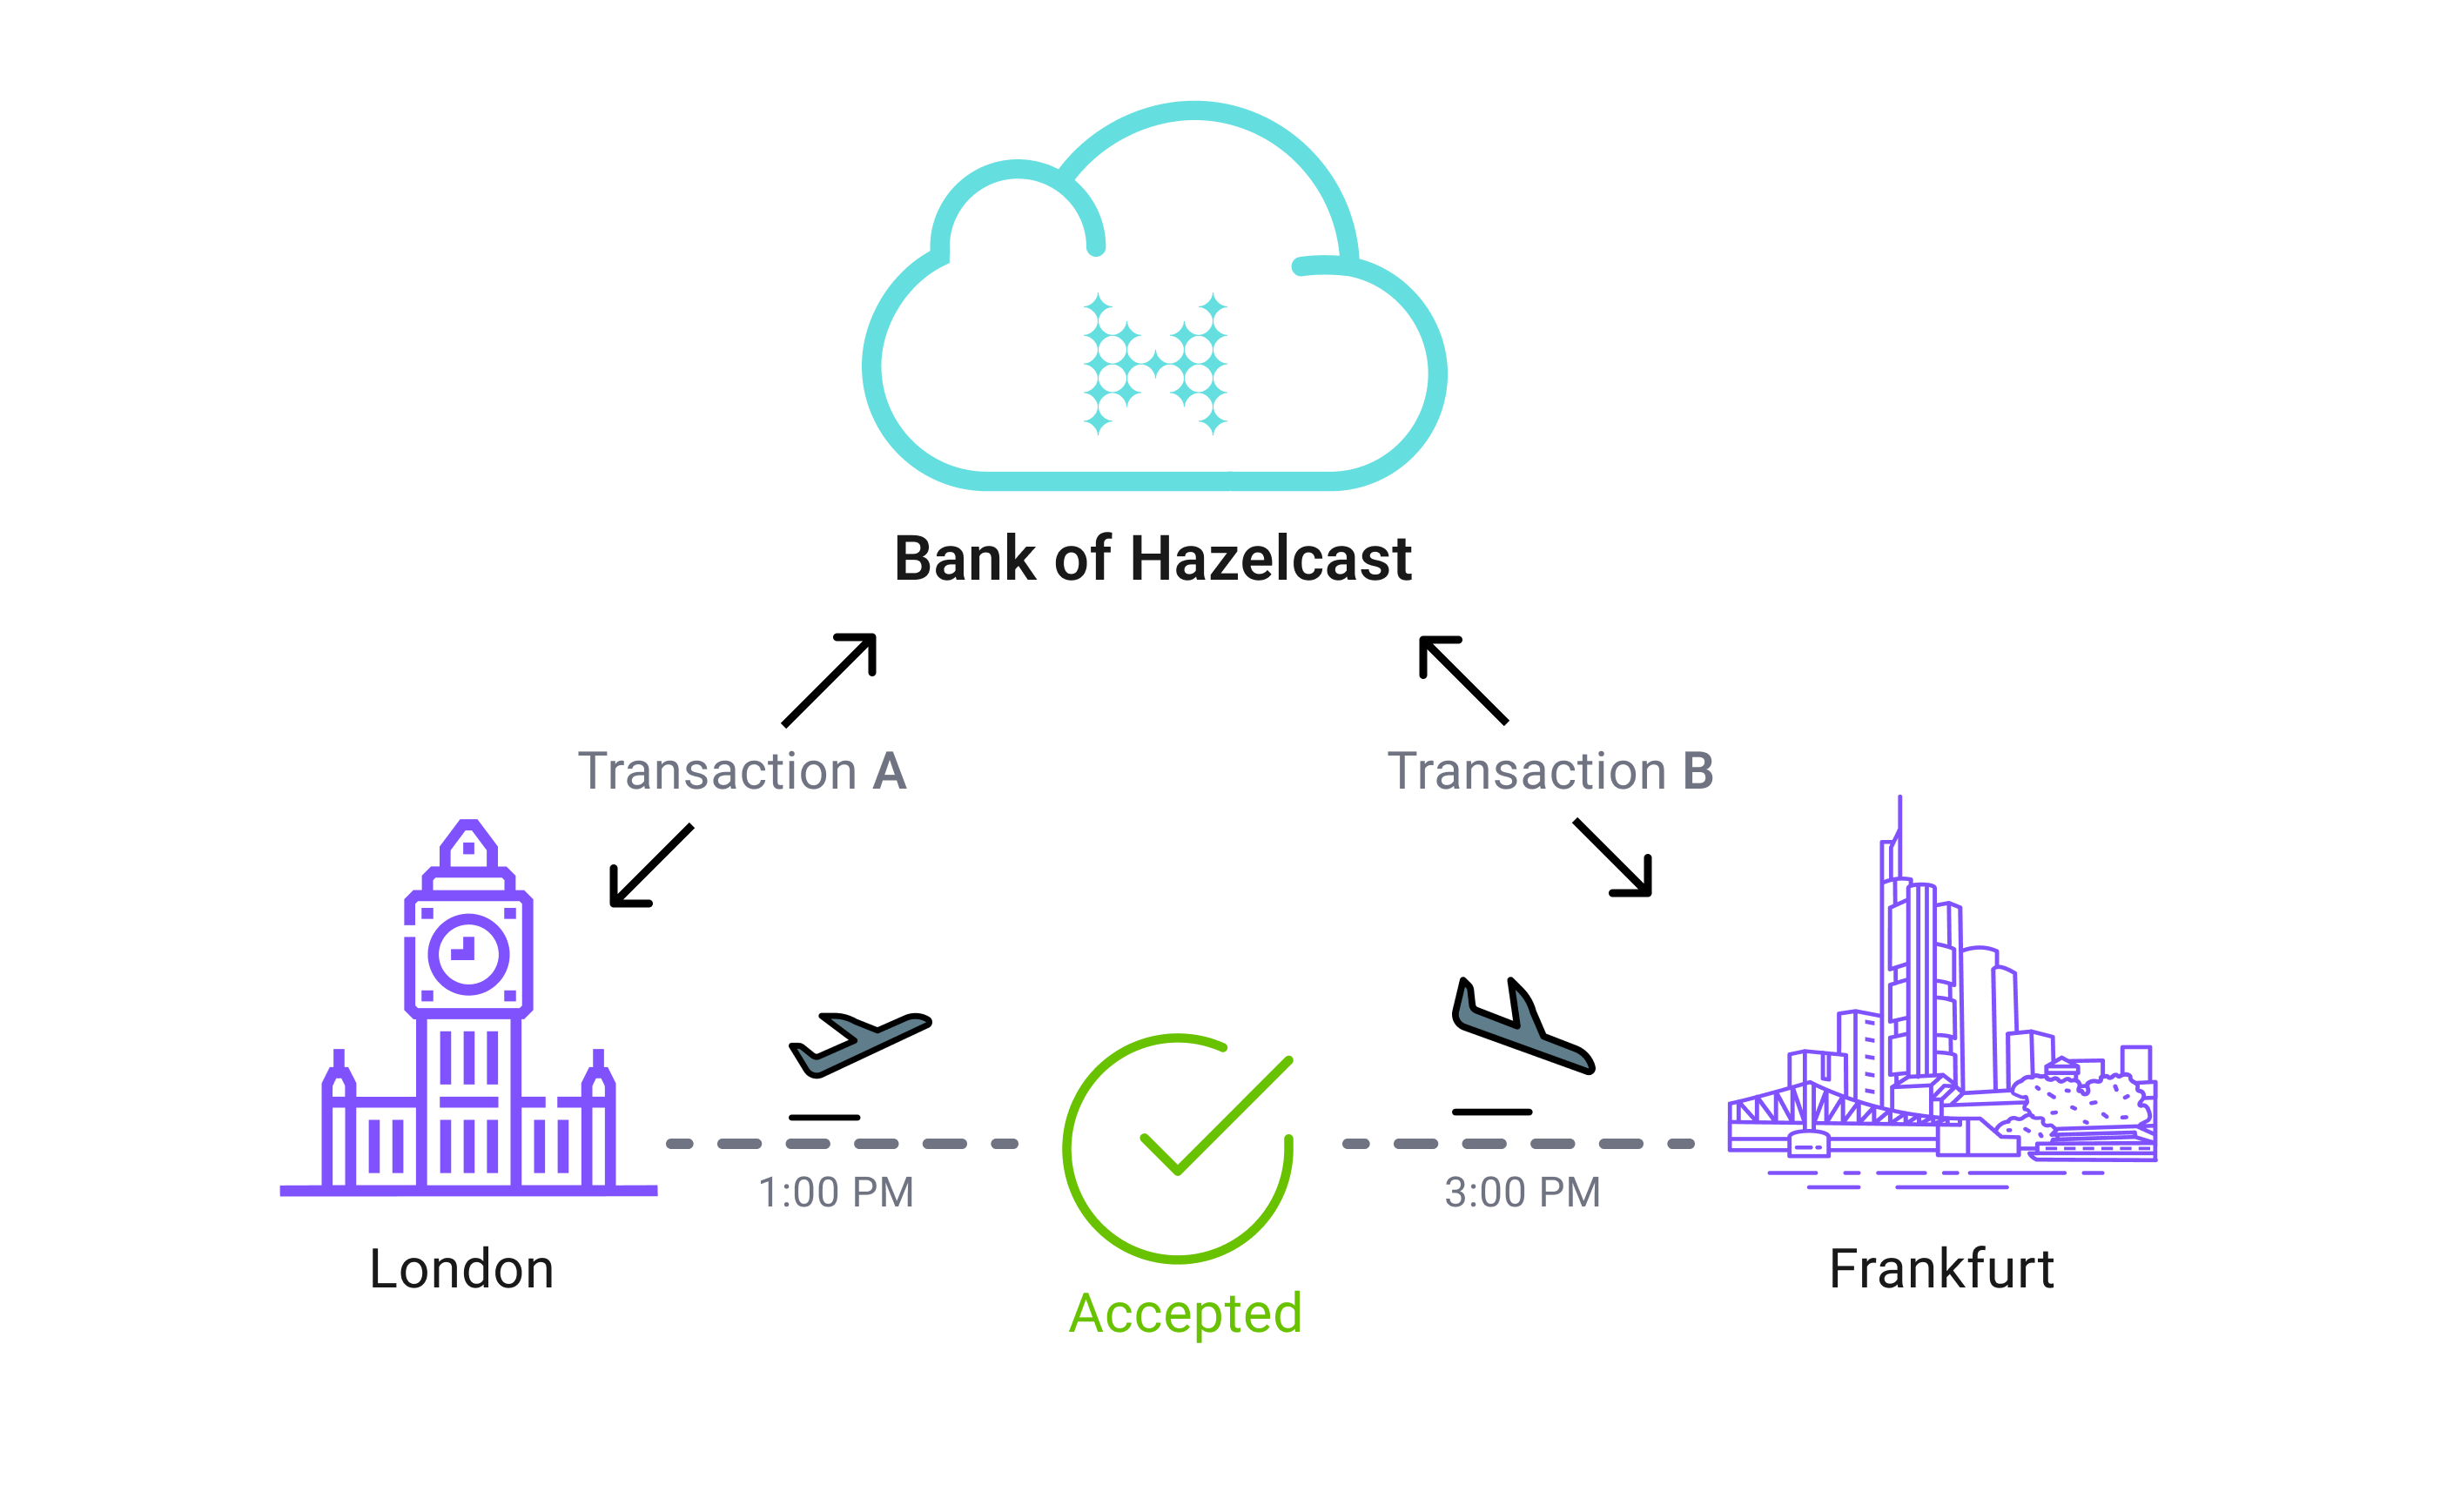
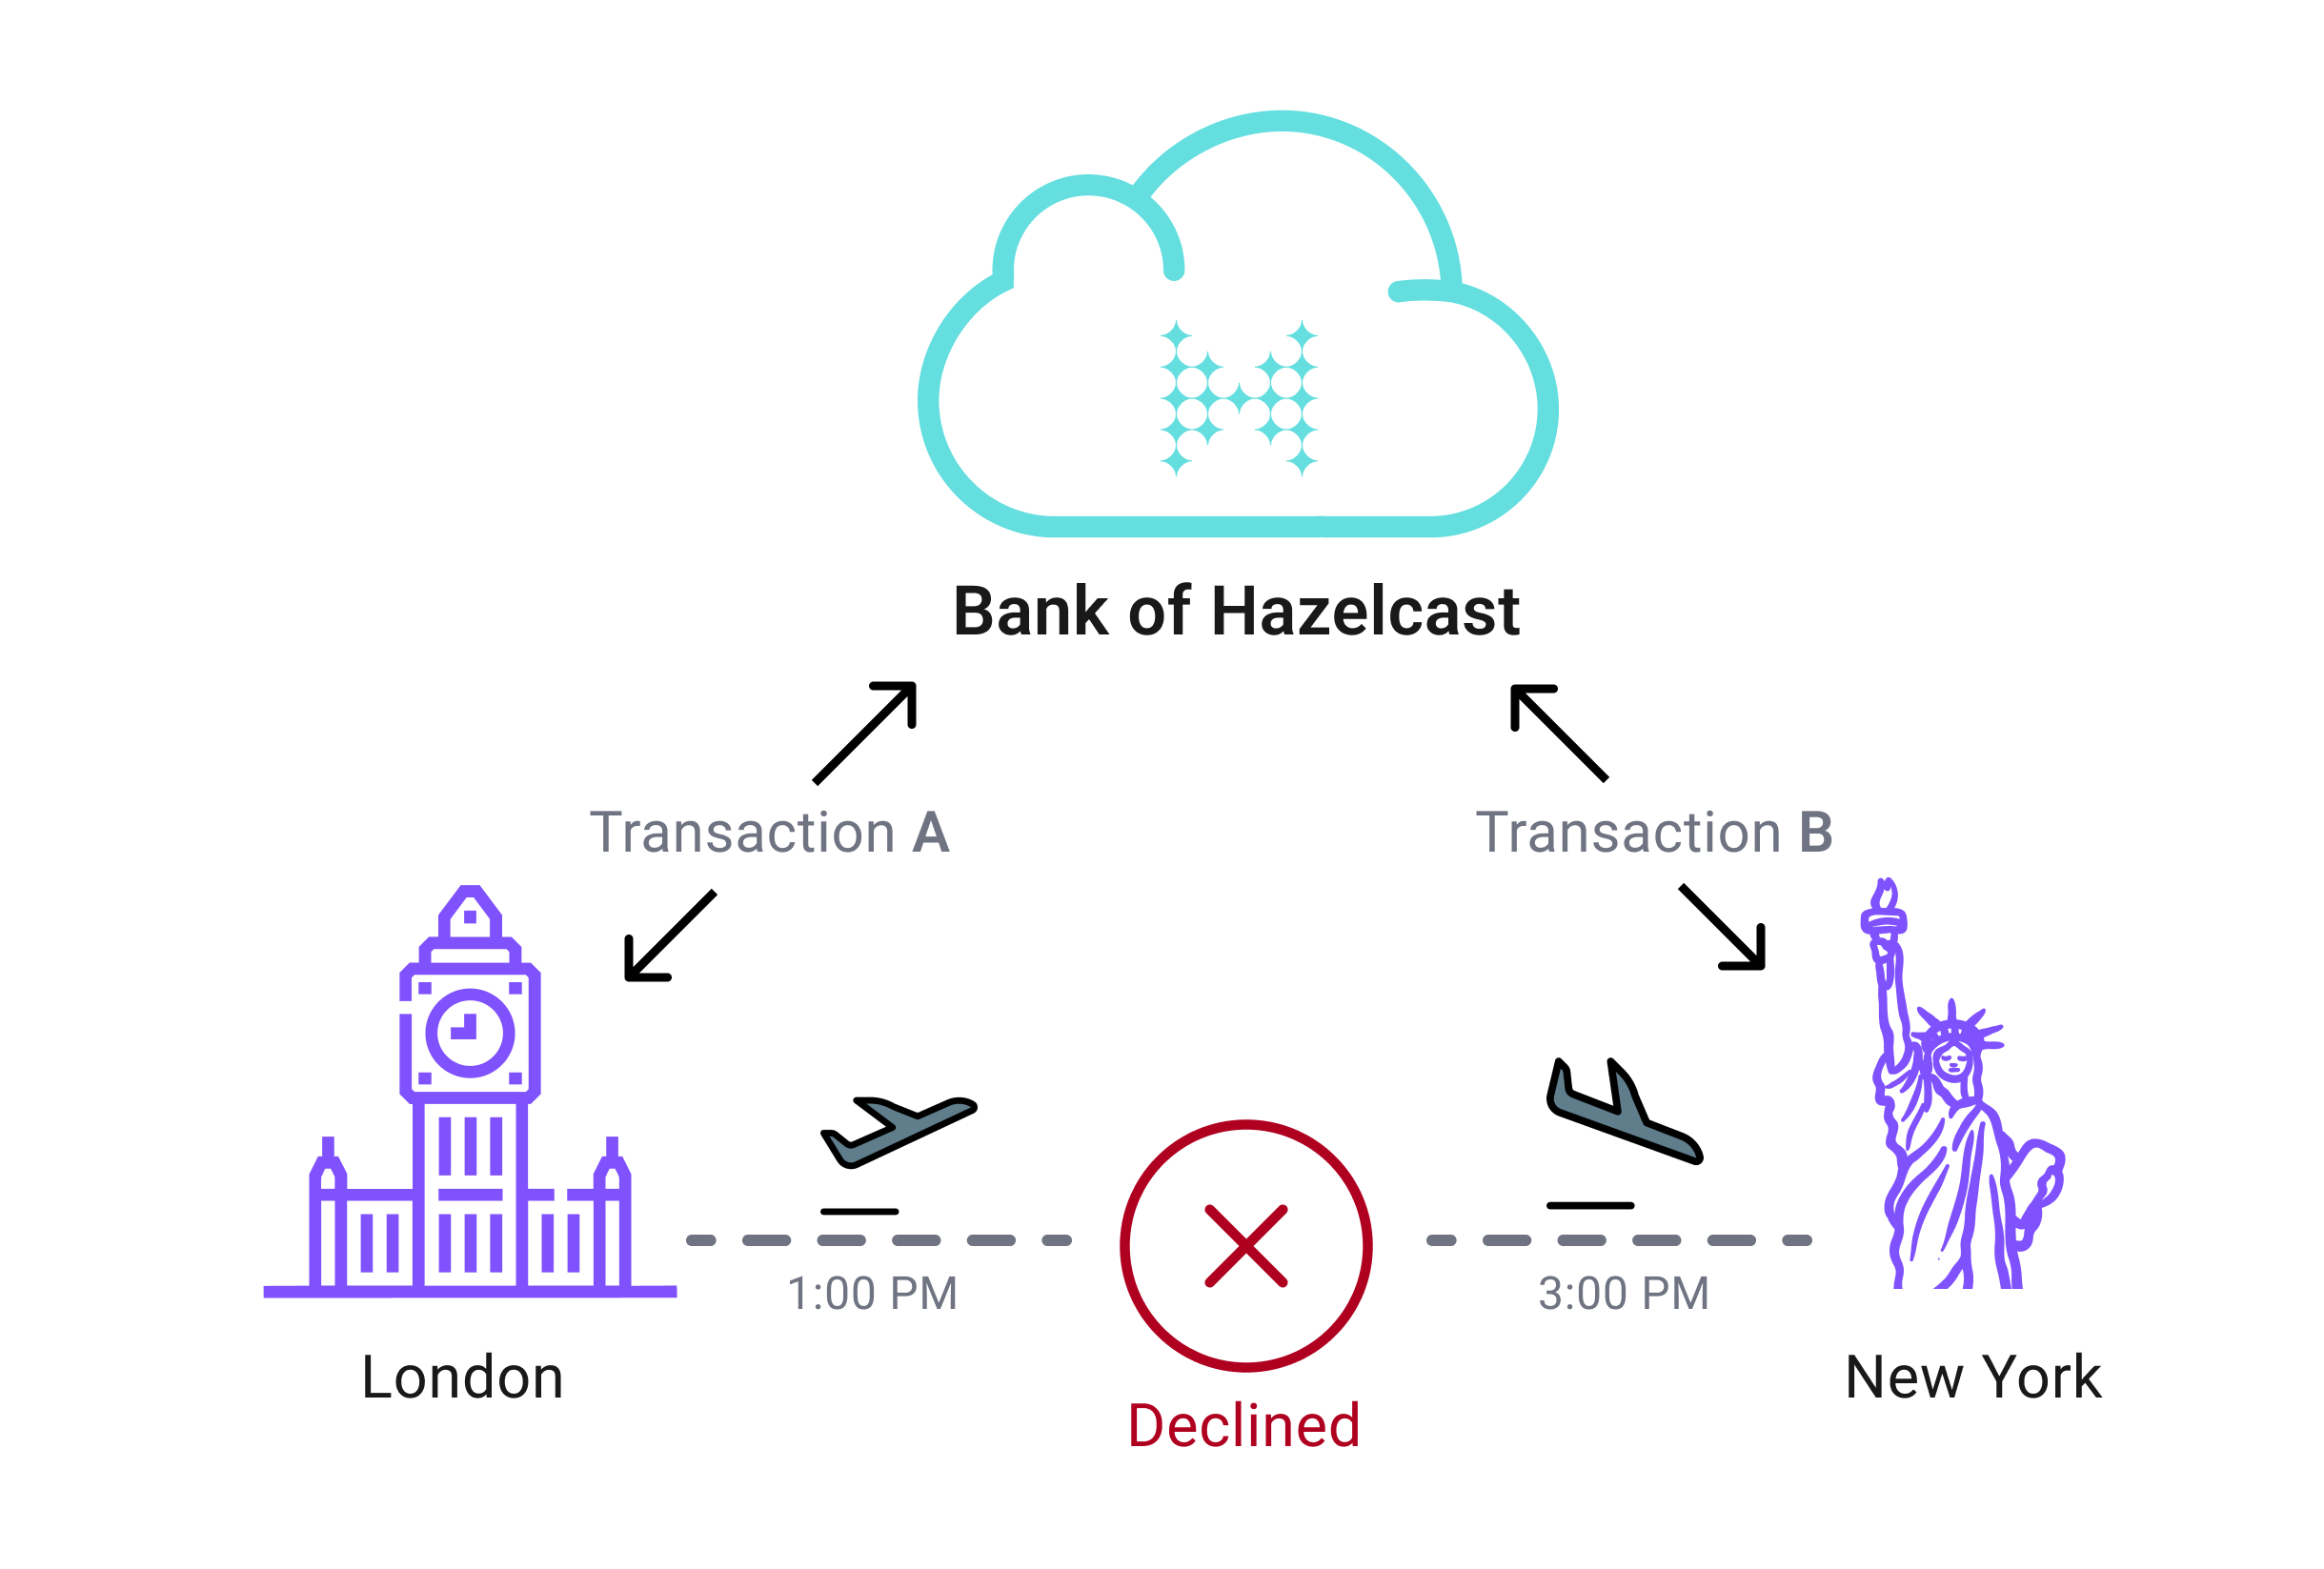
Compare the time between two transactions. Transaction A is the previous transaction and transaction B is the current transaction.
-
Calculate the distance between the airports where the transactions were made, using the haversine formula.
-
Determine whether someone could move from one airport to the other within the given timeframe.
For example, if transaction A is made in London and transaction B is made in Frankfurt, and the time between them is greater than two hours, then the transaction is valid.
If transaction A is made in London and transaction B is made in New York, and the time between them is less than two hours, then the transaction is suspicious.
Every time a new transaction is made, the airport’s coordinates are read and used as input in the haversine formula. If the data is slow to read, the whole process takes longer, which delays the transaction. To make sure that this data is always available and fast to read, it is cached in a Cloud Standard cluster because it offers fast-access in-memory storage.
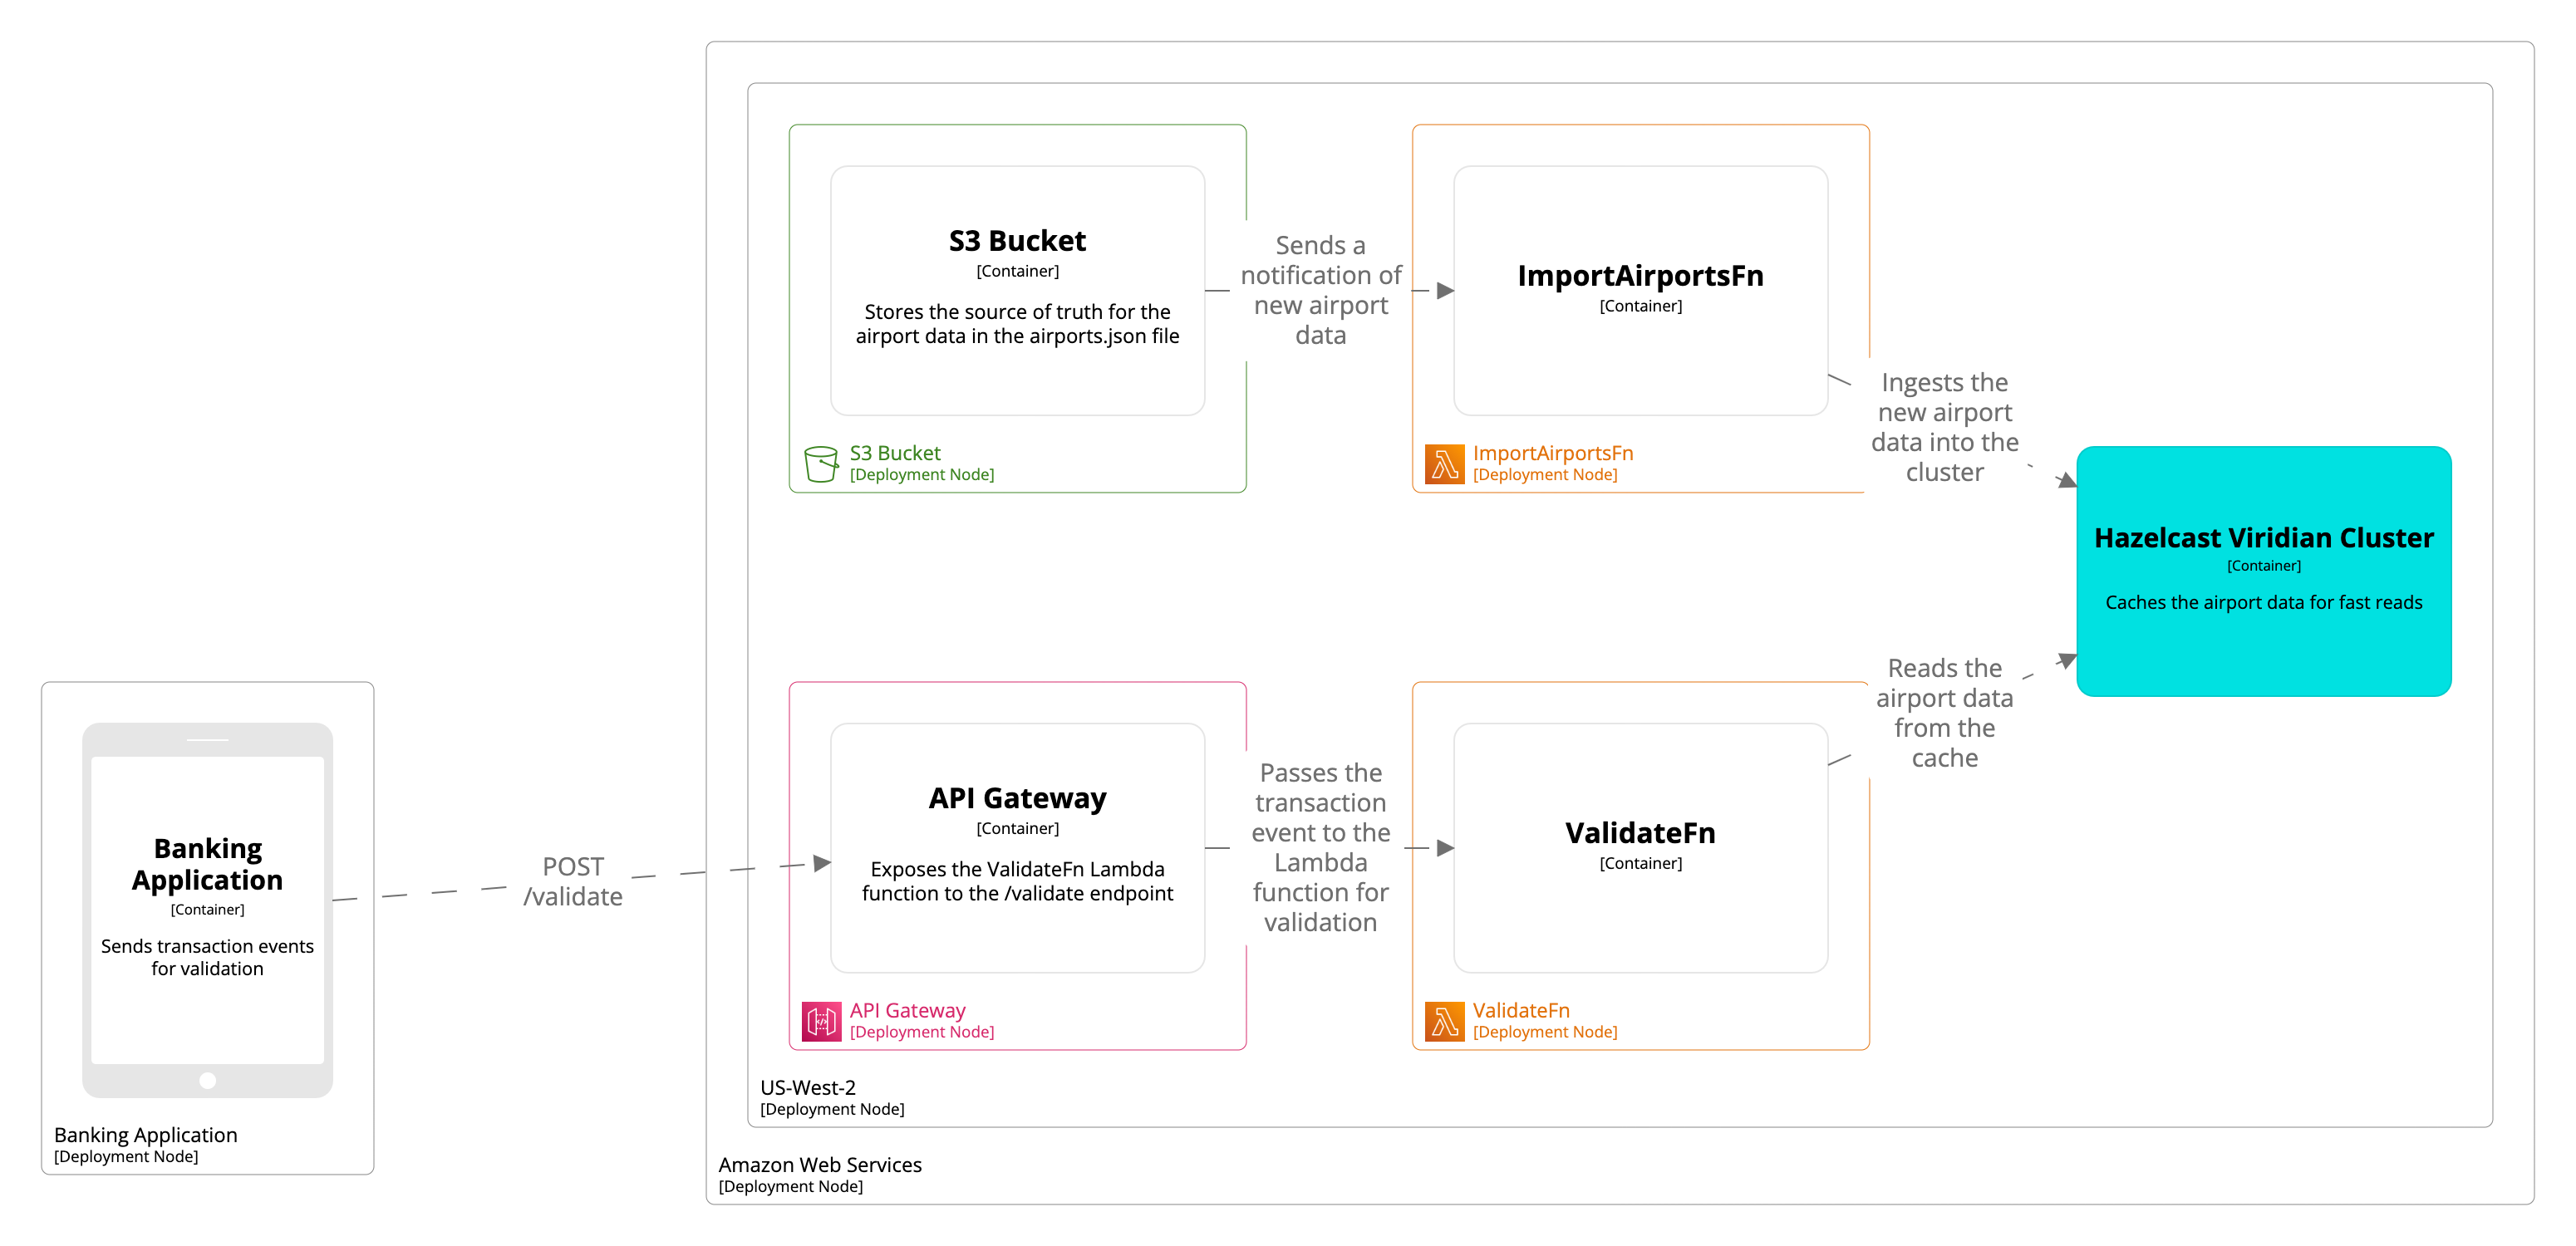
Architecture
The whole stack is in the same AWS region to ensure the shortest network paths between the components.
-
The S3 bucket stores the airport data.
-
The
ImportAirportsFnLambda function ingests the airport data into the Cloud Standard cluster so that it can be queried with the lowest latency. This function is triggered by uploads to the S3 bucket so that any new data is ingested to the Cloud Standard cluster. -
The
ValidateFnLambda function implements the fraud detection logic to validate the transactions. This function communicates with the Cloud Standard cluster to read airport data. -
The Amazon API Gateway exposes the
ValidateFnLambda function to a REST API resource at the/validatepath. -
The Cloud Standard cluster stores a copy of the airport data so that the
ValidateFnLambda function can read it faster than if it were in the S3 bucket.
Before you Begin
You need the following:
-
A command-line tool such as Terminal for macOS.
-
Knowledge of AWS services, in particular IAM roles, S3, and Lambda.
-
An AWS account
-
The HTTPie CLI
-
This tutorial assumes that your Cloud cluster is hosted in the us-west-2 (Oregon) region. For best performance, it’s important to host the AWS services in a region that’s closest to your cluster. If you choose to host your Serverless cluster in a different region, edit the --regionflag of the AWS CLI commands in this tutorial.
Step 1. Set Up the Project Files
To set up the project, you need to download the code from GitHub, install the dependencies, and get the TLS certificate files to allow the Hazelcast client to connect to your Cloud Standard cluster.
-
Clone the GitHub repository.
git clone https://github.com/hazelcast-guides/serverless-fraud-detection.git
cd serverless-fraud-detection/code
git clone [email protected]:hazelcast-guides/serverless-fraud-detection.git cd serverless-fraud-detection/code -
Install the project’s dependencies.
npm i -
Open the Cloud console. Next to Connect Client, select Advanced and download the keystore files using the Download keystore file link.
-
Save your files to the
code/directory.
Step 2. Set Up the AWS CLI
You need the AWS CLI to complete this tutorial. To use the AWS CLI to connect to your AWS account and interact with services, you need to grant it the right permissions, using the IAM service.
-
Open the IAM service in the AWS console.
-
Go to Policies and click Create policy.
-
Click the JSON tab and paste the following into the input box:
{ "Version": "2012-10-17", "Statement": [ { "Effect": "Allow", "Action": [ "lambda:CreateFunction", "lambda:AddPermission", "lambda:UpdateFunctionConfiguration", "s3:CreateBucket", "s3:PutBucketNotification", "s3:PutObject", "iam:CreateRole", "iam:PutRolePolicy", "iam:PassRole" ], "Resource": "*" } ] } -
Click through the steps, and then give your policy a name, such as CLI.
-
Go to Users and click Add users.
-
Create a user with programmatic access and attach the policy that you just created to it.
-
Copy the Access key id and Secret access key credentials somewhere safe to use in the next step.
-
Configure the CLI with your access key credentials.
Open the
~/.aws/credentialsfile and paste the following. Add the values for your access key id and secret access key:[default] aws_access_key_id= aws_secret_access_key=Open the
%USERPROFILE%\.aws\credentialsfile and paste the following. Add the values for your access key id and secret access key:[default] aws_access_key_id= aws_secret_access_key=
Step 3. Set Up the S3 Bucket and IAM Roles
You need an S3 bucket and an IAM role that you can attach to the Lambda function later in this tutorial. The S3 bucket will store the airport data. The IAM role will grant the Lambda functions permission to upload logs to CloudWatch and read airport data from your S3 bucket.
-
Create an S3 bucket in which to store the airport data. Replace
$BUCKET_NAMEwith a unique name for your bucket.aws s3api create-bucket --bucket $BUCKET_NAME --region us-west-2 --create-bucket-configuration LocationConstraint=us-west-2 -
Create an IAM role for your Lambda and API Gateway services. You’ll create the API Gateway in the last step of this tutorial.
aws iam create-role --role-name HazelcastServerlessFraudDetection --assume-role-policy-document file://aws/lambda_trust_policy.jsonExample output
{ "Role": { "Path": "/", "RoleName": "HazelcastServerlessFraudDetection", "RoleId": "AROA4EAWH6IZ5HCD6OVIJ", "Arn": "arn:aws:iam::833270313523:role/HazelcastServerlessFraudDetection", "CreateDate": "2022-08-05T12:34:15+00:00", "AssumeRolePolicyDocument": { "Version": "2012-10-17", "Statement": [ { "Effect": "Allow", "Principal": { "Service": "lambda.amazonaws.com" }, "Action": "sts:AssumeRole" } ] } } } -
Copy the ARN that is displayed in the output. You’ll need the ARN later in this tutorial.
-
Attach a policy to your role so that the Lambda functions have permission to upload logs and read airport data from your S3 bucket.
aws iam put-role-policy --role-name HazelcastServerlessFraudDetection --policy-name HazelcastLambda --policy-document file://aws/lambda_policy.json
Step 4. Ingest Airport Data
The code that ingests airport data from the S3 bucket into your Cloud Standard cluster uses the following resources in the code/ directory:
-
hazelcast.js: Creates a Hazelcast client to connect to the cluster. -
import.js: Ingests the airport data from the S3 bucket into the cluster where it can be read faster. This code uses the client in thehazelcast.jsfile to communicate with the cluster. -
node_modules/: Contains the project dependencies. -
.pemfiles: Contain the TLS certificate data to authenticate the Hazelcast client.-
Zip the files so that they are ready to be given to the Lambda function.
zip -r import.zip import.js hazelcast.js node_modules ca.pem cert.pem key.pem -
Create the Lambda function and pass it your zipped file. Replace the
$ROLE_ARNplaceholder with the ARN of theHazelcastServerlessFraudDetectionrole that you created when you set up the AWS services.aws lambda create-function --function-name ImportAirportsFn --role $ROLE_ARN --zip-file fileb://import.zip --handler import.handle --description "Imports Airport Data from S3 into the Hazelcast Viridian cluster" --runtime nodejs16.x --region us-west-2 --timeout 30 --memory-size 256 --publishExample output
{ "FunctionName": "ImportAirportsFn", "FunctionArn": "arn:aws:lambda:us-west-2:833270313523:function:ImportAirportsFn", "Runtime": "nodejs16.x", "Role": "arn:aws:iam::833270313523:role/HazelcastServerlessFraudDetection", "Handler": "import.handle", "CodeSize": 13767991, "Description": "Imports Airport Data from S3 into the Hazelcast Viridian cluster", "Timeout": 30, "MemorySize": 256, "LastModified": "2022-08-05T13:53:31.291+0000", "CodeSha256": "1wTeFCYiSzVrl4nWgmaJNcsTw1d+rHkNP7UekLnQDIM=", "Version": "6", "TracingConfig": { "Mode": "PassThrough" }, "RevisionId": "cfc2c02f-1dfe-4f13-94e2-446be629d575", "State": "Pending", "StateReason": "The function is being created.", "StateReasonCode": "Creating", "PackageType": "Zip", "Architectures": [ "x86_64" ], "EphemeralStorage": { "Size": 512 } } -
Copy the value of the
FunctionArnfield and paste it into theaws/s3_notification.jsonfile to replace the$FUNCTION_ARNplaceholder. -
Grant the
ImportAirportsFnfunction permission to be invoked whenever data is uploaded to the S3 bucket. Replace the$S3_BUCKET_NAMEplaceholder with the name of your S3 bucket.aws lambda add-permission --function-name ImportAirportsFn --action lambda:InvokeFunction --principal s3.amazonaws.com --source-arn arn:aws:s3:::$S3_BUCKET_NAME --statement-id hazelcast-viridian-lambda-permission --region us-west-2Example output
{ "Statement": "{\"Sid\":\"hazelcast-viridian-lambda-permission\",\"Effect\":\"Allow\",\"Principal\":{\"Service\":\"s3.amazonaws.com\"},\"Action\":\"lambda:InvokeFunction\",\"Resource\":\"arn:aws:lambda:us-west-2:833270313523:function:ImportAirportsFn\",\"Condition\":{\"ArnLike\":{\"AWS:SourceArn\":\"arn:aws:s3:::hazelcast-airports\"}}}" } -
Configure the s3 bucket to notify your
ImportAirportsFnfunction whenever new data is added to the bucket. Replace the$S3_BUCKET_NAMEplaceholder with the name of the S3 bucket that you created.aws s3api put-bucket-notification-configuration --bucket $S3_BUCKET_NAME --notification-configuration file://aws/s3_notification.json --region us-west-2 -
Open the Cloud console. Next to Connect Client, select Advanced to view cluster token and certificate password. Leave this window open. You’ll need some of these details in the next step.
-
Configure the
ImportAirportsFnfunction with the environment variables that the Hazelcast client needs to connect to your cluster.aws lambda update-function-configuration --function-name ImportAirportsFn --environment Variables="{CLUSTER_NAME=$CLUSTER_NAME,KEYSTORE_PASSWORD=$KEYSTORE_PASSWORD,DISCOVERY_TOKEN=$DISCOVERY_TOKEN}" --region us-west-2Example output
{ "FunctionName": "ImportAirportsFn", "FunctionArn": "arn:aws:lambda:us-west-2:833270313523:function:ImportAirportsFn", "Runtime": "nodejs16.x", "Role": "arn:aws:iam::833270313523:role/HazelcastServerlessFraudDetection", "Handler": "import.handle", "CodeSize": 13767991, "Description": "Imports Airport Data from S3 into the Hazelcast Viridian cluster", "Timeout": 30, "MemorySize": 256, "LastModified": "2022-08-05T14:58:19.000+0000", "CodeSha256": "1wTeFCYiSzVrl4nWgmaJNcsTw1d+rHkNP7UekLnQDIM=", "Version": "$LATEST", "Environment": { "Variables": { "CLUSTER_NAME": "", "DISCOVERY_TOKEN": "", "KEYSTORE_PASSWORD": "" } }, "TracingConfig": { "Mode": "PassThrough" }, "RevisionId": "30fe07e0-6c1d-4c77-ada2-db4cb21f5997", "State": "Active", "LastUpdateStatus": "InProgress", "LastUpdateStatusReason": "The function is being created.", "LastUpdateStatusReasonCode": "Creating", "PackageType": "Zip", "Architectures": [ "x86_64" ], "EphemeralStorage": { "Size": 512 } } -
Upload the airport data to the S3 bucket.
aws s3 cp data/airports.json s3://$S3_BUCKET_NAME/Example output
upload: data/airports.json to s3://hazelcast-airports/airports.json -
Open the CloudWatch service, go to Logs > Log groups, and find the logs for the /aws/lambda/ImportAirportsFn group.
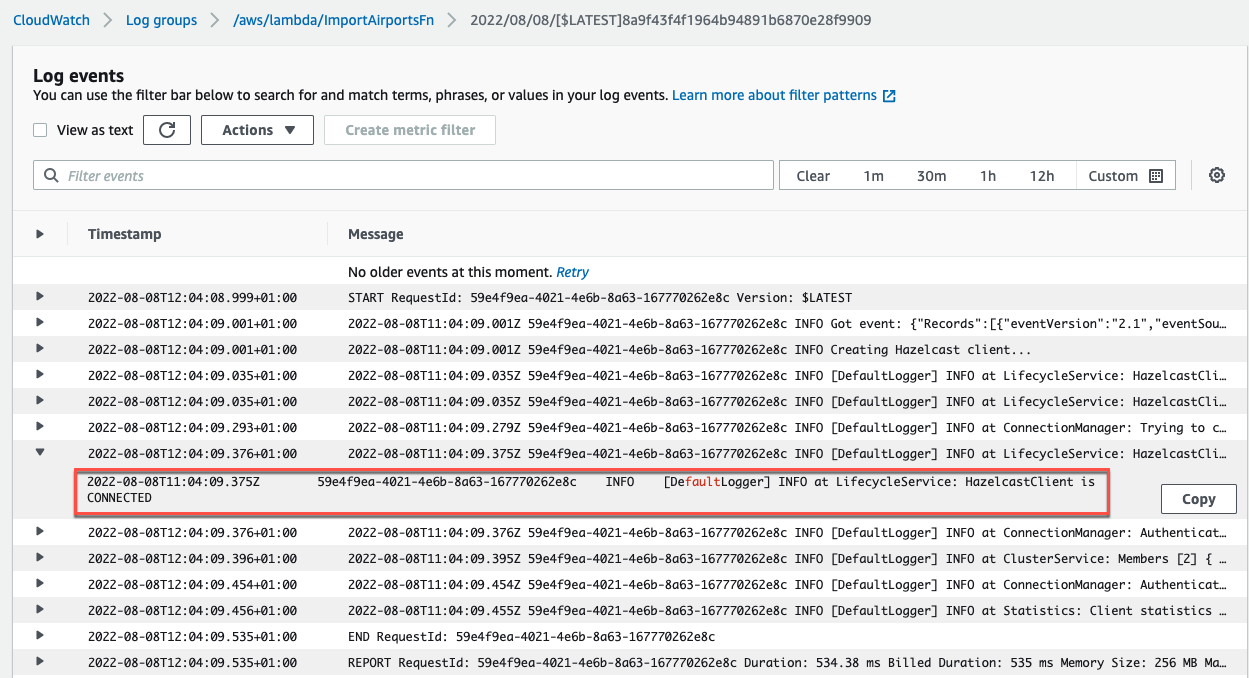
The logs show that the Lambda function was invoked when the airport data was uploaded.
-
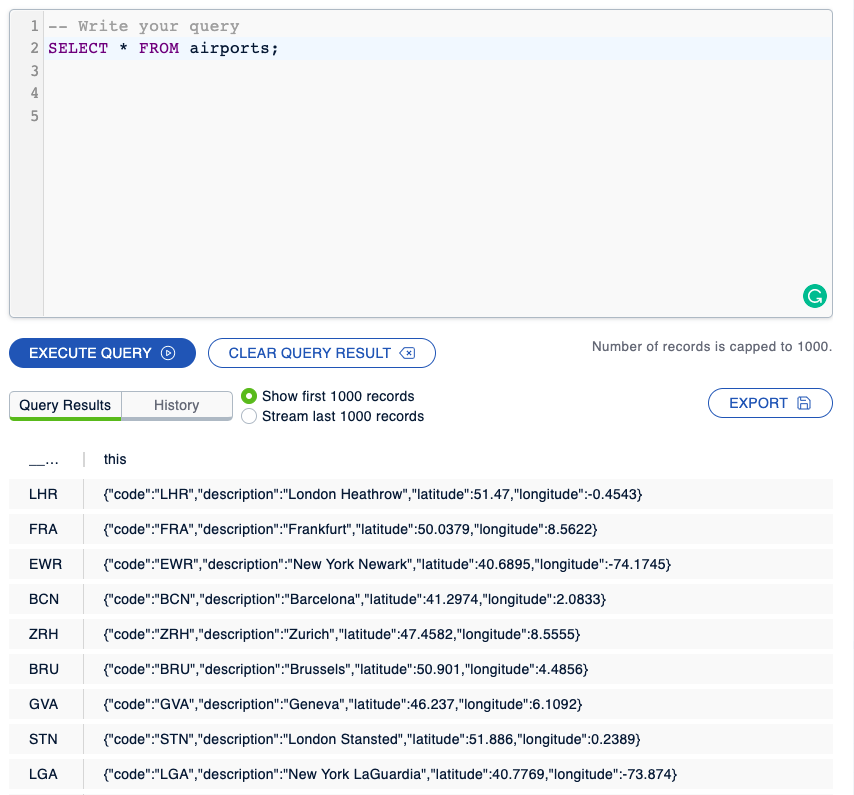
Open the Cloud console and go to Management Center > SQL Browser.
You can see that the Lambda function ingested the airport data into Hazelcast, using the following SQL queries:
CREATE OR REPLACE MAPPING airports
TYPE IMAP
OPTIONS (
  'keyFormat'='varchar',
  'valueFormat'='json'
);
SELECT * FROM airports;
-
The airport data is stored in a map called airports.
Step 5. Validate Transactions Against the Airport Data
The code that validates incoming transactions against the airport data in your cluster uses the following resources in the code/ directory:
-
hazelcast.js: Creates a Hazelcast client to connect to the cluster. -
validate.js: Reads the airport data in the cluster to determine whether a transaction is valid. This code uses the client in thehazelcast.jsfile to communicate with the cluster. -
node_modules/: Contains the project dependencies. -
.pemfiles: Contain the TLS certificate data to authenticate the Hazelcast client.-
Zip the files so that they are ready to be given to the Lambda function.
zip -r validate.zip validate.js hazelcast.js node_modules ca.pem cert.pem key.pem -
Create the function. Replace the
$ROLE_ARNplaceholder with the ARN of theHazelcastServerlessFraudDetectionrole that you created when you set up the AWS services. Also, configure the$CLUSTER_NAME,$KEYSTORE_PASSWORD, and$DISCOVERY_TOKENvariables like you did for the other Lambda function.aws lambda create-function --function-name ValidateFn --role $ROLE_ARN --zip-file fileb://validate.zip --handler validate.handle --description "Validates User Transactions" --runtime nodejs16.x --environment Variables="{CLUSTER_NAME=$CLUSTER_NAME,KEYSTORE_PASSWORD=$KEYSTORE_PASSWORD,DISCOVERY_TOKEN=$DISCOVERY_TOKEN}" --region us-west-2 --timeout 30 --memory-size 256 --publishExample output
{ "FunctionName": "ValidateFn", "FunctionArn": "arn:aws:lambda:us-west-2:833270313523:function:ValidateFn", "Runtime": "nodejs16.x", "Role": "arn:aws:iam::833270313523:role/HazelcastServerlessFraudDetection", "Handler": "validate.handle", "CodeSize": 13768191, "Description": "Validates User Transactions", "Timeout": 30, "MemorySize": 256, "LastModified": "2022-08-05T15:14:57.506+0000", "CodeSha256": "7gfpwbTRqLFveSTzLydmhopMJxKxMKTcksTavvko8Bk=", "Version": "2", "Environment": { "Variables": { "CLUSTER_NAME": "", "DISCOVERY_TOKEN": "", "KEYSTORE_PASSWORD": "" } }, "TracingConfig": { "Mode": "PassThrough" }, "RevisionId": "38e1cc8b-a740-41fe-9a85-f653e0df416e", "State": "Pending", "StateReason": "The function is being created.", "StateReasonCode": "Creating", "PackageType": "Zip", "Architectures": [ "x86_64" ], "EphemeralStorage": { "Size": 512 } } -
In the AWS console, open the Lambda service and click Functions > ValidateFn > Test.
-
In the input box, enter the following JSON data to simulate a transaction event, and click Test.
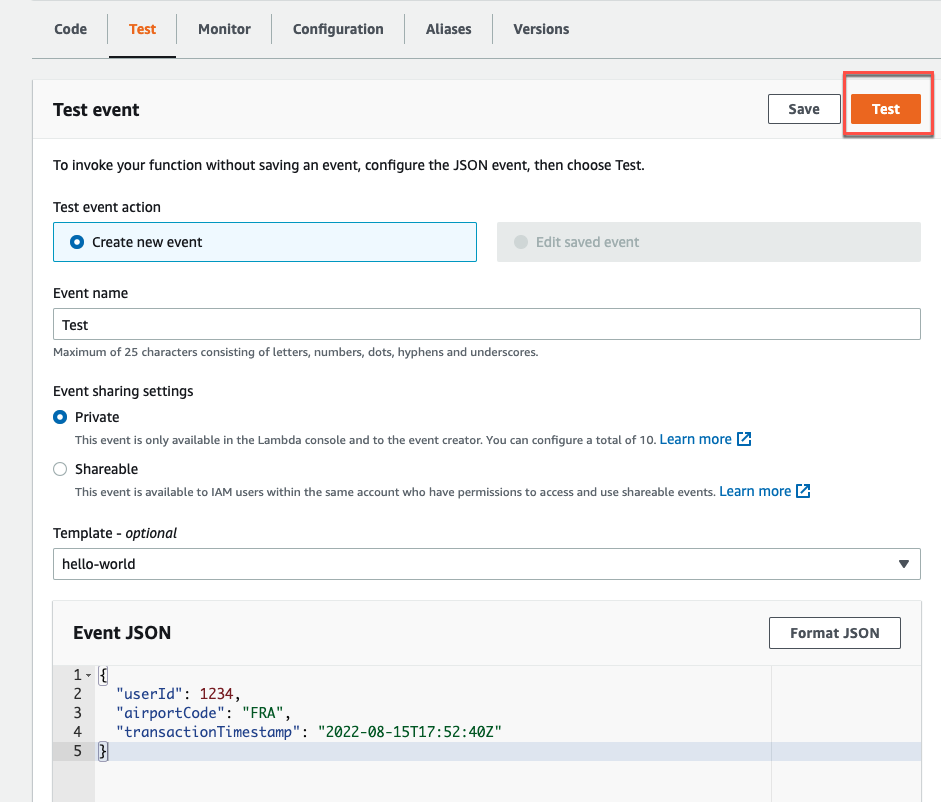
{
  "userId": 1234,
  "airportCode": "FRA",
  "transactionTimestamp": "2022-08-15T17:52:40Z"
}
Example output
{
  "valid": true,
  "message": "Transaction performed from the same location"
}
-
Because this is the first recorded transaction, it is valid. The API now thinks that you are in France.
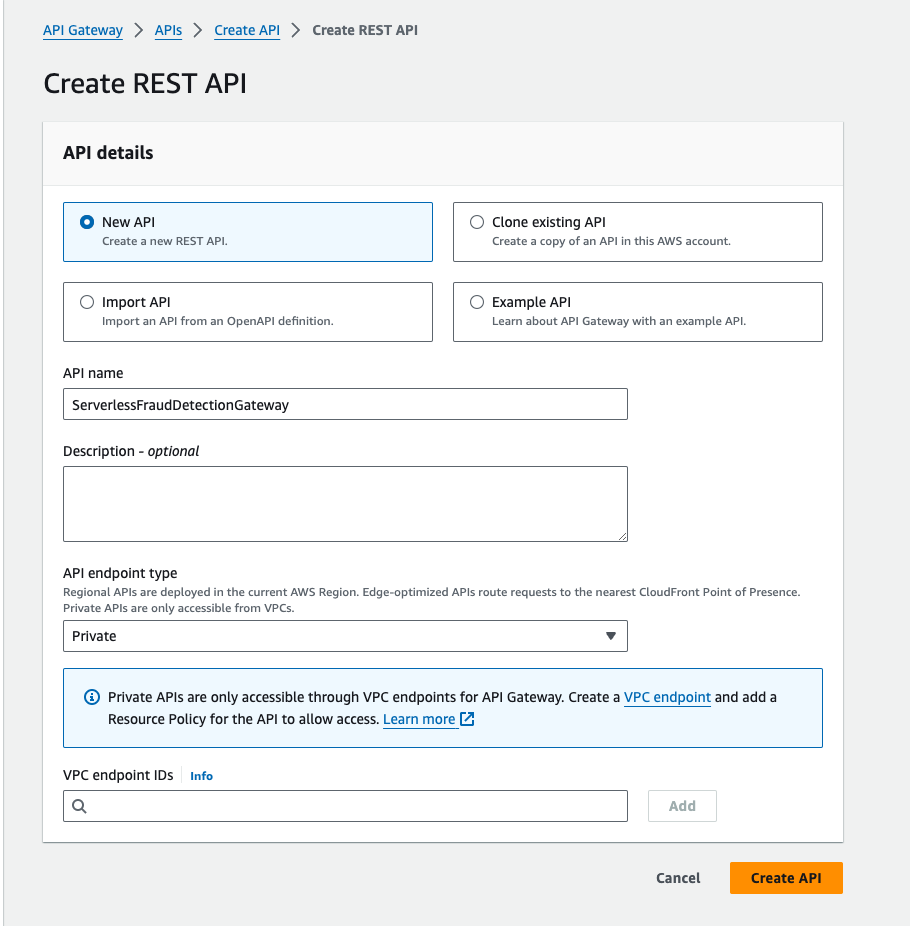
Step 6. Create the API Gateway Endpoint
To allow applications to validate new transactions, you need to expose the ValidateFn function. AWS has a service called API Gateway that allows you to expose your Lambda functions to a public REST API.
-
Open the API Gateway service in the AWS console.
-
Click Build in the REST API section.
-
Create a new REST API called ServerlessFraudDetectionGateway.
-
Create a new resource:
-
Resource Name:
ValidateTransactions -
Resource Path:
/
-
-
Create a POST method for the /ValidateTransactions resource:
-
Lambda Function:
ValidateFn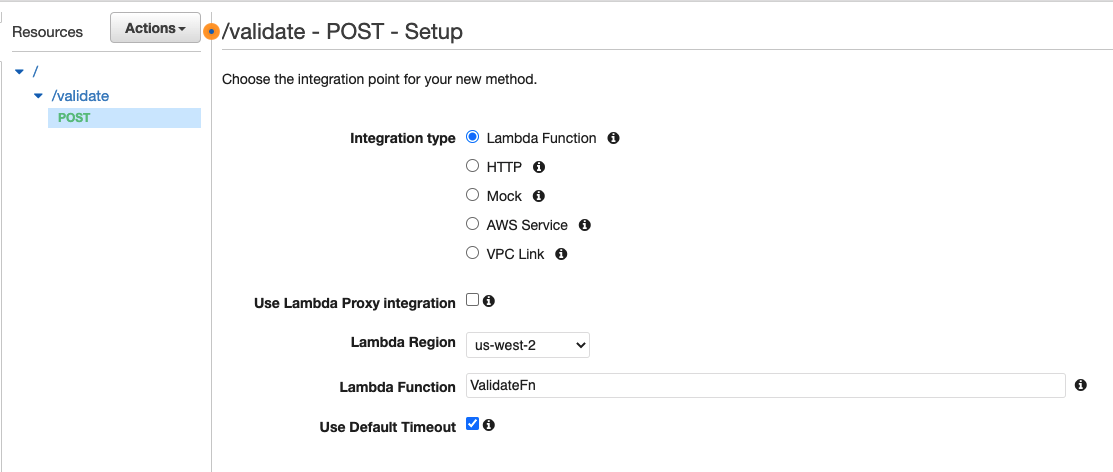
-
-
Go to Models > Create and enter the following:
-
Model name:
ValidateRequestModel -
Content type:
application/json -
Model schema:
{
  "$schema": "http://json-schema.org/draft-04/schema#",
  "title": "ValidateRequestModel",
  "type": "object",
  "properties": {
    "userId": { "type": "number" },
    "airportCode": { "type": "string" },
    "transactionTimestamp": { "type": "string" }
  }
}
-
-
Go to Resources > /validate > Actions > Deploy API and enter the following to deploy your API Gateway:
-
Deployment stage: [New Stage]
-
Stage name: Test
-
-
Copy the Invoke URL at the top of the page.
-
Use your new
/validateresource to send some data to theValidateFnfunction. Replace the$INVOKE_URLplaceholder with your invoke URL.Valid transactionhttp POST $INVOKE_URL/validate userId:=12345 airportCode=FRA transactionTimestamp=2019-03-18T17:55:40ZExample output
{
    "message": "User data saved for future validations",
    "valid": true
}
Invalid transactionhttp POST $INVOKE_URL/validate userId:=12345 airportCode=EWR transactionTimestamp=2019-03-18T17:55:40ZExample output
{
    "message": "Transaction is suspicious",
    "valid": false
}
Summary
In this tutorial, you learned how to do the following:
-
Deploy a Hazelcast client to AWS Lambda.
-
Ingest data into a Cloud Standard cluster from an S3 bucket.
-
Use Hazelcast as a fast cache.
Learn More
Try another tutorial.
Learn more about Hazelcast Cloud Standard:
Find out more about the SQL statements used in this tutorial:
Learn more about using the Node.js client.