What You’ll Learn
In this tutorial, you will create two EC2 instances with Hazelcast members and see them connecting to each other and forming a cluster via Hazelcast AWS plugin.
Before you Begin
Steps 1 to 4 cover the creation and the configuration of VPC, internet gateway, route table, subnet and IAM role. If you already have these configured you can skip them. However, make sure that you have these properties before creating instances:
-
Have an IAM role with
ec2:DescribeInstancespermission -
Have a security group with at least port 5701 open
-
Able to establish SSH connections to instances
1. Create and Configure a VPC
Let’s start with creating a VPC on which our instances will run.
1.1. Create a VPC
Under VPC > Your VPCs section of AWS console, create a new VPC and give it a name you can remember in the next steps:

Create a VPC with a cidr block and note the VpcId to use afterwards:
$ aws ec2 create-vpc --cidr-block 10.0.0.0/16

Vpc:
  CidrBlock: 10.0.0.0/16
  CidrBlockAssociationSet:
  - AssociationId: vpc-cidr-assoc-***********
    CidrBlock: 10.0.0.0/16
    CidrBlockState:
      State: associated
  DhcpOptionsId: dopt-*******
  InstanceTenancy: default
  Ipv6CidrBlockAssociationSet: []
  IsDefault: false
  OwnerId: '***********'
  State: pending
  VpcId: vpc-***********
Then add a name tag you can remember in the next steps:
$ aws ec2 create-tags --resources vpc-*********** \
    --tags Key=Name,Value=hazelcast-guide
1.1.1. Create an Internet Gateway
Now create an internet gateway to be attached to your VPC. You will need this gateway to establish SSH connections to instances:
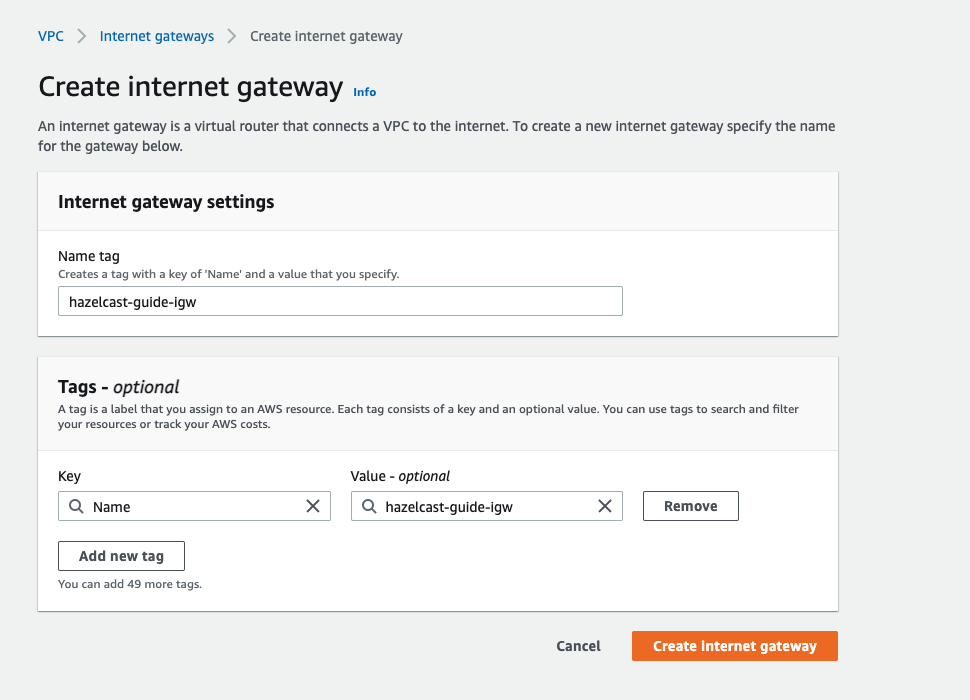
Note the InternetGatewayId when it is created:
$ aws ec2 create-internet-gateway

InternetGateway:
  Attachments: []
  InternetGatewayId: igw-**************
  OwnerId: '**************'
  Tags: []
Then add a name tag to make it distinguishable:
$ aws ec2 create-tags --resources igw-************** \
    --tags Key=Name,Value=hazelcast-guide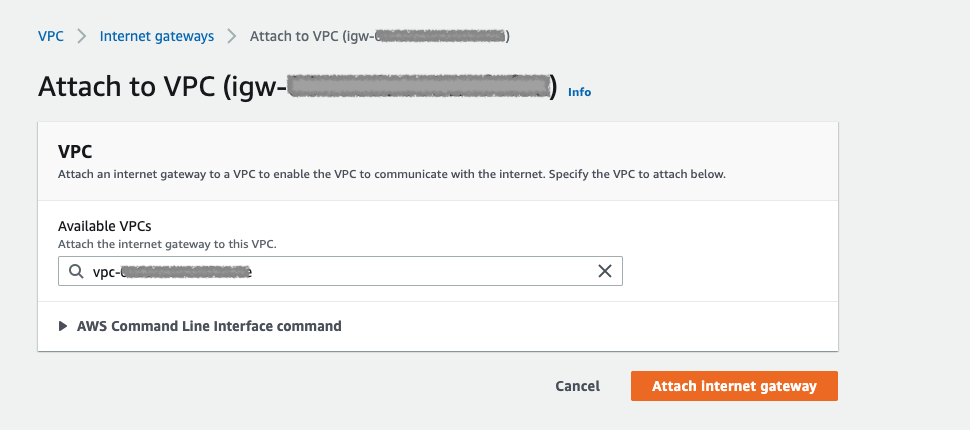
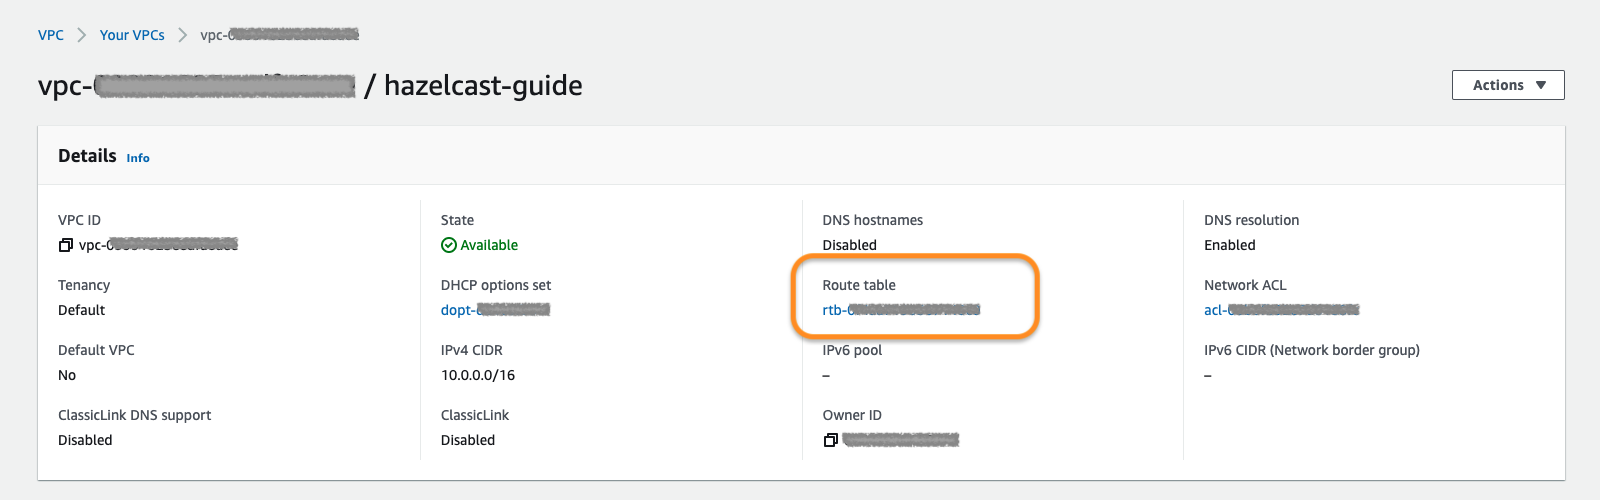
1.2. Add Default Route
Now add the default route to the route table. This step will make you able to connect to instances via SSH.
Under the VPC description, navigate to route table shown in the orange box:
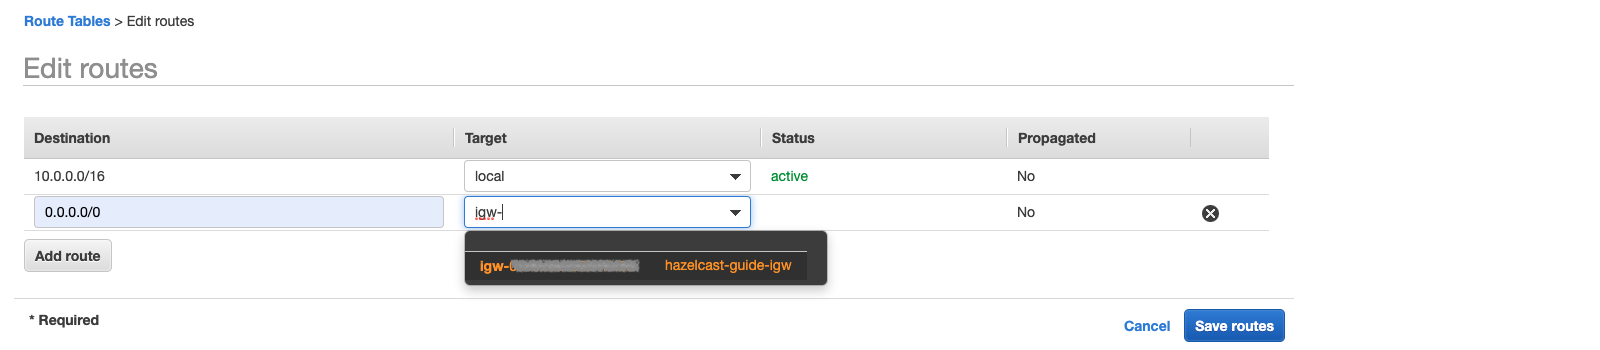
Under Routes tab, you need the default one (0.0.0.0/0) listed. Edit routes to add this one:
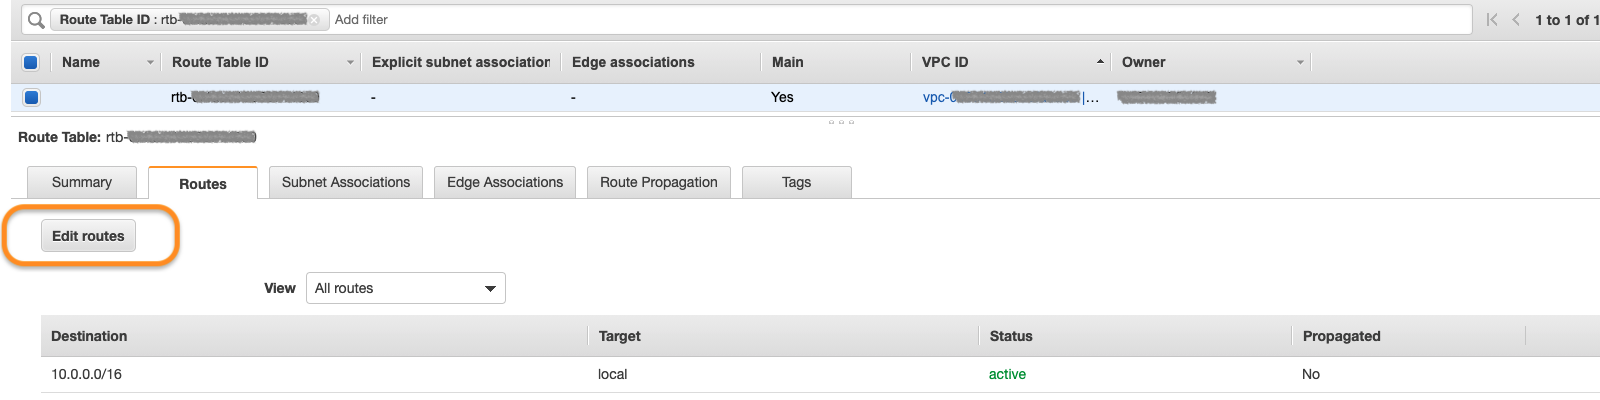
As the target, pick the internet gateway you created in section 1.1.1 and save:
To add a route, find the RouteTableId of the VPC first:
$ aws ec2 describe-route-tables \
    --filters Name=vpc-id,Values=vpc-***********

RouteTables:
- Associations:
  - AssociationState:
      State: associated
    Main: true
    RouteTableAssociationId: rtbassoc-***********
    RouteTableId: rtb-***********
  OwnerId: '***********'
  PropagatingVgws: []
  RouteTableId: rtb-***********
  Routes:
  - DestinationCidrBlock: 10.0.0.0/16
    GatewayId: local
    Origin: CreateRouteTable
    State: active
  Tags: []
  VpcId: vpc-***********
Then create the default route using the InternetGatewayId:
$ aws ec2 create-route --route-table-id rtb-*********** \
    --destination-cidr-block 0.0.0.0/0 \
    --gateway-id igw-***********
2. Create a Subnet in the VPC
Let’s continue with creating a subnet in the VPC.
Under VPC > Subnets section, choose Create Subnet. Pick the proper
VPC and give the subnet a recognizable name:
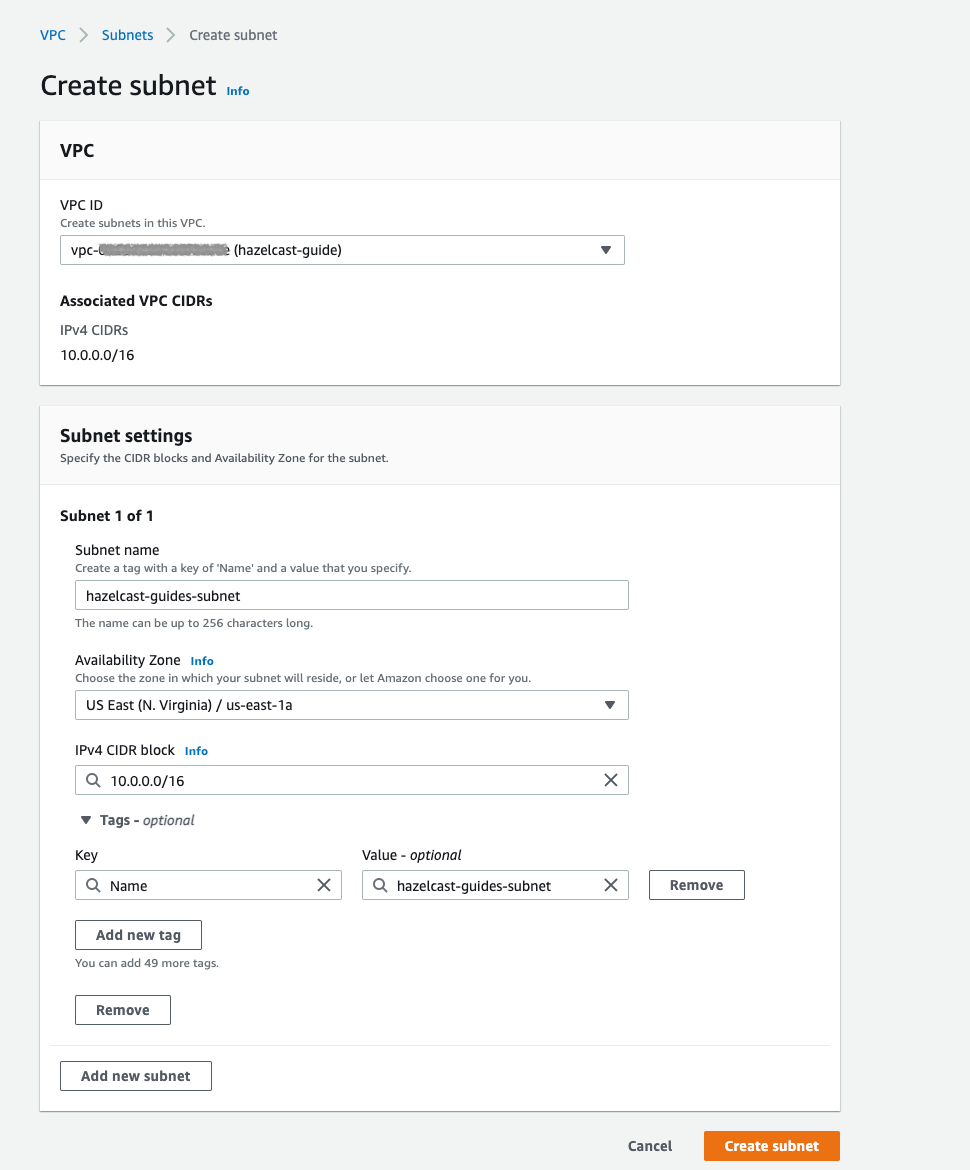
Create a subnet in the VPC using the VpcId and note the SubnetId when created:
$ aws ec2 create-subnet --vpc-id vpc-*********** \
    --cidr-block 10.0.0.0/16 \
    --availability-zone us-east-1a

Subnet:
  AssignIpv6AddressOnCreation: false
  AvailabilityZone: us-east-1a
  AvailabilityZoneId: use1-az4
  AvailableIpAddressCount: 65531
  CidrBlock: 10.0.0.0/16
  DefaultForAz: false
  Ipv6CidrBlockAssociationSet: []
  MapPublicIpOnLaunch: false
  OwnerId: '***********'
  State: available
  SubnetArn: ***********
  SubnetId: subnet-***********
  VpcId: vpc-***********
Then add a name tag using the SubnetId you can remember in the next steps:
$ aws ec2 create-tags --resources subnet-*********** \
    --tags Key=Name,Value=hazelcast-guide
3. Create an IAM Role
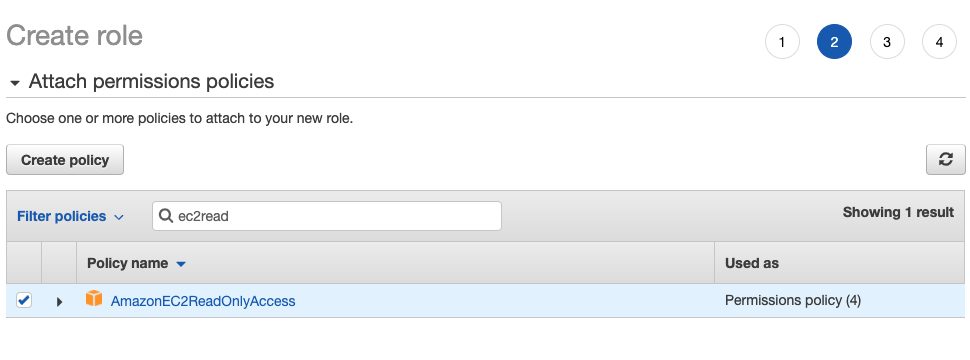
The EC2 instances we will create need the IAM role to have ec2:DescribeInstances permission. This way, Hazelcast
members are able to fetch other instance IPs and connect them dynamically. If you already have an IAM role, check
the permissions. Otherwise, create a new one with the permission. For instance, AmazonEC2ReadOnlyAccess policy
contains DescribeInstances permission and is enough to complete this guide.
-
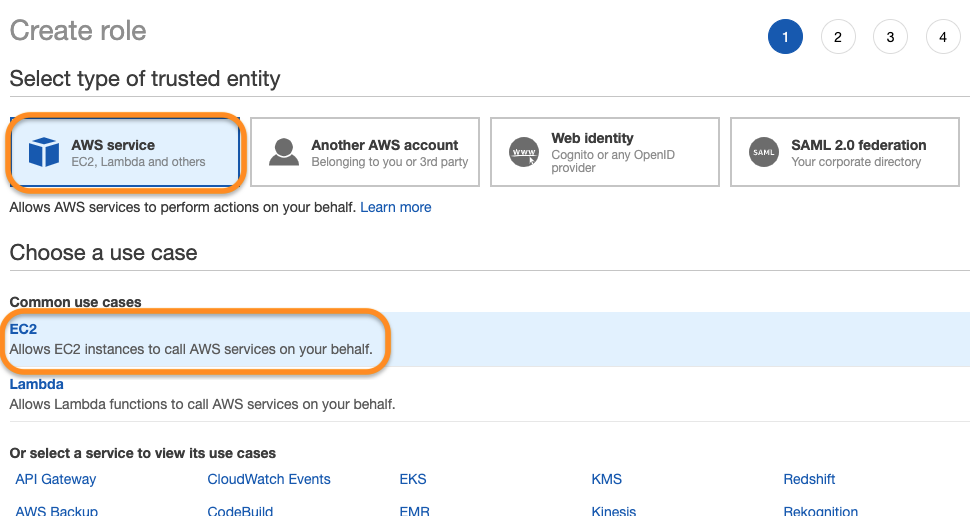
Navigate to
IAM > Rolesand create a new role onAccess Management > Role > Create Rolesection for EC2 use case:
-
Attach permission policies for the role:
Create a role policy in assume-role-policy.json first:
$ cat <<EOT >> assume-role-policy.json
{
    "Version": "2012-10-17",
    "Statement": [
      {
        "Action": "sts:AssumeRole",
        "Principal": {
          "Service": "ec2.amazonaws.com"
        },
        "Effect": "Allow",
        "Sid": ""
      }
    ]
}
EOT
Then create a role with this policy:
$ aws iam create-role --role-name hazelcast-guide \
    --assume-role-policy-document file://assume-role-policy.json

Role:
  Arn: ***********
  AssumeRolePolicyDocument:
    Statement:
    - Action: sts:AssumeRole
      Effect: Allow
      Principal:
        Service: ec2.amazonaws.com
      Sid: ''
    Version: '2012-10-17'
  CreateDate: '2020-12-17T12:46:24+00:00'
  Path: /
  RoleId: ***********
  RoleName: hazelcast-guide
Now attach AmazonEC2ReadOnlyAccess to the role:
$ aws iam attach-role-policy \
    --policy-arn arn:aws:iam::aws:policy/AmazonEC2ReadOnlyAccess \
    --role-name hazelcast-guide
As the last step, create an instance profile and add the role created above to this profile:
$ aws iam create-instance-profile \
    --instance-profile-name hazelcast-guide-EC2-Instance-Profile

InstanceProfile:
  Arn: ***********
  CreateDate: '2020-12-17T13:44:47+00:00'
  InstanceProfileId: ***********
  InstanceProfileName: hazelcast-guide-EC2-Instance-Profile
  Path: /
  Roles: []

$ aws iam add-role-to-instance-profile \
    --role-name hazelcast-guide \
    --instance-profile-name hazelcast-guide-EC2-Instance-Profile
4. Create a Security Group
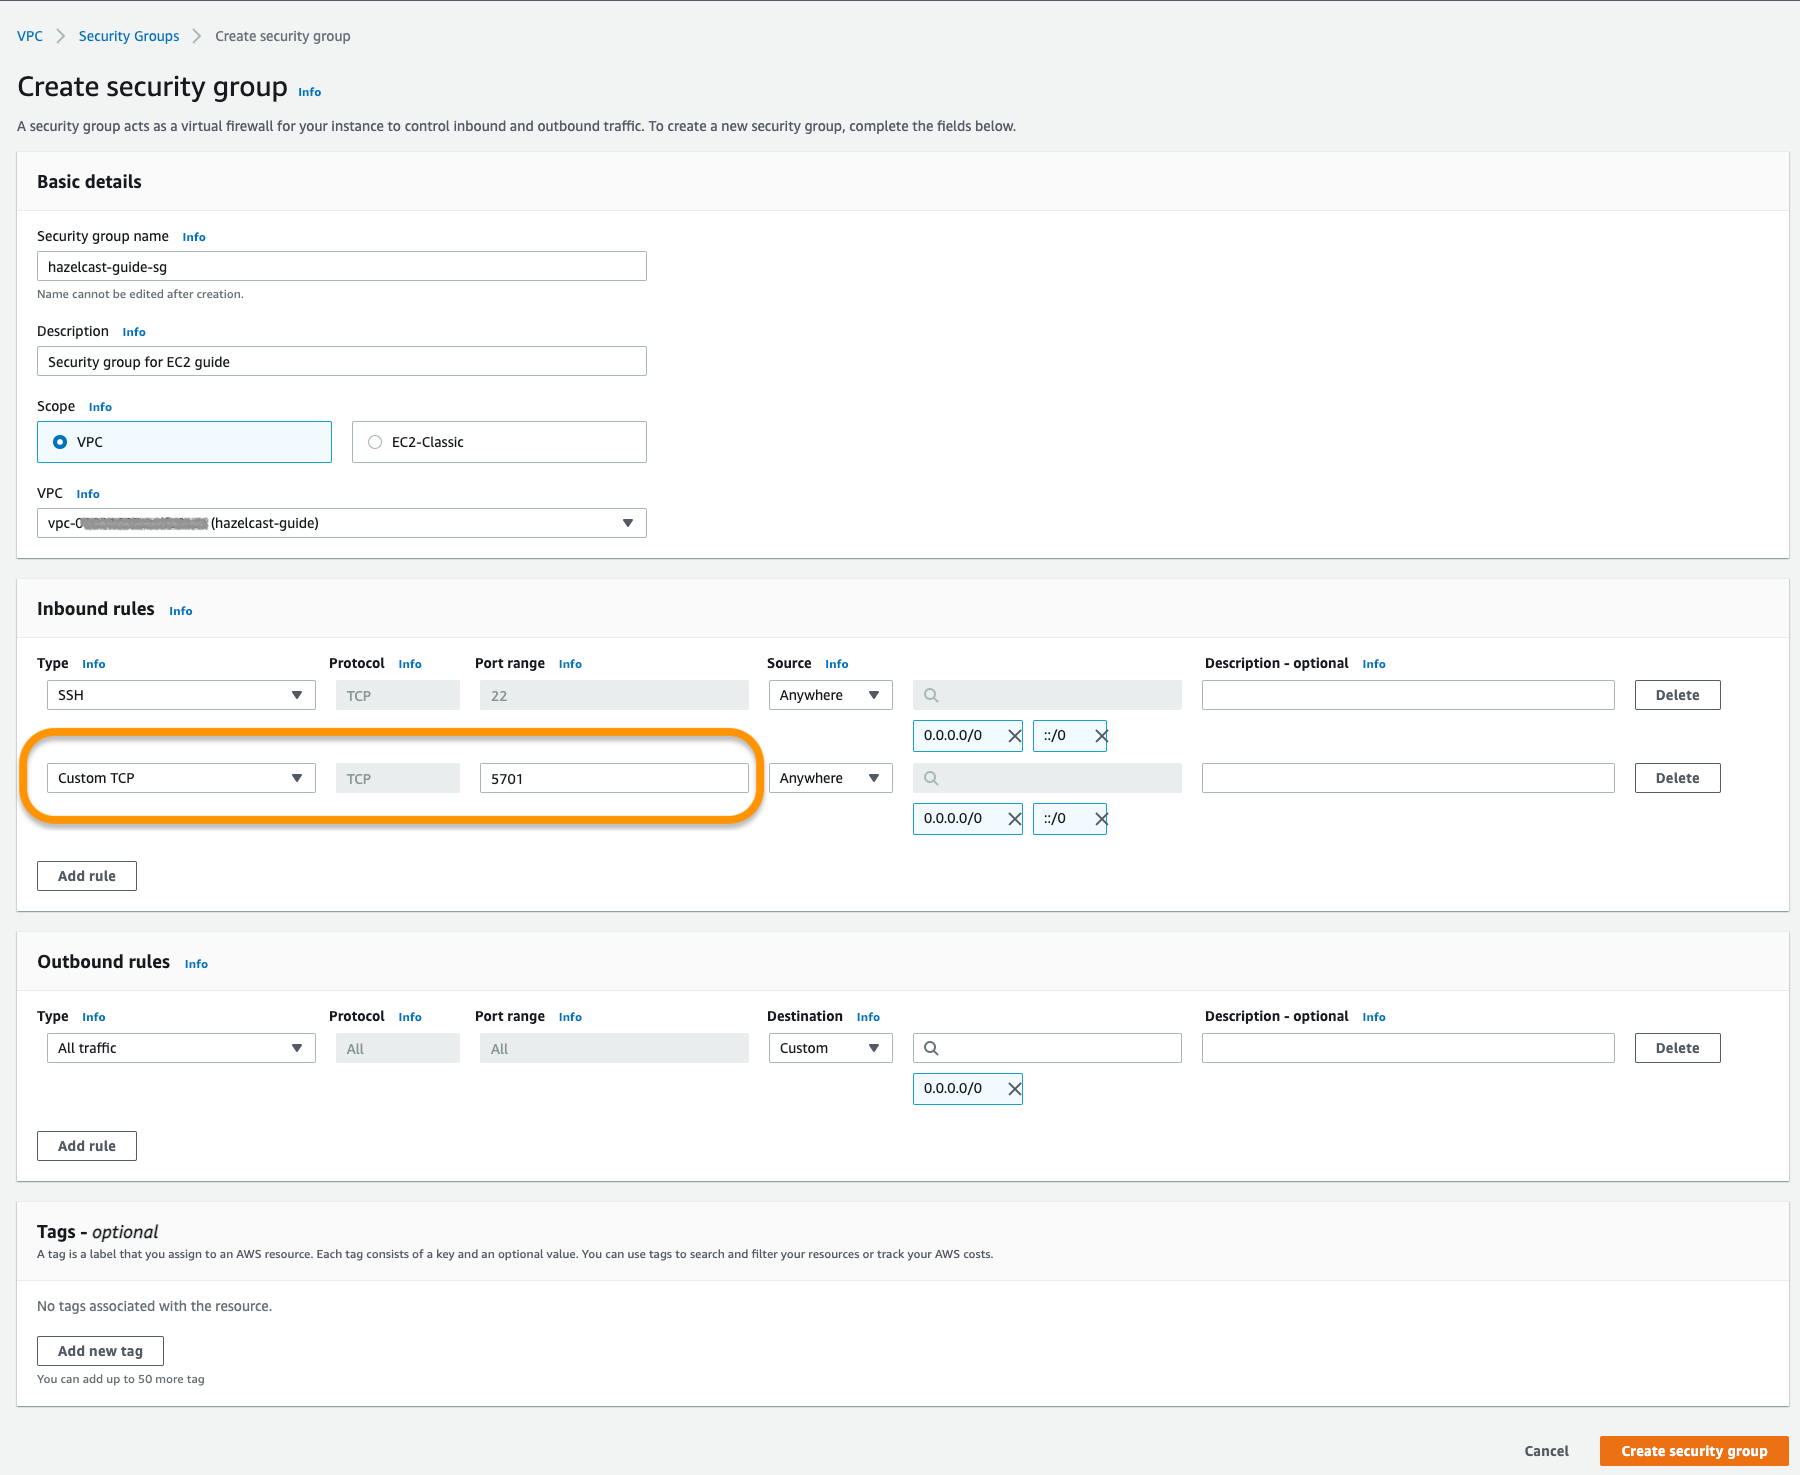
As the last step, create a security group in your VPC with the proper inbound rules for Hazelcast. Allow port 5701 among inbound rules as it’s the default port of Hazelcast. If you plan to run more than one Hazelcast member on an EC2 Instance, then you should open more ports. Also, do not forget to allow SSH port:
Navigate to VPC > Security Groups and create a new one:
Create a security group with the VpcId and note the returned GroupId:
$ aws ec2 create-security-group \
    --group-name hazelcast-guide \
    --description "Hazelcast EC2 Guide" \
    --vpc-id vpc-***********

GroupId: sg-***********
Open the SSH port:
$ aws ec2 authorize-security-group-ingress \
    --group-id sg-*********** \
    --protocol tcp \
    --port 22 \
    --cidr 0.0.0.0/0
Open a port for Hazelcast:
$ aws ec2 authorize-security-group-ingress \
    --group-id sg-*********** \
    --protocol tcp \
    --port 5701 \
    --cidr 0.0.0.0/0
5. Create EC2 Instances
Let’s start creating our instances via LaunchInstanceWizard under EC2 > Launch Instances on AWS Console.
-
Choose an Amazon Machine Image (AMI).
Amazon Linuxis used in this guide:

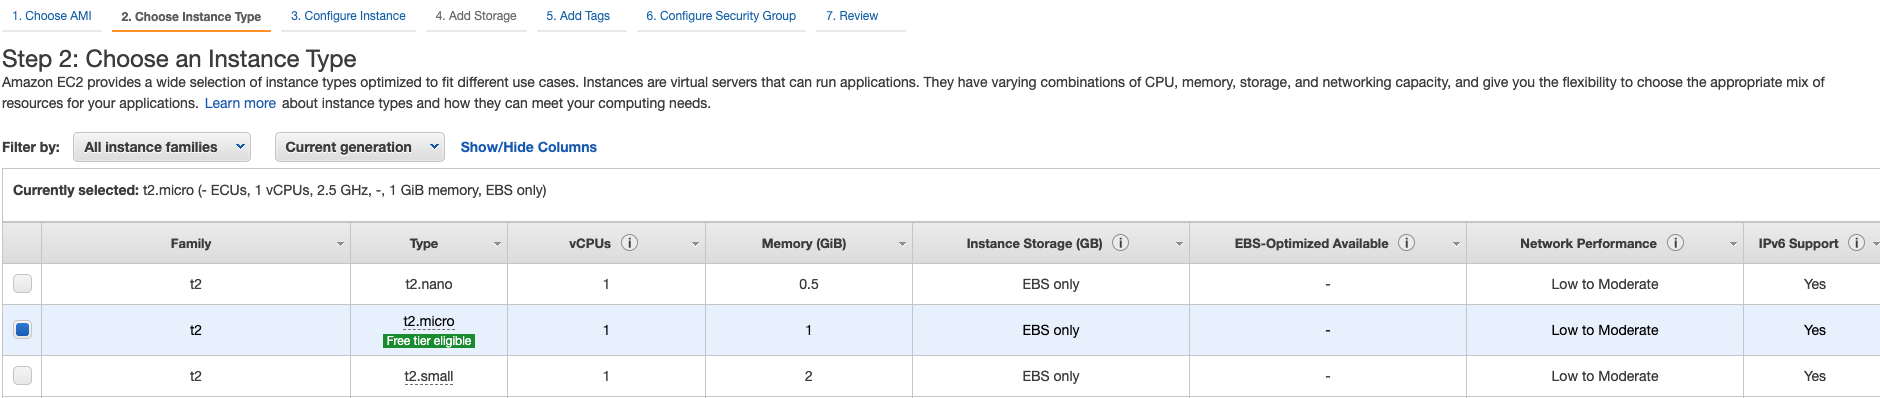
-
Choose an instance type:
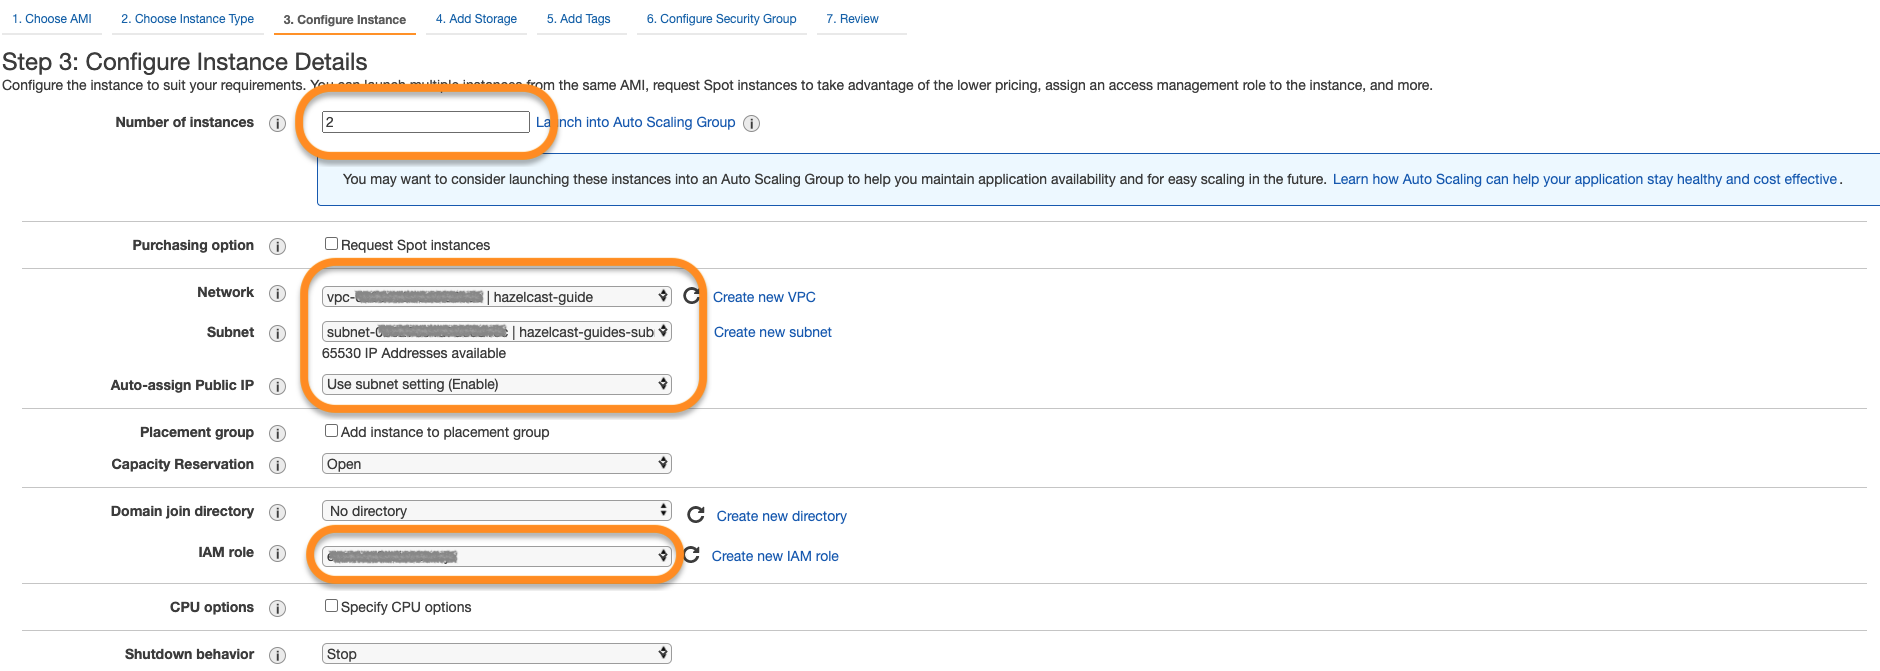
-
Now configure instance details with the VPC, subnet and IAM roles you created above. Notice that the number of instances is 2. Also, enable
Auto-assign Public IPto establish SSH connections later on.
-
Next, add a unique tag to the instances. This is optional but recommended if your AWS account has many running instances associated with:

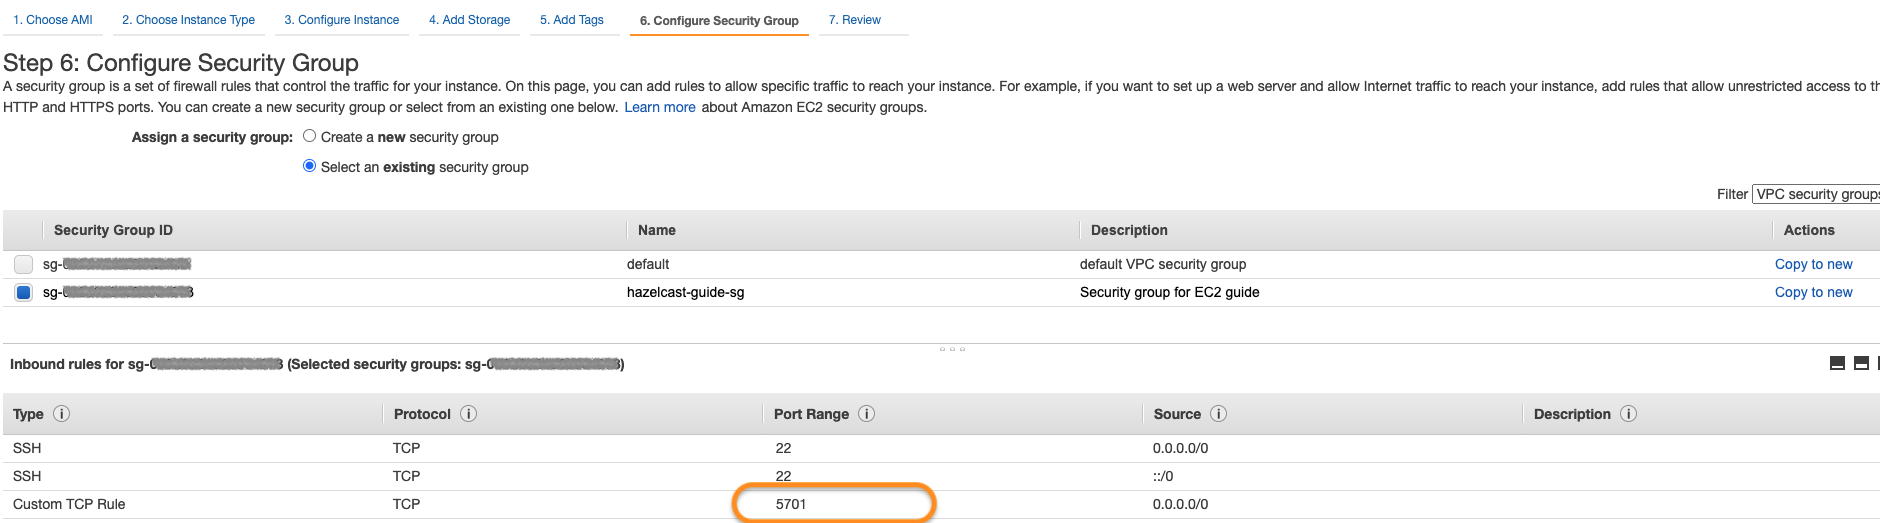
-
Finally, select the security group you created above:
As the last step, select your key pair for the instances and that’s it. You can launch instances now.
Using the id’s and the names you set above, now run two EC2 instances. In addition to the steps so far, you need to have
a key pair and pass it via --key-name flag.
The command below will start two Amazon Linux machines with type t2.micro and assign public IP addresses to each.
Also a tag named "cluster-tag" with "guide-ec2-cluster" value will be assigned to the instances:
$ aws ec2 run-instances \
    --image-id resolve:ssm:/aws/service/ami-amazon-linux-latest/amzn2-ami-hvm-x86_64-gp2 \
    --count 2 --instance-type t2.micro \
    --key-name *********** \
    --security-group-ids sg-*********** \
    --subnet-id subnet-*********** \
    --iam-instance-profile Name="hazelcast-guide-EC2-Instance-Profile" \
    --associate-public-ip-address \
    --tag-specifications 'ResourceType=instance,Tags=[{Key=cluster-tag,Value=guide-ec2-cluster}]'
Then fetch the instance id’s filtered by their tags:
$ aws ec2 describe-instances \
    --filters "Name=tag:cluster-tag,Values=guide-ec2-cluster" \
    --query "Reservations[].Instances[].InstanceId"

- i-xxxxxxxxxxxxxxxxx
- i-yyyyyyyyyyyyyyyyy
Finally, fetch the public IPs of the instances to establish SSH connections in the next step:
$ aws ec2 describe-instances \
    --instance-ids i-xxxxxxxxxxxxxxxxx i-yyyyyyyyyyyyyyyyy \
    --query 'Reservations[*].Instances[*].PublicIpAddress'

- 5.10.x.y
- 6.12.x.y
6. Create a Hazelcast Cluster
-
Now that you have 2 instances running with the same IAM role, let’s connect to each of them via SSH:
ssh -i "<your-key-pair>.pem" ec2-user@<instance-public-ip>|
If you encounter any problem regarding the SSH connection, see SSH troubleshooting page in AWS documentation. |
-
After SSH connection is established, install Hazelcast CLI to the instances:
wget https://repository.hazelcast.com/rpm/hazelcast-rpm.repo -O hazelcast-rpm.repo
sudo mv hazelcast-rpm.repo /etc/yum.repos.d/
sudo yum install hazelcast-
Now start Hazelcast members in both EC2 instances:
hz startWhen Hazelcast members find each other, you will see a log similar to below for each instance:
Members {size:2, ver:2} [
	Member [10.0.x.x]:5701 - 1cc76eb9-4032-4ba2-870c-43baba3cbd88
	Member [10.0.y.y]:5701 - 3e8b66fc-52eb-4379-ae11-4b6e30549055 this
]|
By default, Hazelcast will use the current region, the IAM Role attached to the EC2 instance and the port range 5701-5708
to discover other Hazelcast members in other instances. You can configure Hazelcast such that it tries to connect
to certain EC2 instances only. For instance, if you use the tag from You can find all discovery configuration details on Hazelcast AWS discovery plugin documentation. |
Summary
In this tutorial, you created all AWS components you need to form a Hazelcast cluster on EC2. Then you started two Hazelcast members on two different EC2 instances and saw them connecting each other and forming a cluster. If you created more EC2 instances and Hazelcast members in the same way, these members would also find each other and they all would form a single cluster.